# Smart Studio
> Smart Studio
Version: 2.0
This file contains all documentation content in a single document following the llmstxt.org standard.
## AI Dataset Preparation
AI Dataset Preparation automates preparation and labeling for supported
fine-tuning workflows. Review the processed output and its quality checks
before using it in a training job.
## When to Use AI Dataset Preparation
Use this feature when you have raw, unlabeled data and need to create a structured dataset for fine-tuning. LLM will help you generate high-quality data.
:::info[ Prerequisite]
This feature consumes model tokens. Confirm that AI Dataset Preparation is
available in your workspace and that your account has sufficient balance
before starting a large job.
:::
## Step 1: Upload & Configure
In this step, you upload your raw data, select a dataset generation method, and define your training requirements. The system uses these inputs to generate labeling rules and build your dataset.
### 1. Method Selection
Choose the data preparation method that best suits your needs:
- **Base Data Agent**: Standard processing from your raw data.
- **SSS-Bench**: An advanced version offering a "T-shaped" evaluation framework to balance task specialization with general robustness. (**Currently supports LLM models only**)
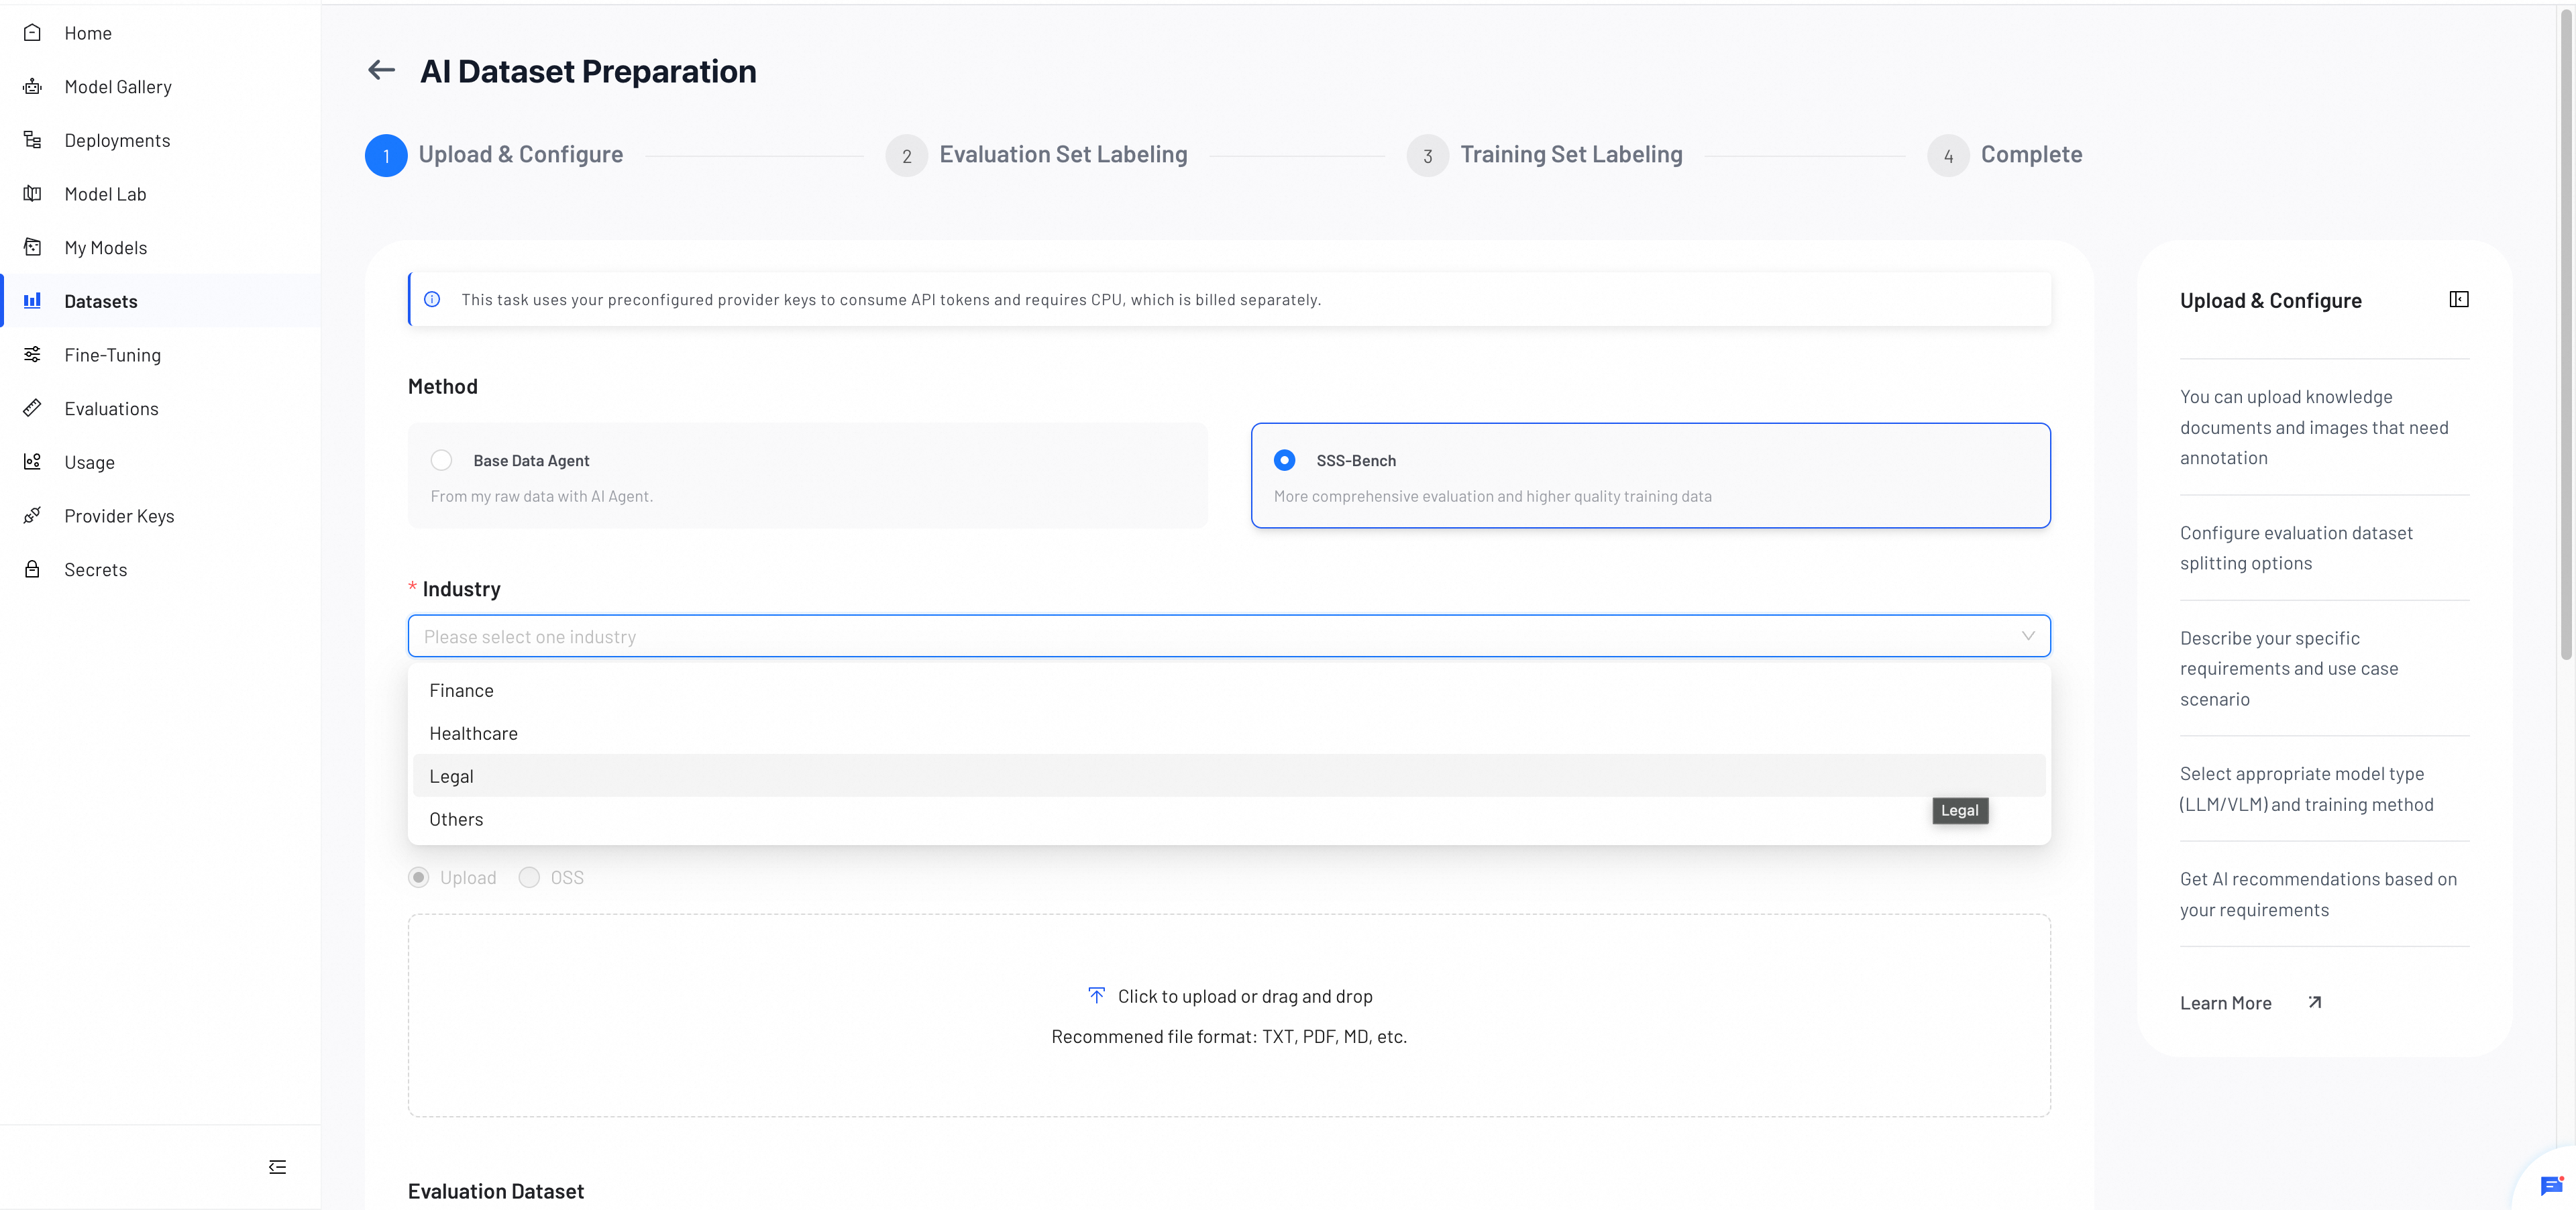
#### When to Use Each Method
| | Base Data Agent | SSS-Bench |
|---|---|---|
| **Best for** | Quick dataset generation with standard labeling | Improving domain expertise while preserving the base model's general capabilities |
| **Model support** | LLM, VLM | LLM only |
| **Token consumption** | Lower | Higher |
| **Use when** | You need train-ready data fast and do not require domain benchmarking | You want to ensure domain adaptation gains without significant degradation in general performance |
| **Key advantage** | Simple and efficient | Injects industry open-source data to improve both depth and breadth of your dataset, leading to better training results |
How SSS-Bench Works
Post-training adaptation (such as SFT) risks catastrophic forgetting. SSS-Bench provides a "Specialization-Generalization" dynamic evaluation across three dimensions:
- **Vertical Depth (Task Specialization):** Generates diverse task-specific questions from your raw data to quantify domain adaptation gains.
- **Domain Breadth (Domain General Knowledge):** Evaluates coverage of broad industry knowledge (e.g., medical, financial) using open-source datasets.
- **Horizontal Base (General Robustness):** Monitors retention of basic reasoning capabilities (based on MMLU, etc.) to detect degradation in general utility.
## SSS-Bench Configuration (SSS-Bench Only)
If you select **SSS-Bench**, three additional configuration steps are required:
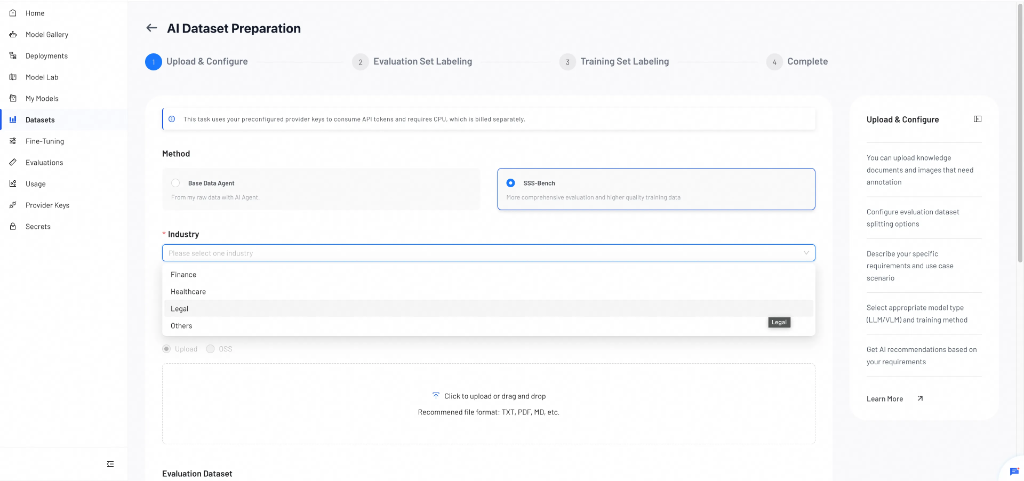
#### Select Industry
Choose the target industry for your model: `Finance`, `Healthcare`, `Legal`, or `Others`.
> **Note:** If your domain is not listed, select **Others**. SSS-Bench generates diverse datasets from your raw data and may produce better training results than Base Data Agent, but consumes more tokens.
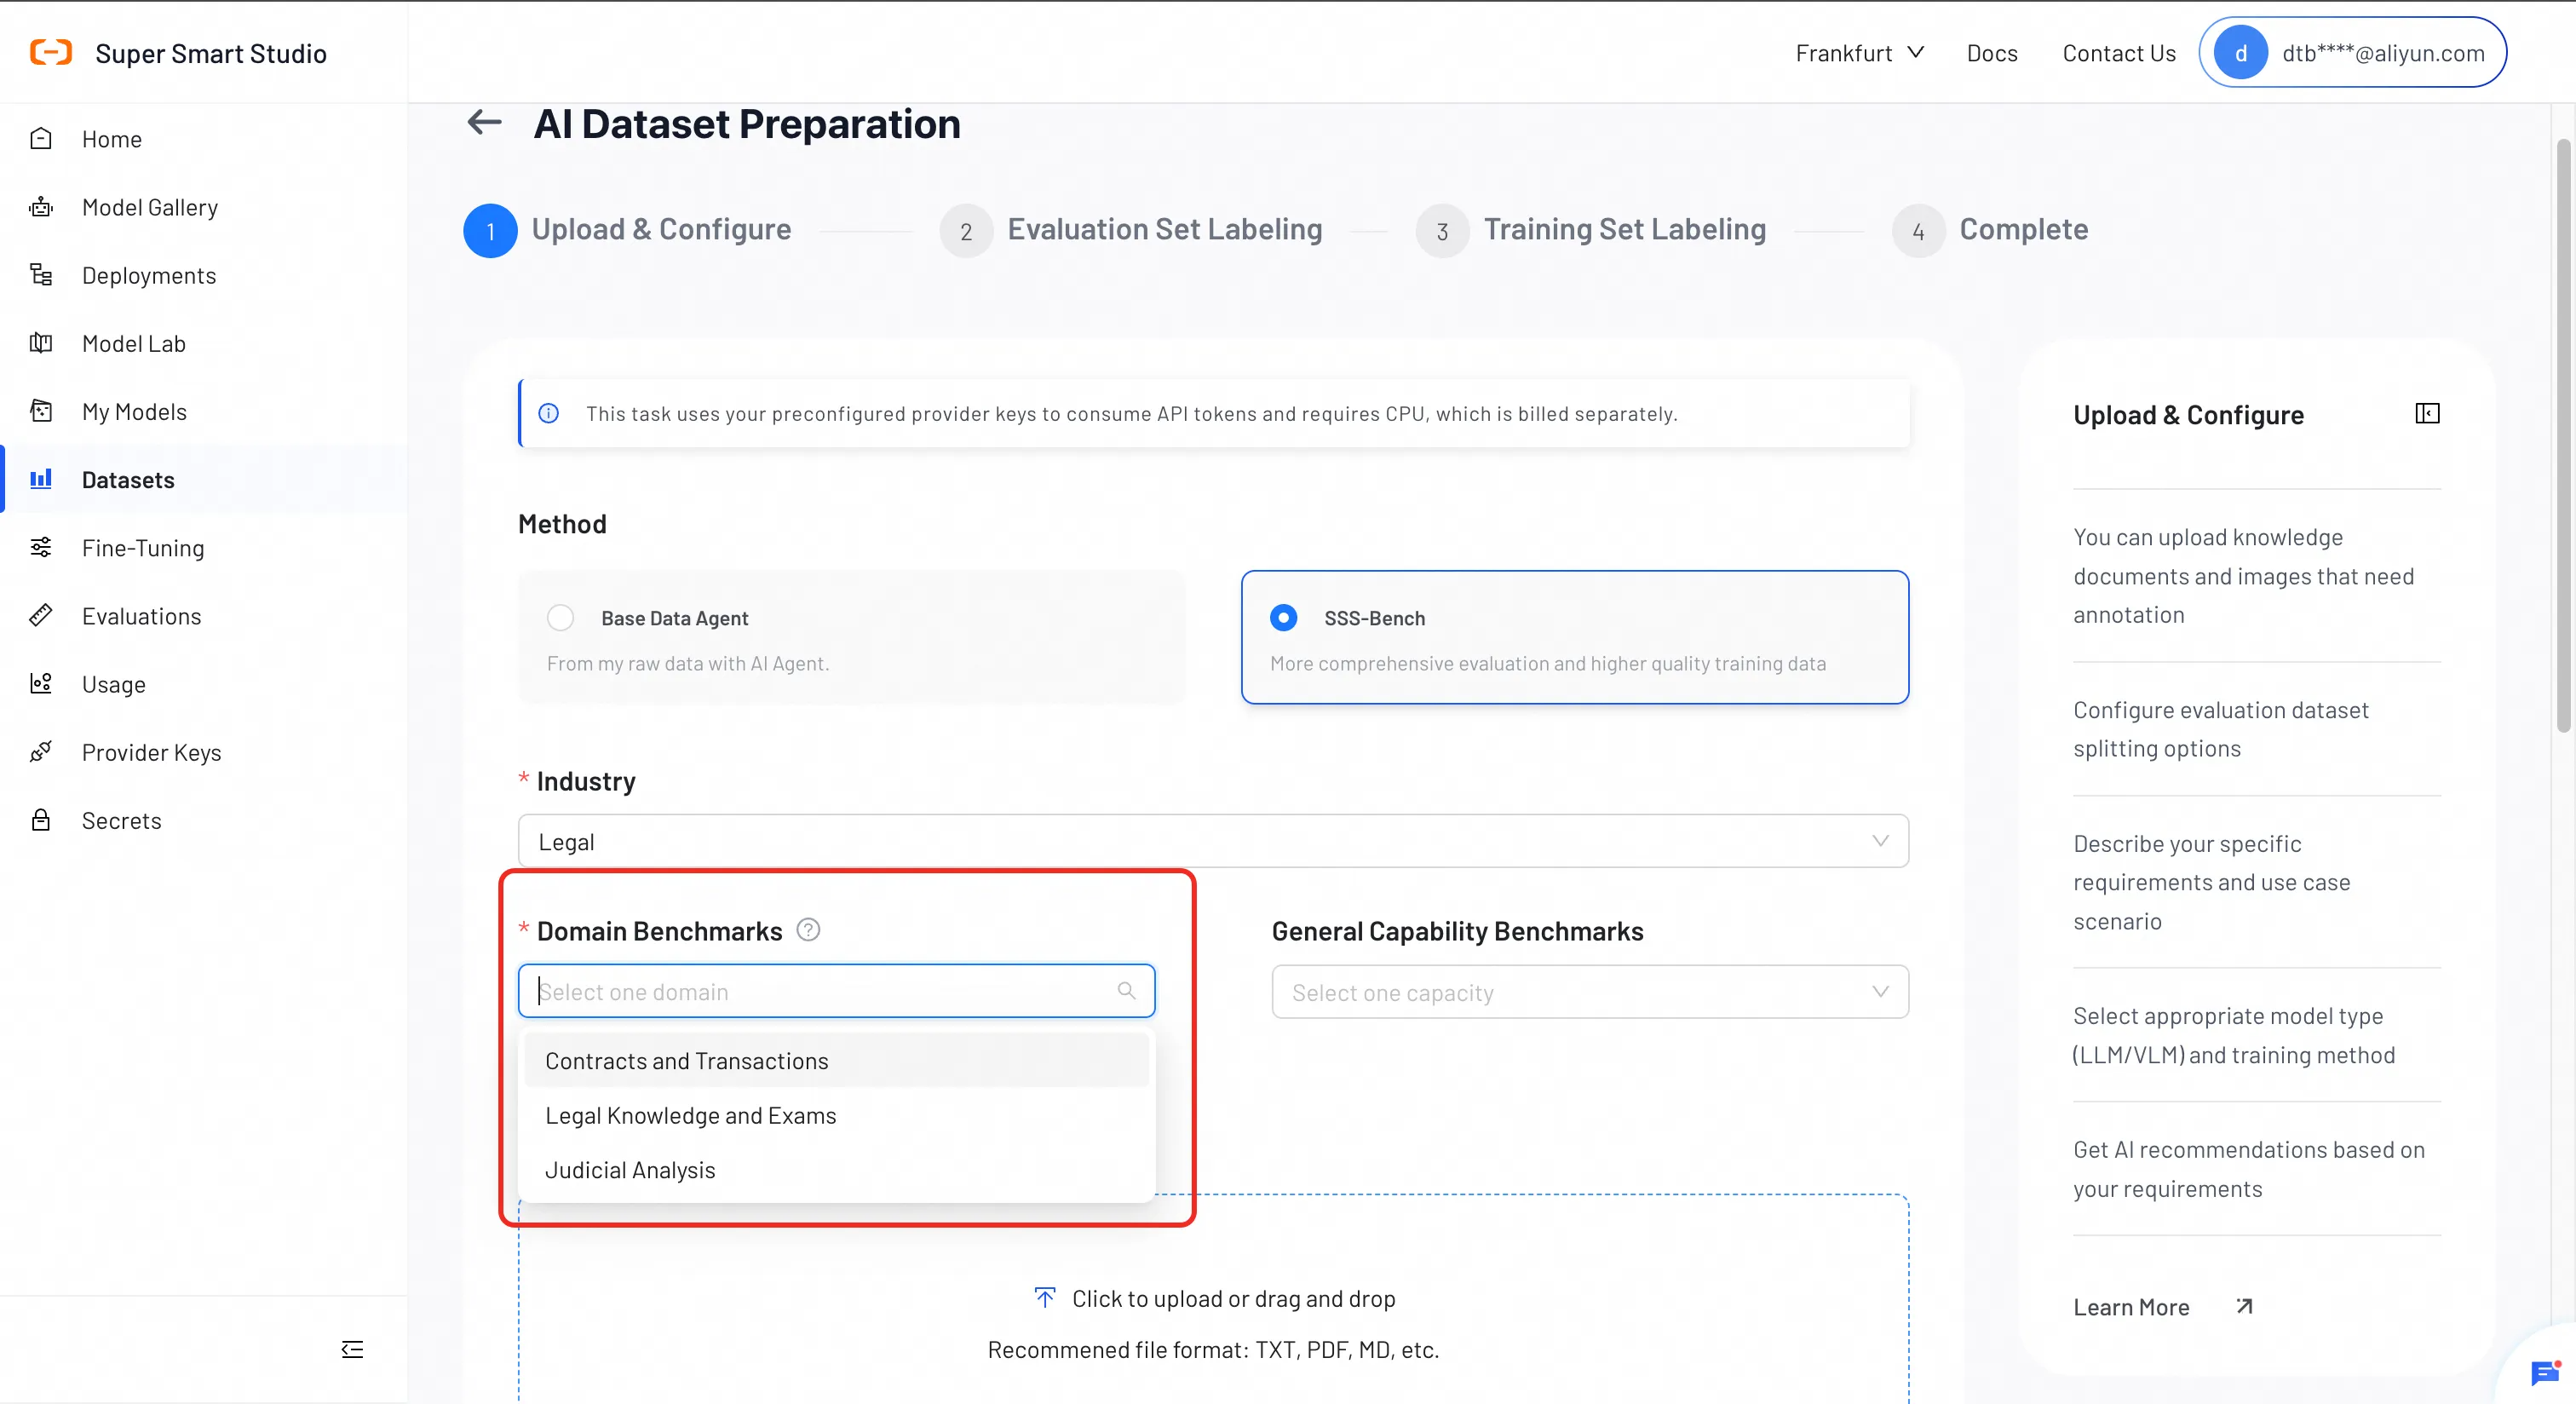
#### Select Domain Benchmarks
Choose specific sub-datasets within the industry to focus your evaluation.
| Industry | Sub-datasets |
|---|---|
| Finance | Financial Report QA, Financial Math (test set only) |
| Healthcare | Medical Subfields Knowledge, Medical Exams |
| Legal | Contracts & Transactions, Legal Knowledge & Exams, Judicial Analysis |
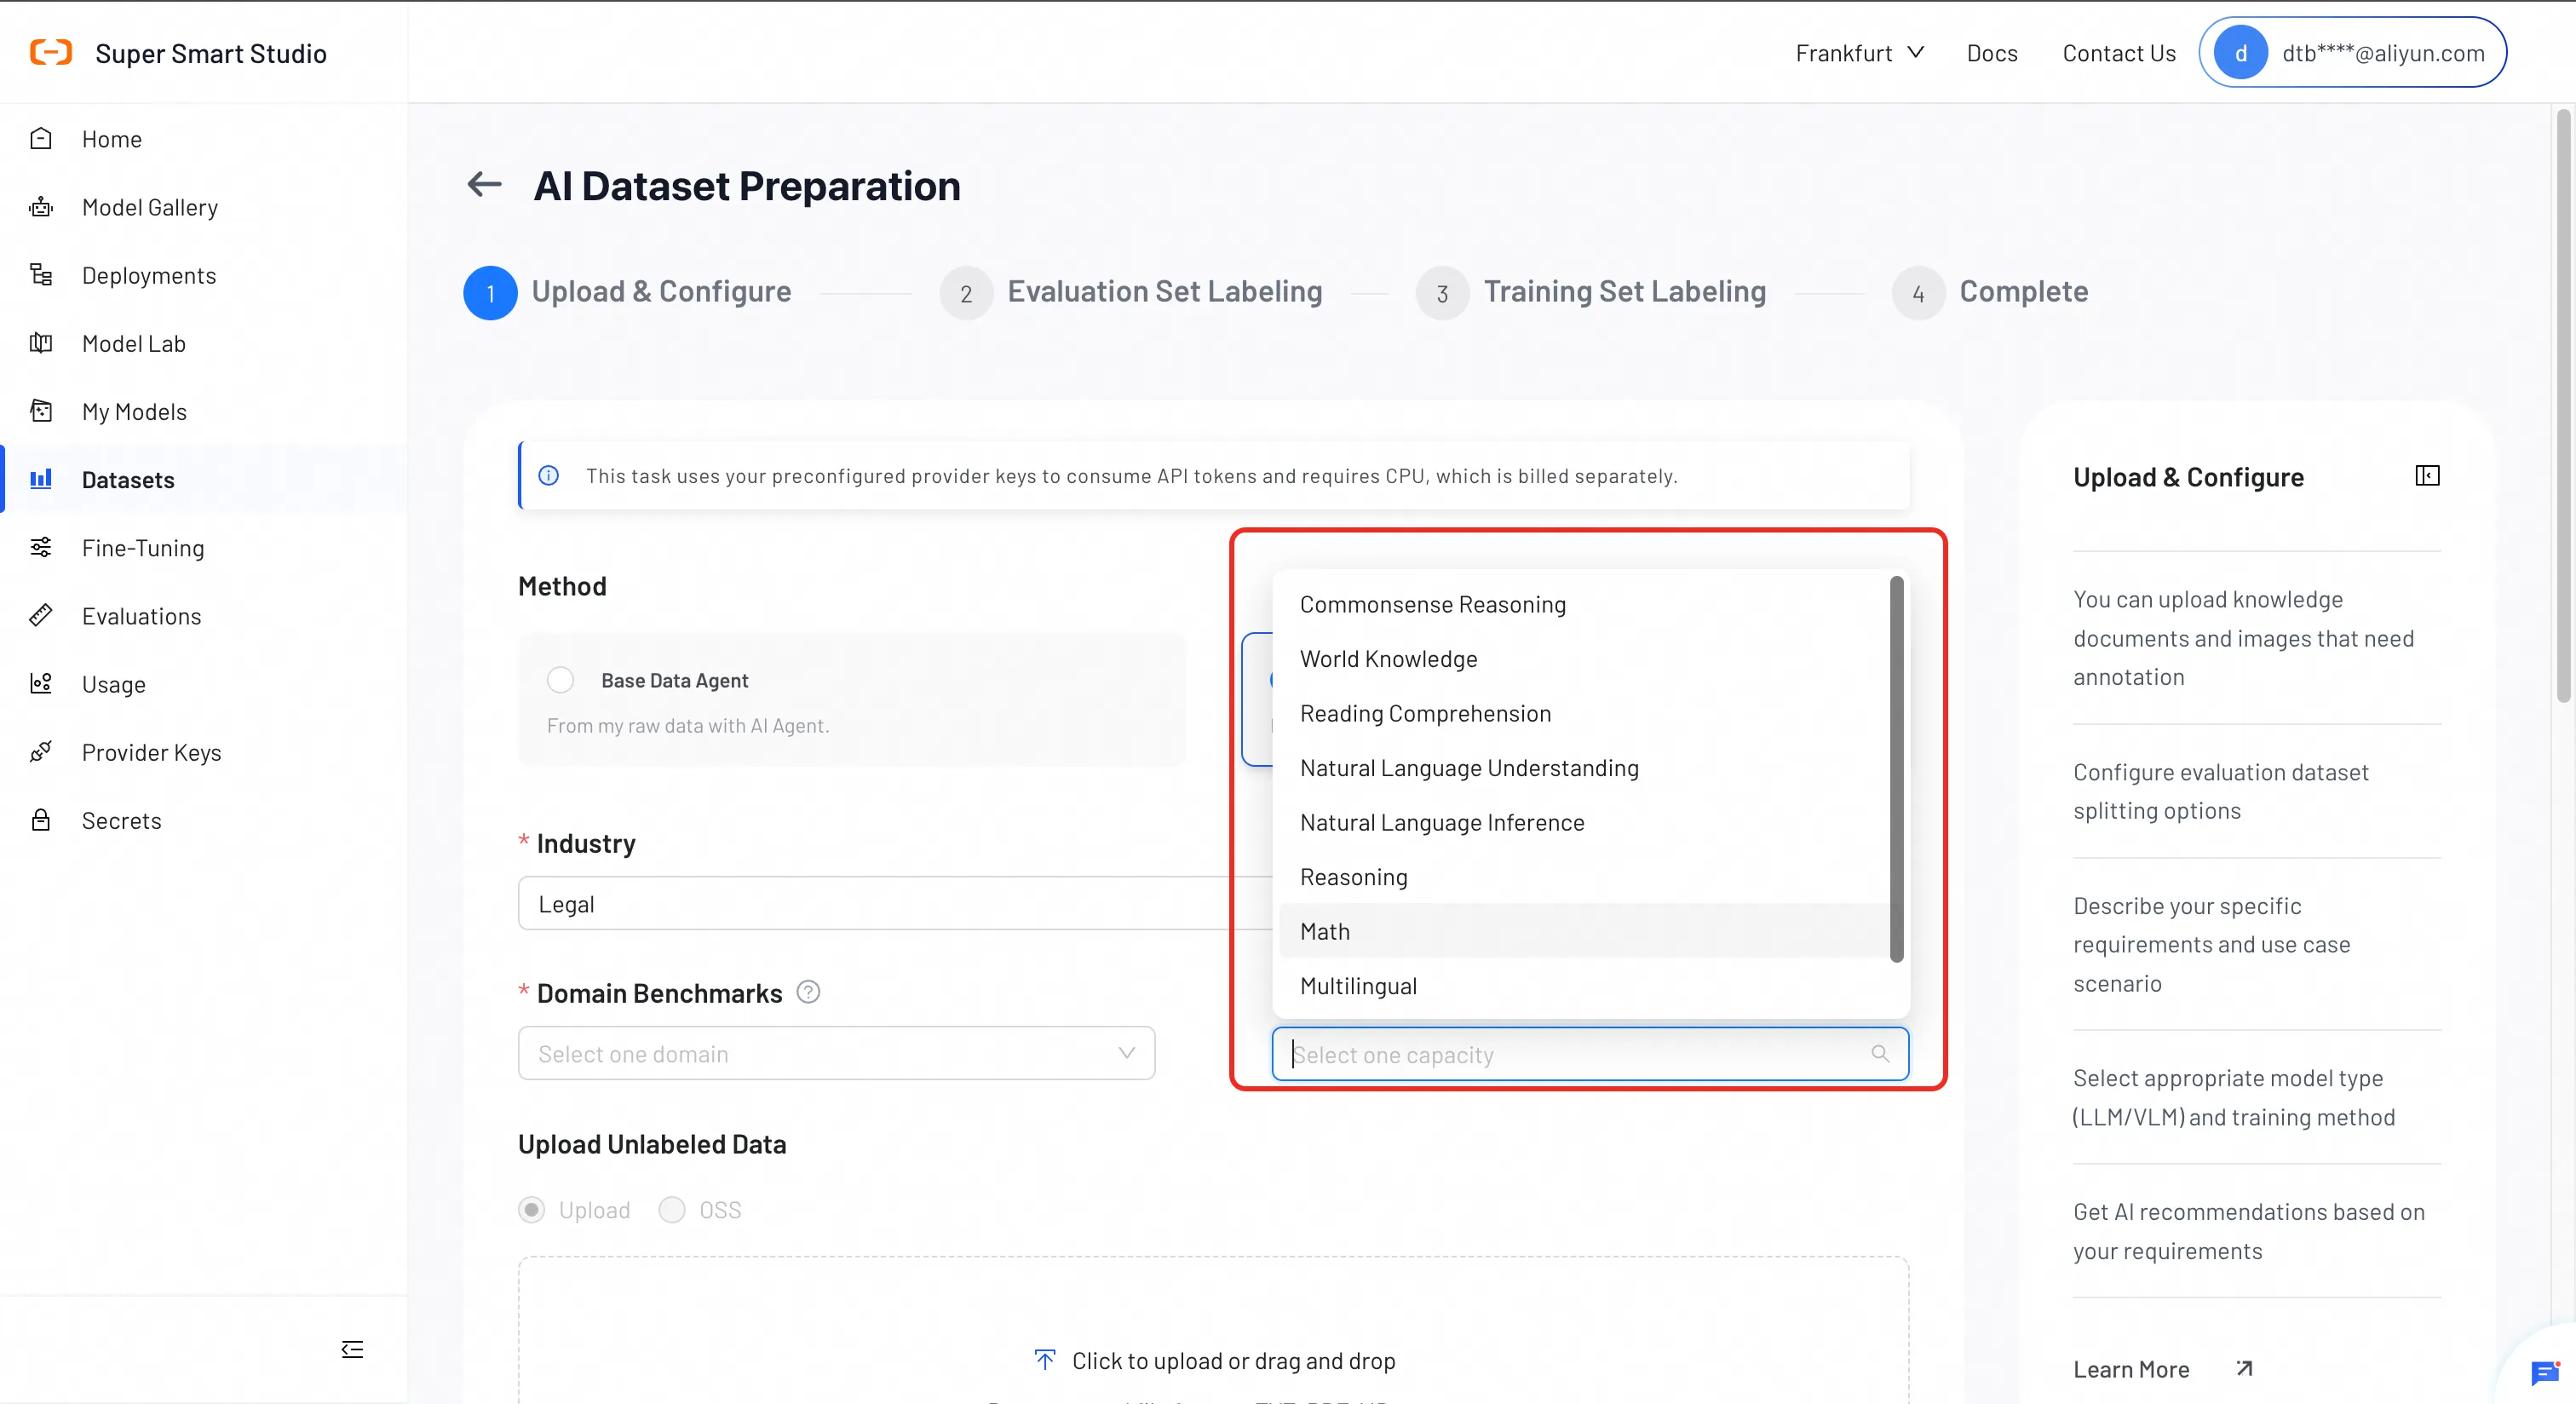
#### Select General Capability Benchmarks (Optional)
Select general capabilities to monitor to ensure your model retains its foundational strengths.
Available benchmarks:
- **Knowledge & Comprehension**: commonsense reasoning, world knowledge, reading comprehension
- **Language**: natural language understanding, natural language inference, multilingual
- **Reasoning & Math**: reasoning, math
- **Long Context**: long_context (test set only)
> **Feature**: Even without raw data, SSS-Bench can synthesize open-source datasets to customize training and test sets, allowing you to experience the full fine-tuning flow.
### 2. Upload Unlabeled Data
Upload raw data to generate training and evaluation sets.
#### Supported File Types
Supported formats depend on the model type:
- **VLM (Vision-Language Model)**: image files only (e.g., JPG, PNG)
- **LLM (Large Language Model)**: image and text files (e.g., TXT, PDF, MD)
> **Note**: Files that do not meet the format requirements are ignored and not included in your dataset.
Drag and drop files into the upload area, or click to select them.
### 3. Evaluation Dataset
Choose how to generate the evaluation set:
- **Auto Split**: Automatically allocate a percentage of your data (default: 30%).
- **Upload Your Own**: Upload a pre-made evaluation set.
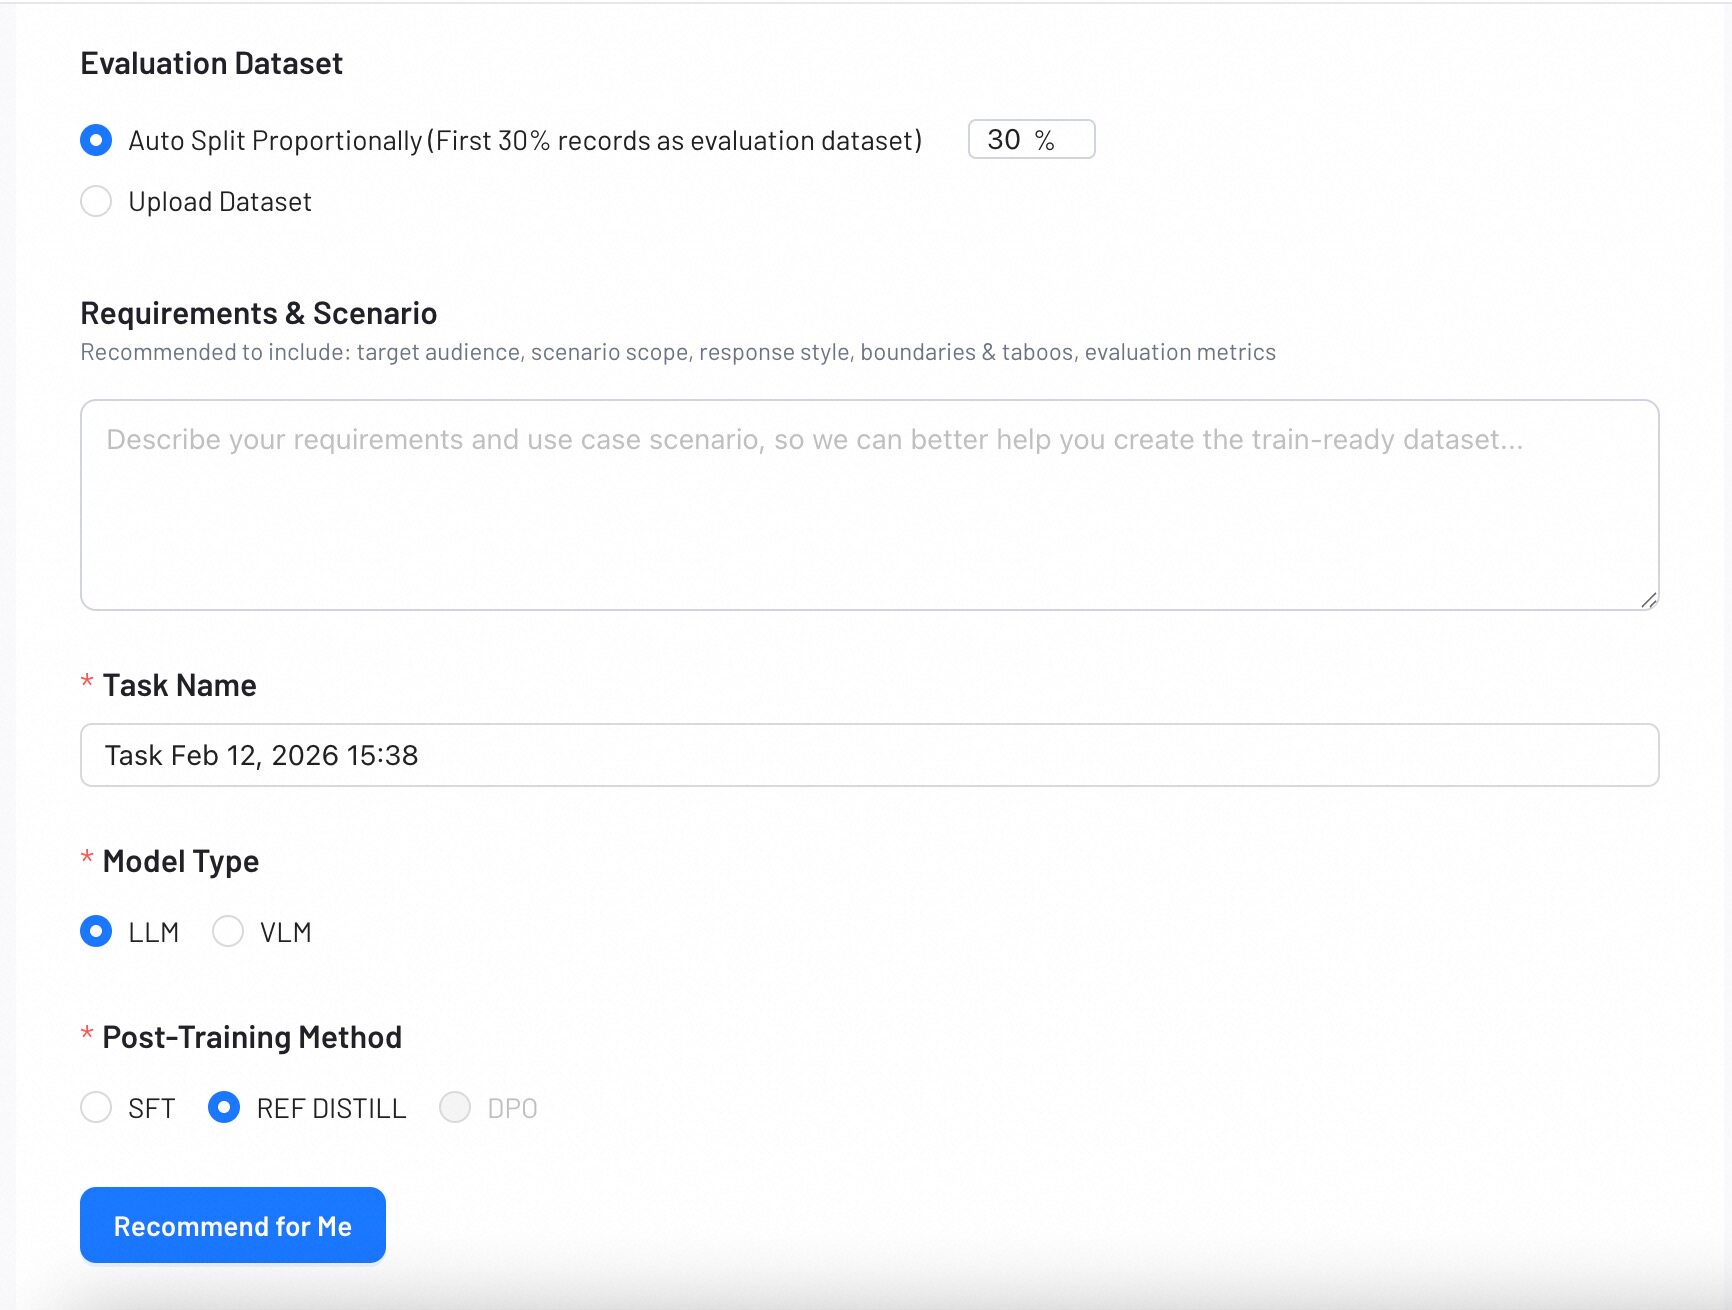
### 4. Requirements & Scenario
Describe your use case and expected response style. The system uses your description to prepare a training-ready dataset that aligns with your goals.
You may include:
- Target audience
- Scenario or domain
- Expected response style
- Boundaries or taboo topics
- Evaluation considerations
### 5. Task Name
Enter a descriptive name for your task.
### 6. Model Type & Post‑Training Method
Select the model type (LLM or VLM) and the post‑training method (SFT, REF DISTILL or DPO) you plan to use.
:::info[ Tip]
If you are unsure which options to choose, click **Recommend for Me**, and the system will suggest the best configuration based on your inputs.
:::
## Step 2: Evaluation Set Labeling
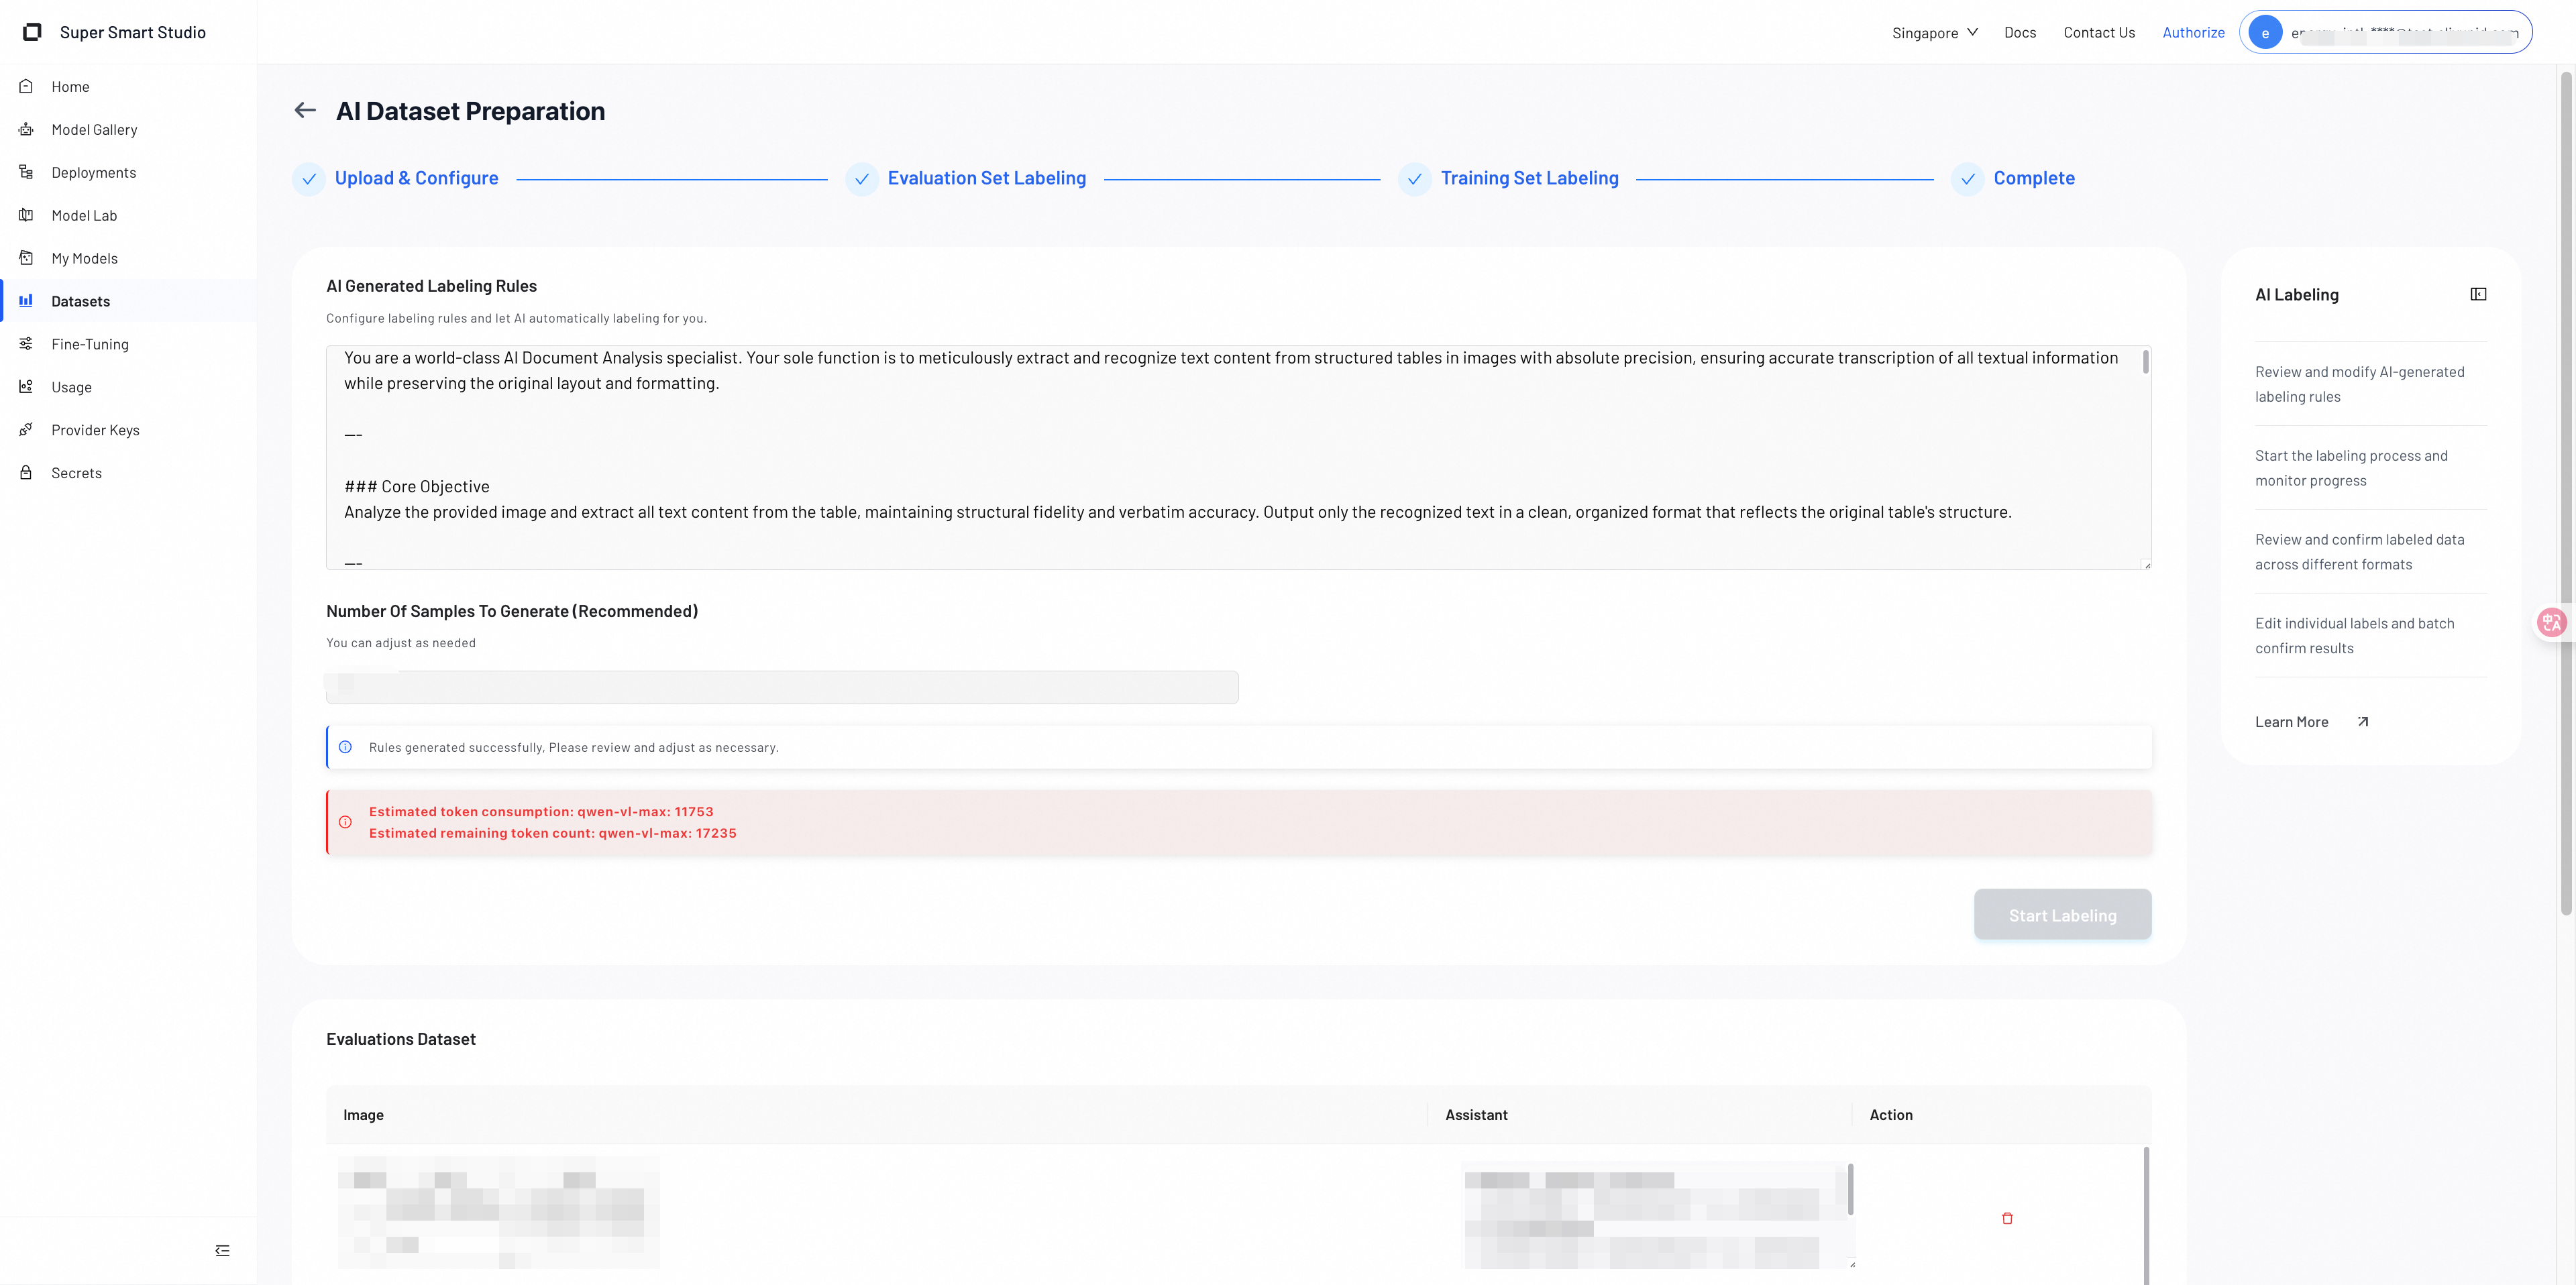
In this step, you review the AI-generated labeling rules and generate the evaluation dataset.
### 1. AI-Generated Labeling Rules
After completing Step 1, the system automatically analyzes your uploaded data and scenario description to generate **labeling rules** and a **dataset construction plan**.
These rules define how the AI will label and structure your test dataset.
You should carefully review them and make any corrections as needed.
The rules typically include:
- Response style guidelines
- Content and structural requirements
- Quality and accuracy expectations
- Dataset construction logic
You can edit or refine any part of the rules before proceeding.
### 2. Token Usage Reminder
Once the system generates the labeling, the interface displays:
- **Tokens already consumed**
- **Estimated tokens required** to generate the full evaluation dataset
:::info[ Token Budget]
Insufficient tokens may interrupt or delay dataset generation. Make sure your remaining token budget is sufficient before proceeding.
:::
### 3. Generate Test Dataset
After confirming the AI-Generated Labeling Rules, click **Generate** to create your evaluation dataset.
>**Note**: You must manually confirm the labeling rules before generation.
### 4. Review and Edit Generated Labels
When the evaluation dataset is generated, you can review each labeled item. The interface allows you to:
- Modify incorrect or incomplete labels
- Delete unwanted labeled samples
- Confirm labels that look correct
You can review items one by one or process them in batches.
## Step 3: Training Set Labeling
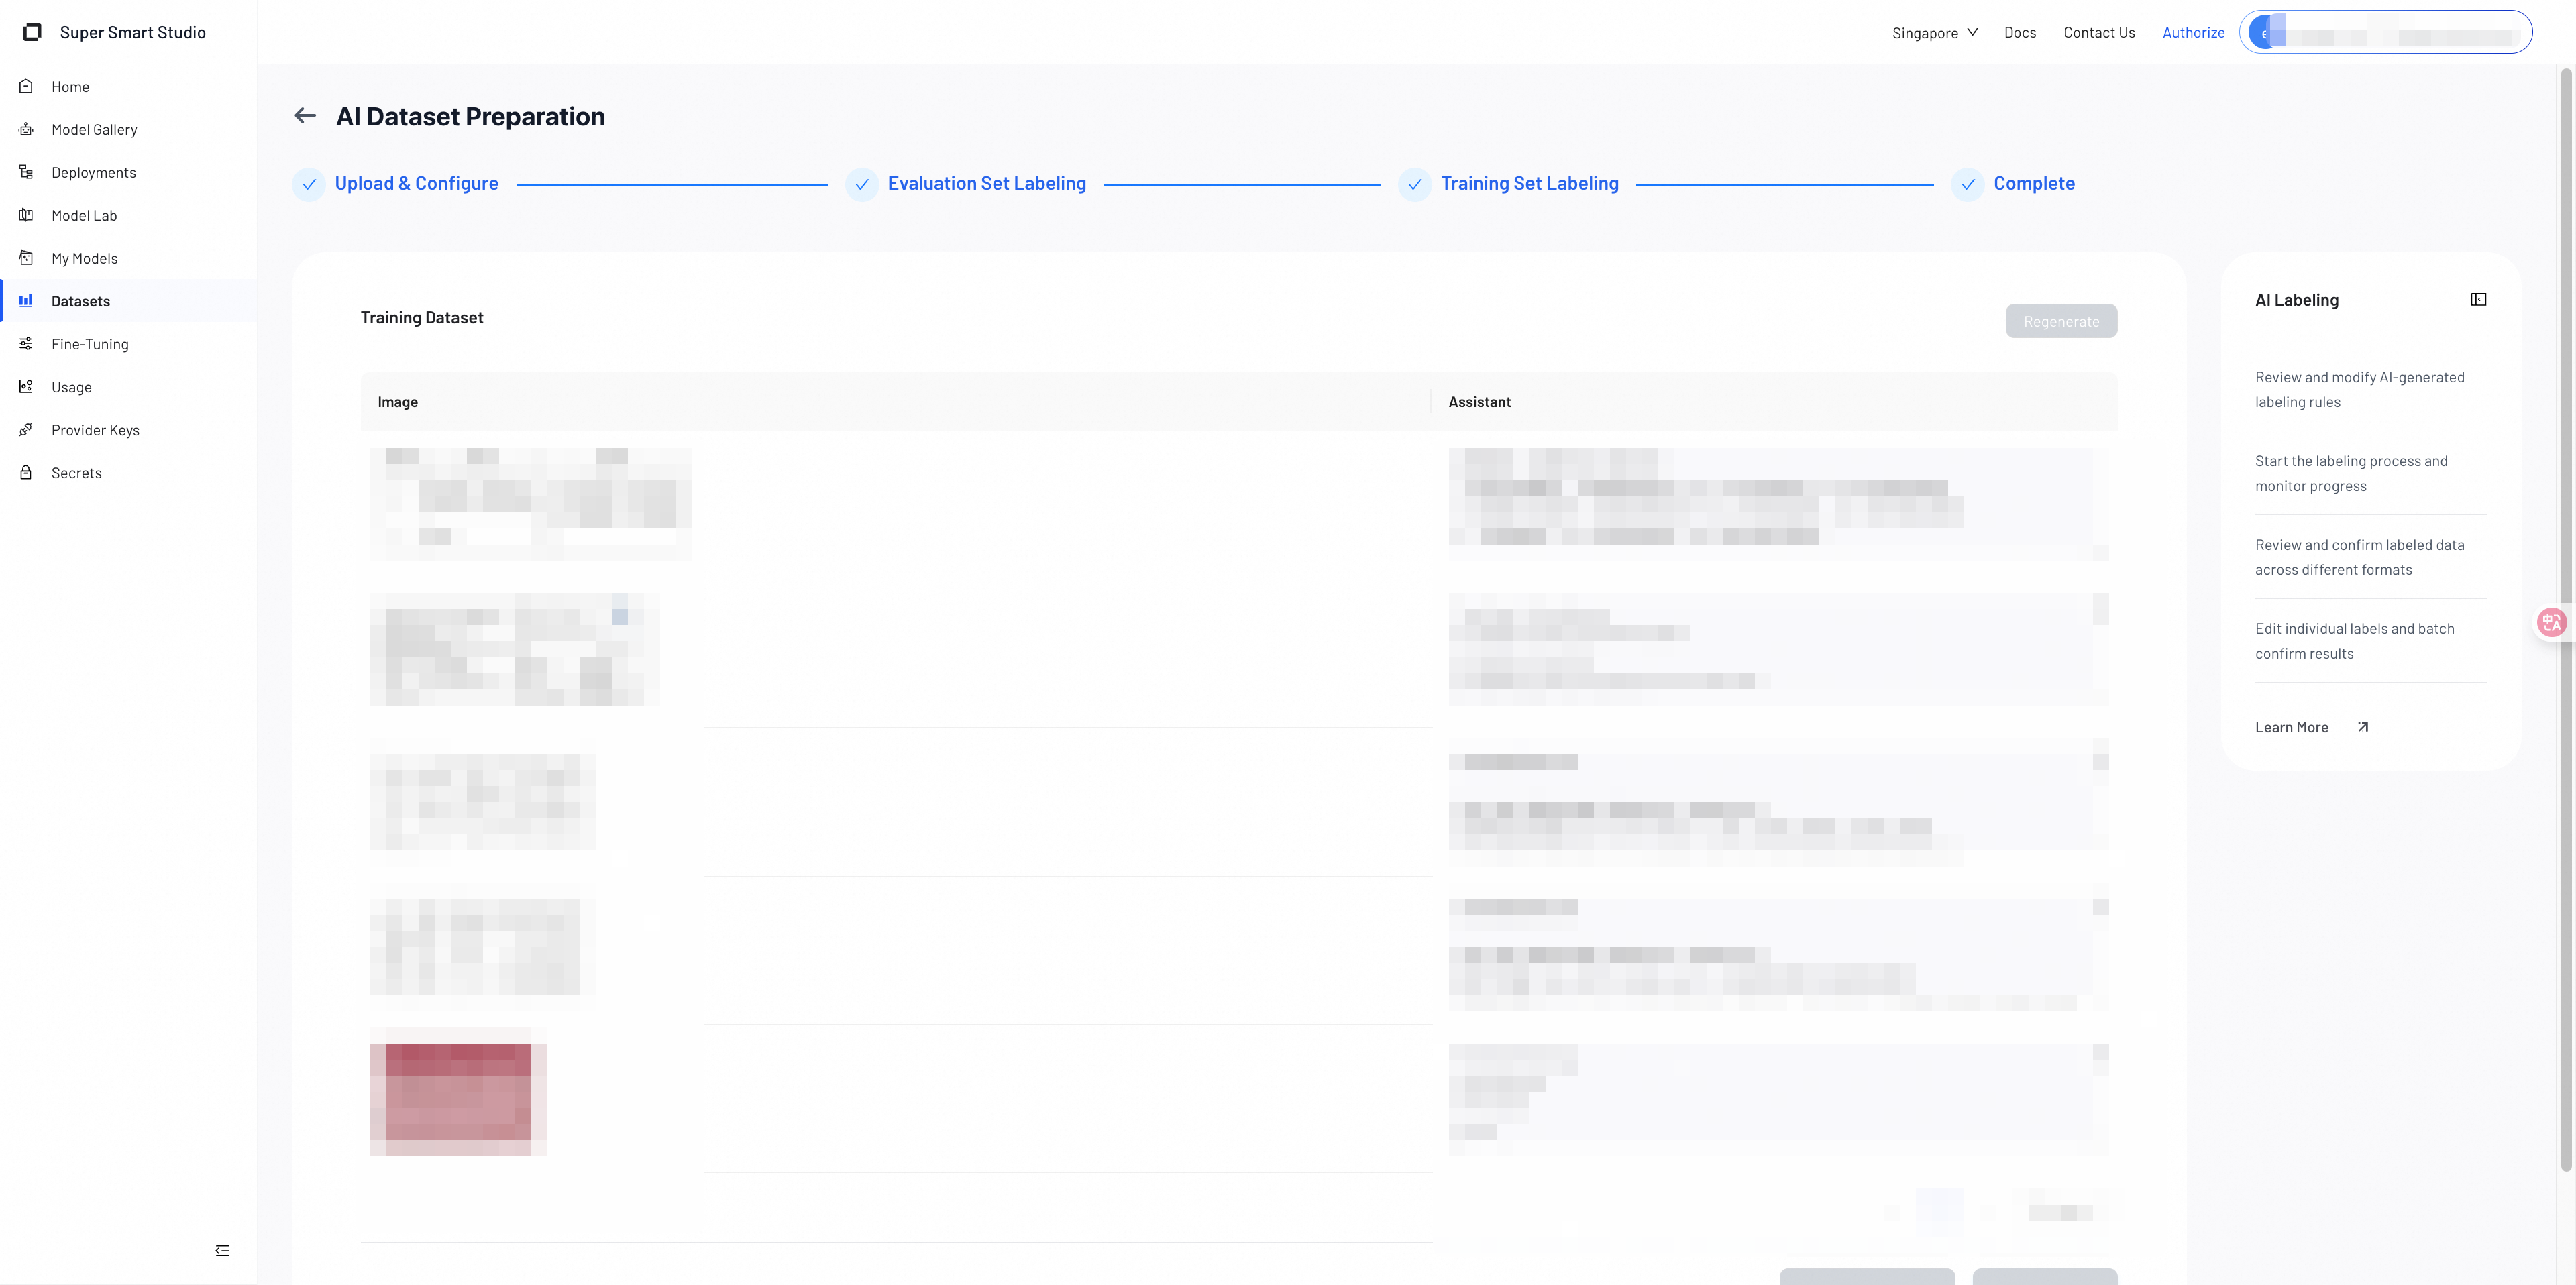
In this step, the system automatically generates labeled training data based on the confirmed labeling rules and the dataset construction plan from the previous steps.
### 1. Auto‑Generated Training Data
The model produces labeled outputs in bulk. The output format matches your selected training model and method.
Review the generated results to ensure they meet your expectations.
### 2. Regenerate If Needed
If the generated labels are inaccurate, incomplete, or misaligned with your rules, you can click **Regenerate**.
The system will recreate the training labels for the dataset based on the same rules. Use this option whenever you feel the overall quality needs improvement.
### 3. Proceed When Satisfied
Once you confirm the training labels are correct, continue to the **Complete** step to finalize your dataset.
## Step 4: Complete
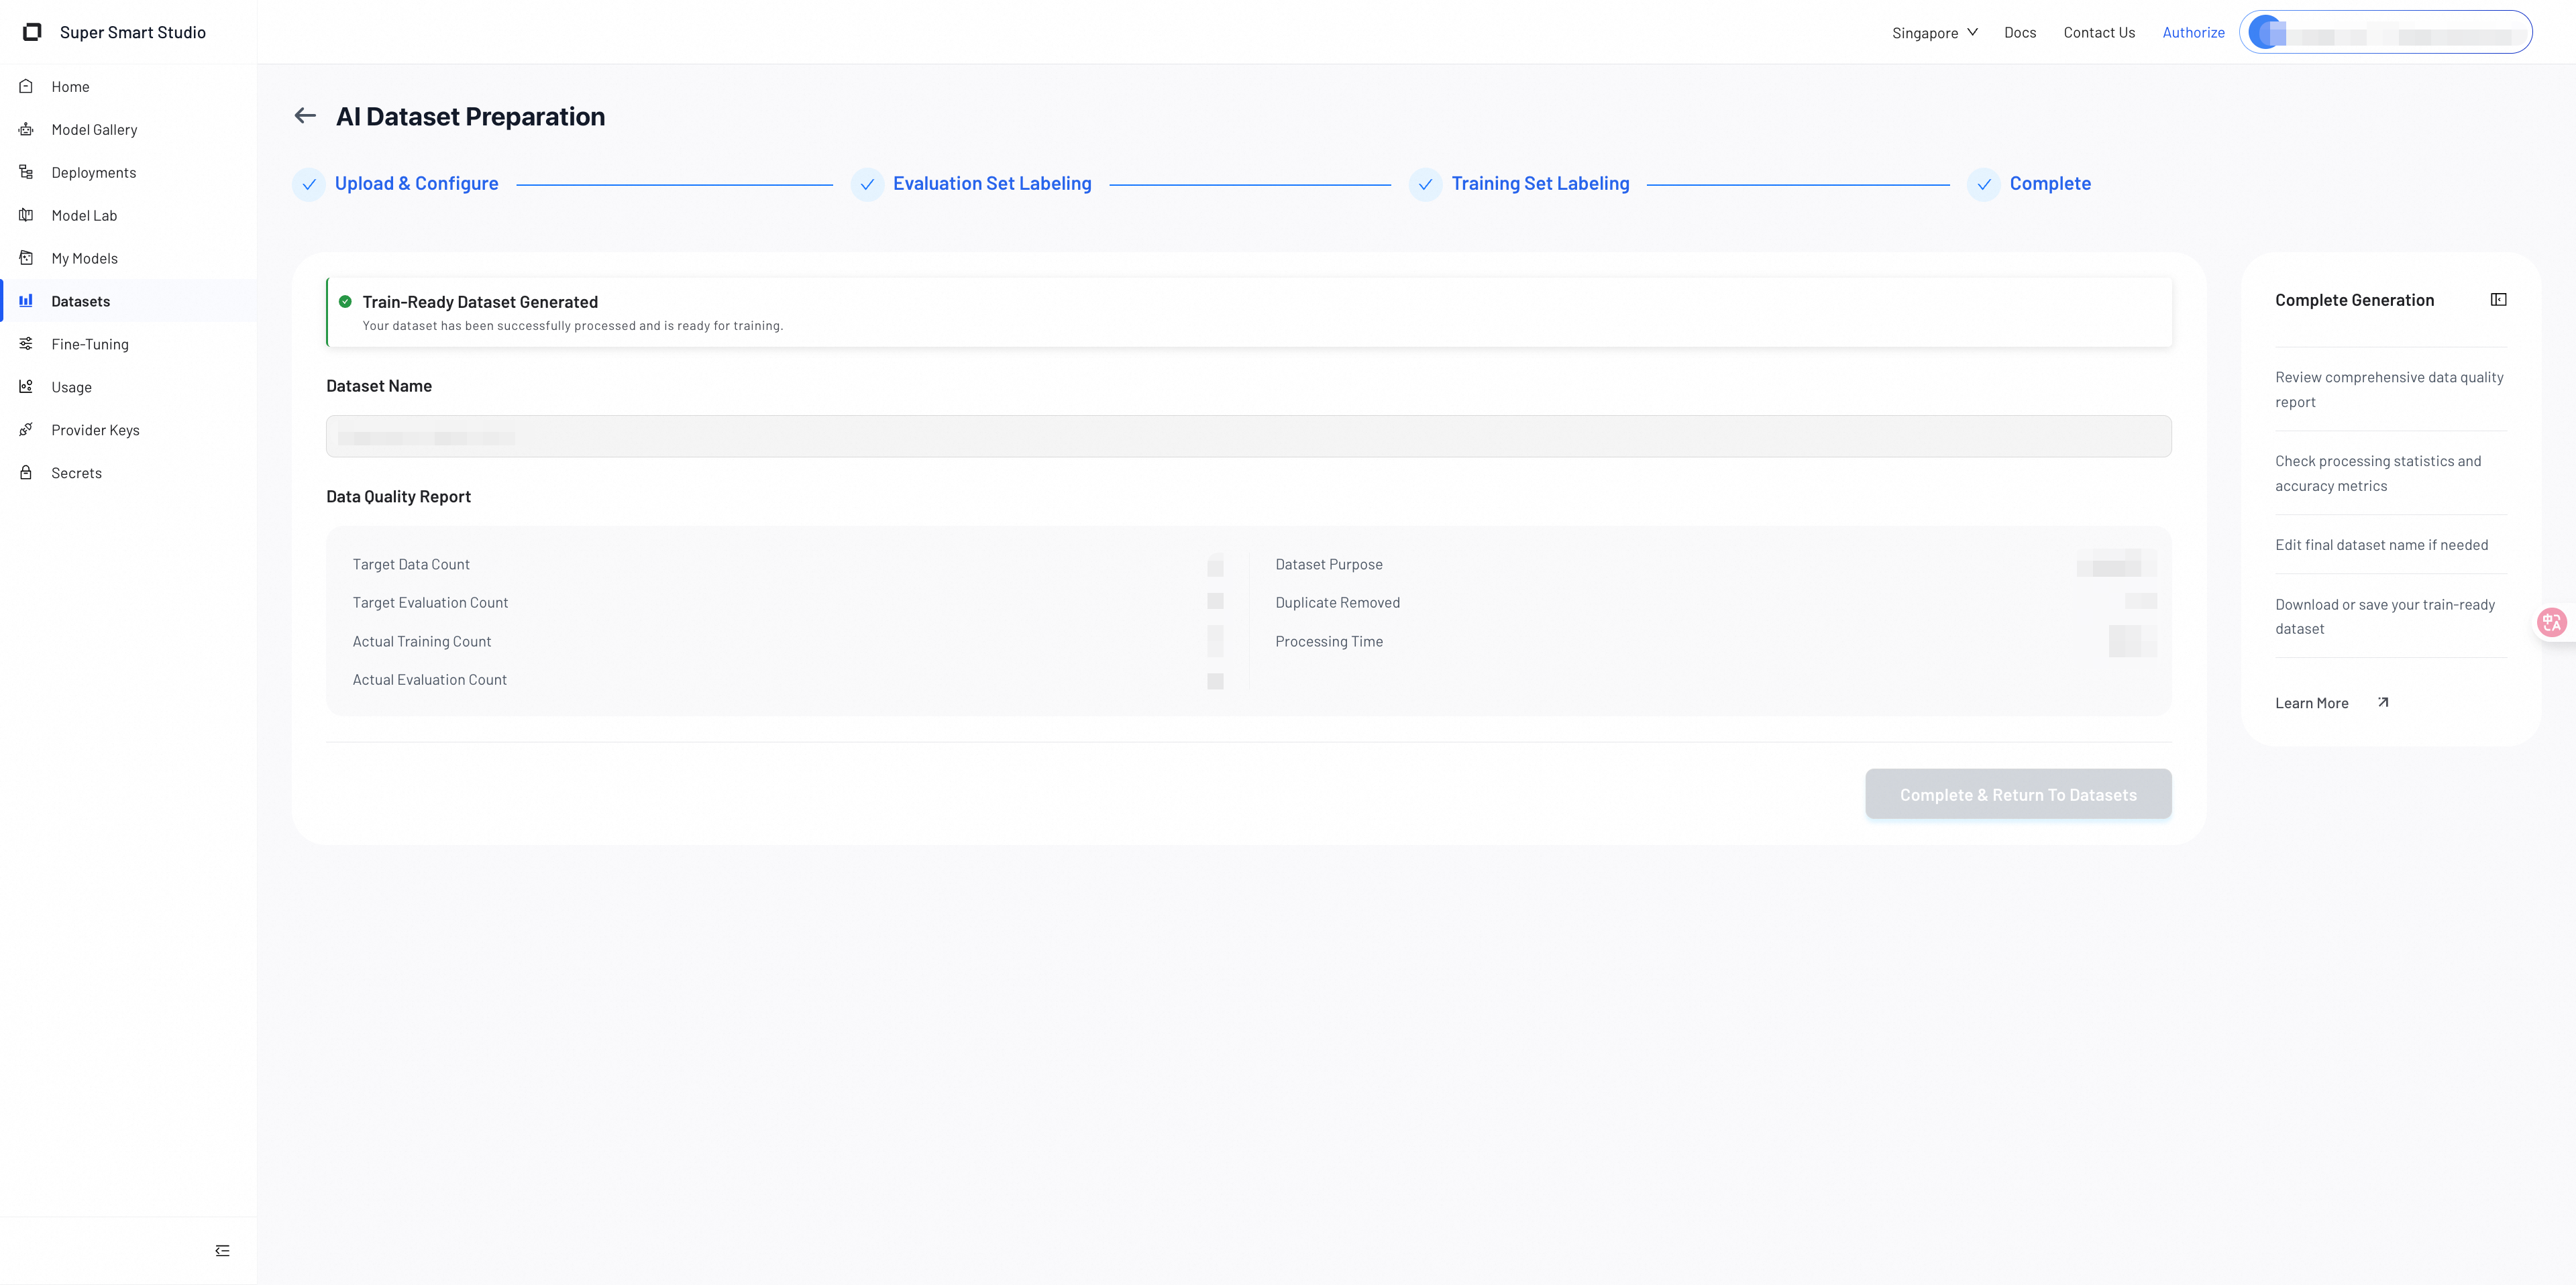
In the final step, you review and confirm your fully processed dataset. Once confirmed, your dataset is ready for training.
### 1. Final Dataset Overview
After the system generates the training set and evaluation set, a summary of your completed dataset appears.
The summary includes key information such as:
- Dataset name
- Target vs. actual training sample counts
- Target vs. actual evaluation sample counts
- Number of duplicates removed
- Dataset purpose
- Total processing time
Review the summary to verify that the dataset meets your expectations.
### 2. Review Data Quality Report
The data quality report shows how the system constructed the dataset and whether the output aligns with your initial requirements.
If needed, you can still update the dataset name at this stage.
### 3. Finalize the Dataset
When everything looks correct, click **Complete & Return to Datasets**.
You can then download, store, or use your newly generated train‑ready dataset for further fine‑tuning.
## Next Steps
}
learnMoreLink="https://smartstudio.console.alibabacloud.com/xt-console/fineTuning"
>
Use your created dataset to fine-tune models for better performance on your specific tasks.
}
learnMoreLink="https://smartstudio.console.alibabacloud.com/xt-console/evaluations"
>
Evaluate your models using your dataset. SSS-Bench datasets support granular reporting on Specialization, Domain Knowledge, and General Robustness.
---
## Create Dataset
Learn how to create and manage datasets for training and evaluation purposes.
For detailed information about fine-tuning methods, see the [Fine‑Tuning](/docs/fine-tuning/overview) documentation.
## Dataset Creation Methods
Smart Studio offers multiple ways to create datasets for training your models.
Upload your existing datasets in various formats including JSON, CSV, TXT, and more.
Features:
- Multiple file formats
- Batch upload support
- Data validation
Let AI automatically prepare and label your datasets with intelligent data processing.
Features:
- Automated labeling
- Smart data splitting
- Quality assurance
## Manual Upload Configuration
Select your dataset settings and upload your data.
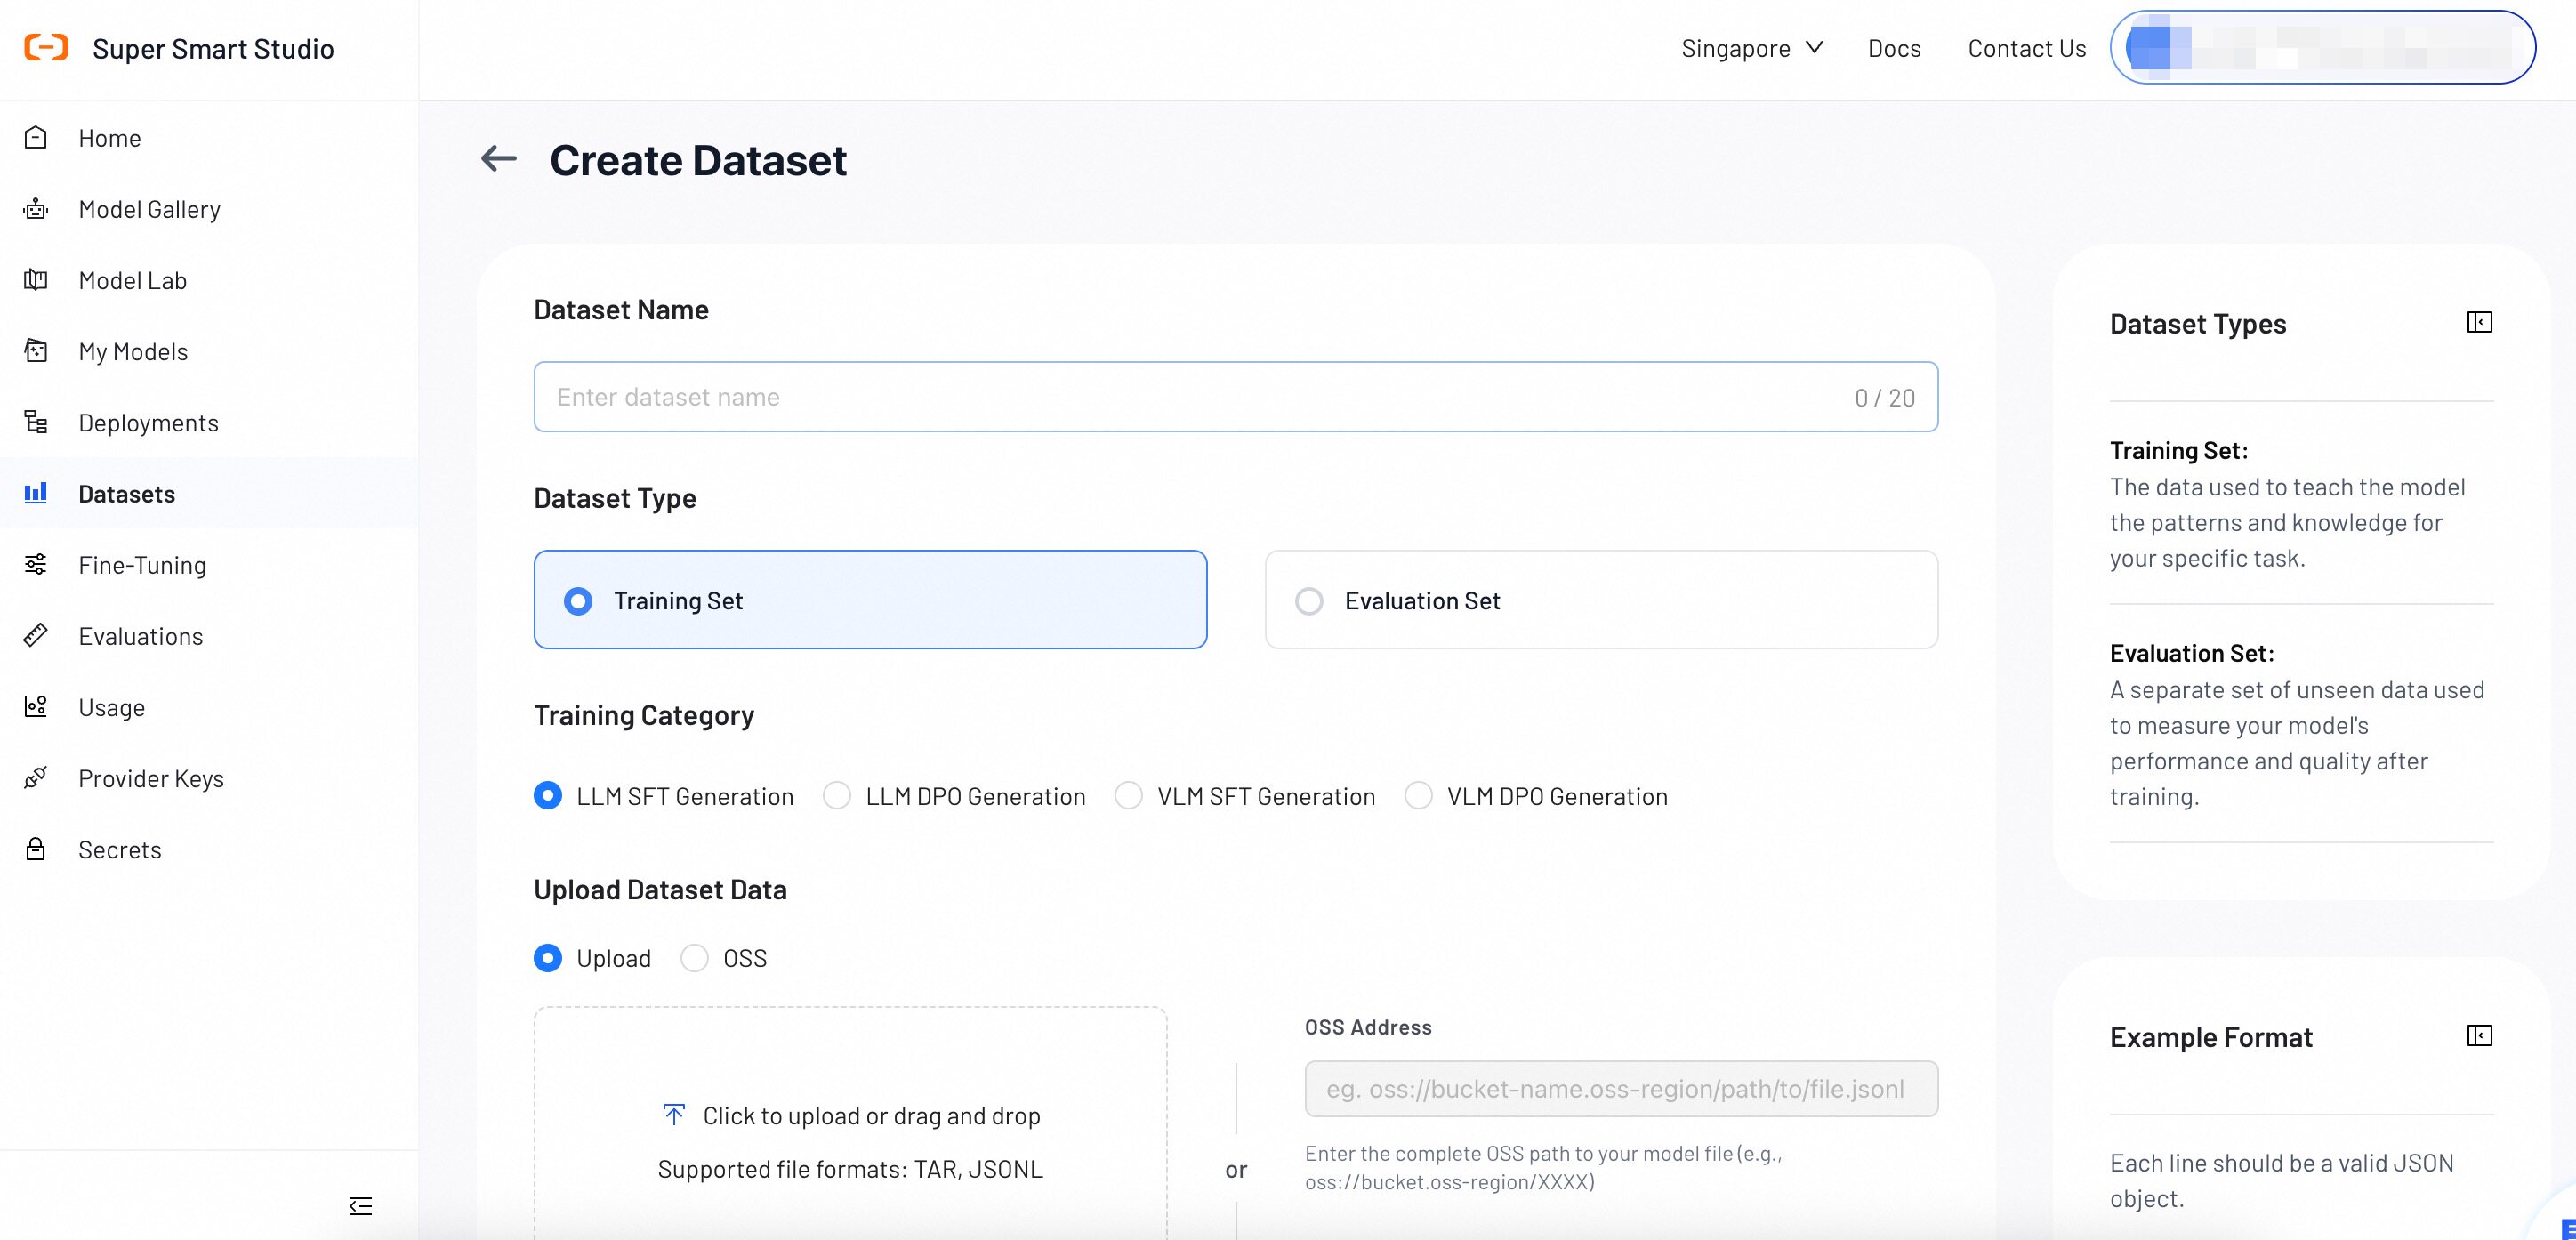
### Dataset Name
Enter a name for your dataset. We recommend including a version number to distinguish between datasets.
Example: `qwen-sft-v1`, `qwen-dpo-v2`
### Dataset Type
Select the type of dataset you want to create.
- **Training Set**: The data used to teach the model patterns and knowledge for your specific task.
- **Evaluation Set**: A separate set of unseen data used to measure your model's performance after training.
### Training Category
Select a training category that matches your fine-tuning task. The required data format depends on the category you choose. See [Data Format Reference](#data-format-reference) for details.
- **LLM SFT Generation**: Supervised fine-tuning for large language models.
- **LLM DPO Generation**: Preference alignment training for large language models.
- **VLM SFT Generation**: Supervised fine-tuning for vision-language models.
- **VLM DPO Generation**: Preference alignment training for vision-language models.
### Upload Method
You can upload your dataset in one of two ways.
**Local Upload**
Click the upload area or drag and drop your file. Supported formats: TAR, JSONL.
**OSS**
Enter the full OSS path to your dataset file.
Format: `oss://bucket-name.oss-region/path/to/file.jsonl`
## Data Format Reference
The required data format depends on the training category you selected. Each line should be a valid JSON object.
### LLM SFT Generation
```json
{
"messages": [
{"role": "system", "content": ""},
{"role": "user", "content": ""},
{"role": "assistant", "content": ""},
{"role": "user", "content": ""},
{"role": "assistant", "content": ""}
]
}
```
### LLM DPO Generation
```json
{
"messages": [
{"role": "system", "content": ""},
{"role": "user", "content": ""},
{"role": "assistant", "content": ""},
],
"rejected_response": ""
}
```
### VLM SFT Generation
```json
{
"messages": [
{"role": "system", "content": ""},
{"role": "user", "content": ""},
{"role": "assistant", "content": ""},
],
"images": ["/xxx/x.jpg", "/xxx/x.png"]
}
```
:::info[ Image Placeholders]
The `` placeholder in the user content is optional. If included, the number of `` placeholders must match the number of paths in the images array.
:::
### VLM DPO Generation
```json
{
"messages": [
{"role": "system", "content": ""},
{"role": "user", "content": ""},
{"role": "assistant", "content": ""},
],
"images": ["/xxx/x.jpg", "/xxx/x.png"],
"rejected_response": ""
}
```
> **Note**:
The `` placeholder in the user content is optional. If included, the number of `` placeholders must match the number of paths in the images array.
## Manage Datasets
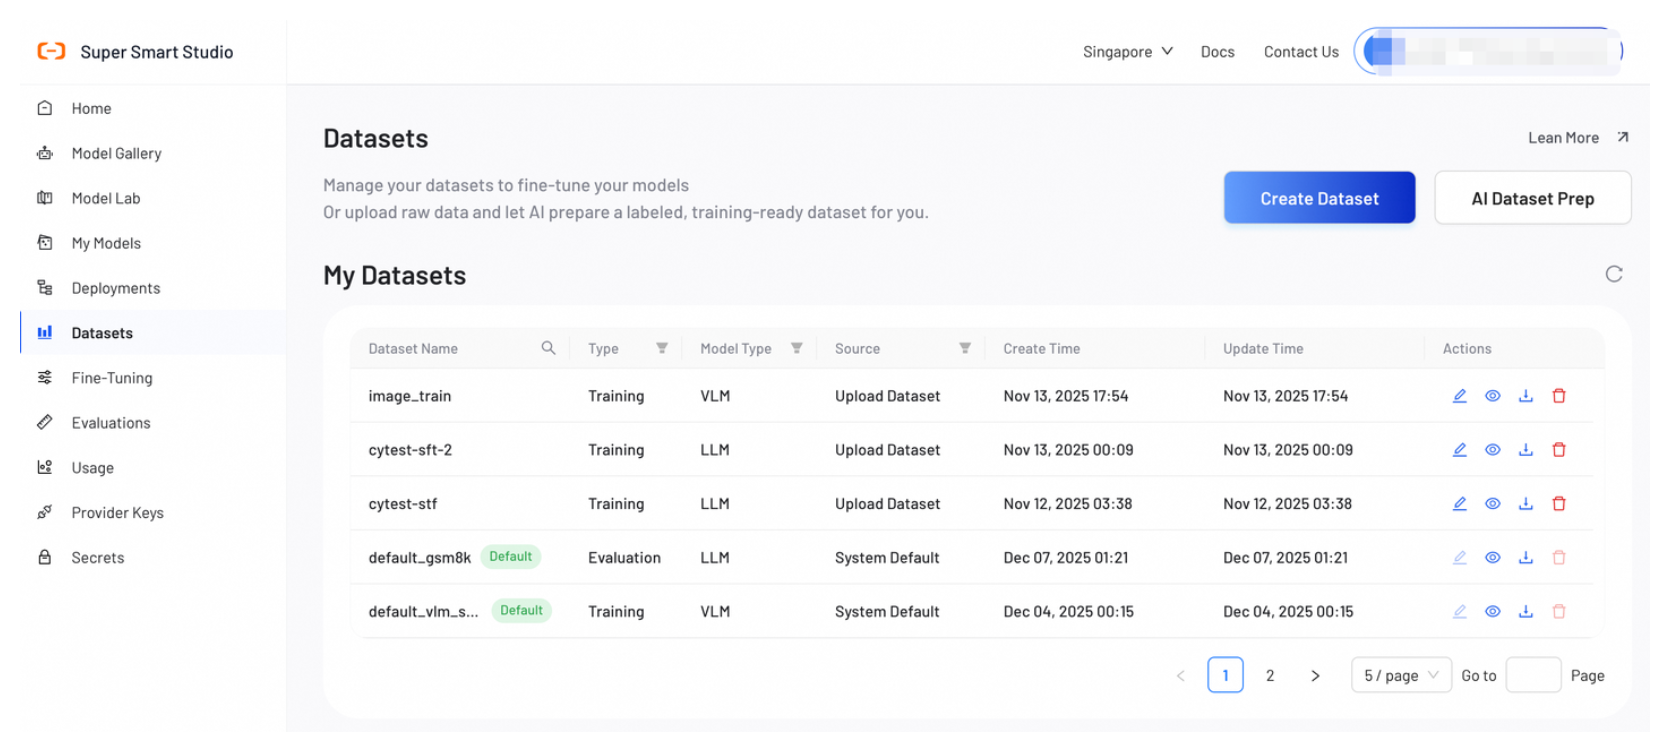
**My Datasets** page lists all datasets that you create. Use this page to view dataset details, edit configurations, and delete datasets you no longer need.
## Next Steps
}
learnMoreLink="https://smartstudio.console.alibabacloud.com/xt-console/fineTuning"
>
Use your created dataset to fine-tune models for better performance on your specific tasks.
}
learnMoreLink="https://smartstudio.console.alibabacloud.com/xt-console/evaluations"
>
Evaluate your models using your dataset to measure performance and accuracy.
---
## Manage Datasets
View, search, filter, download, edit, and delete your datasets from the Datasets dashboard. This page is your central hub for managing both manually uploaded datasets and AI-prepared datasets.
## My Datasets
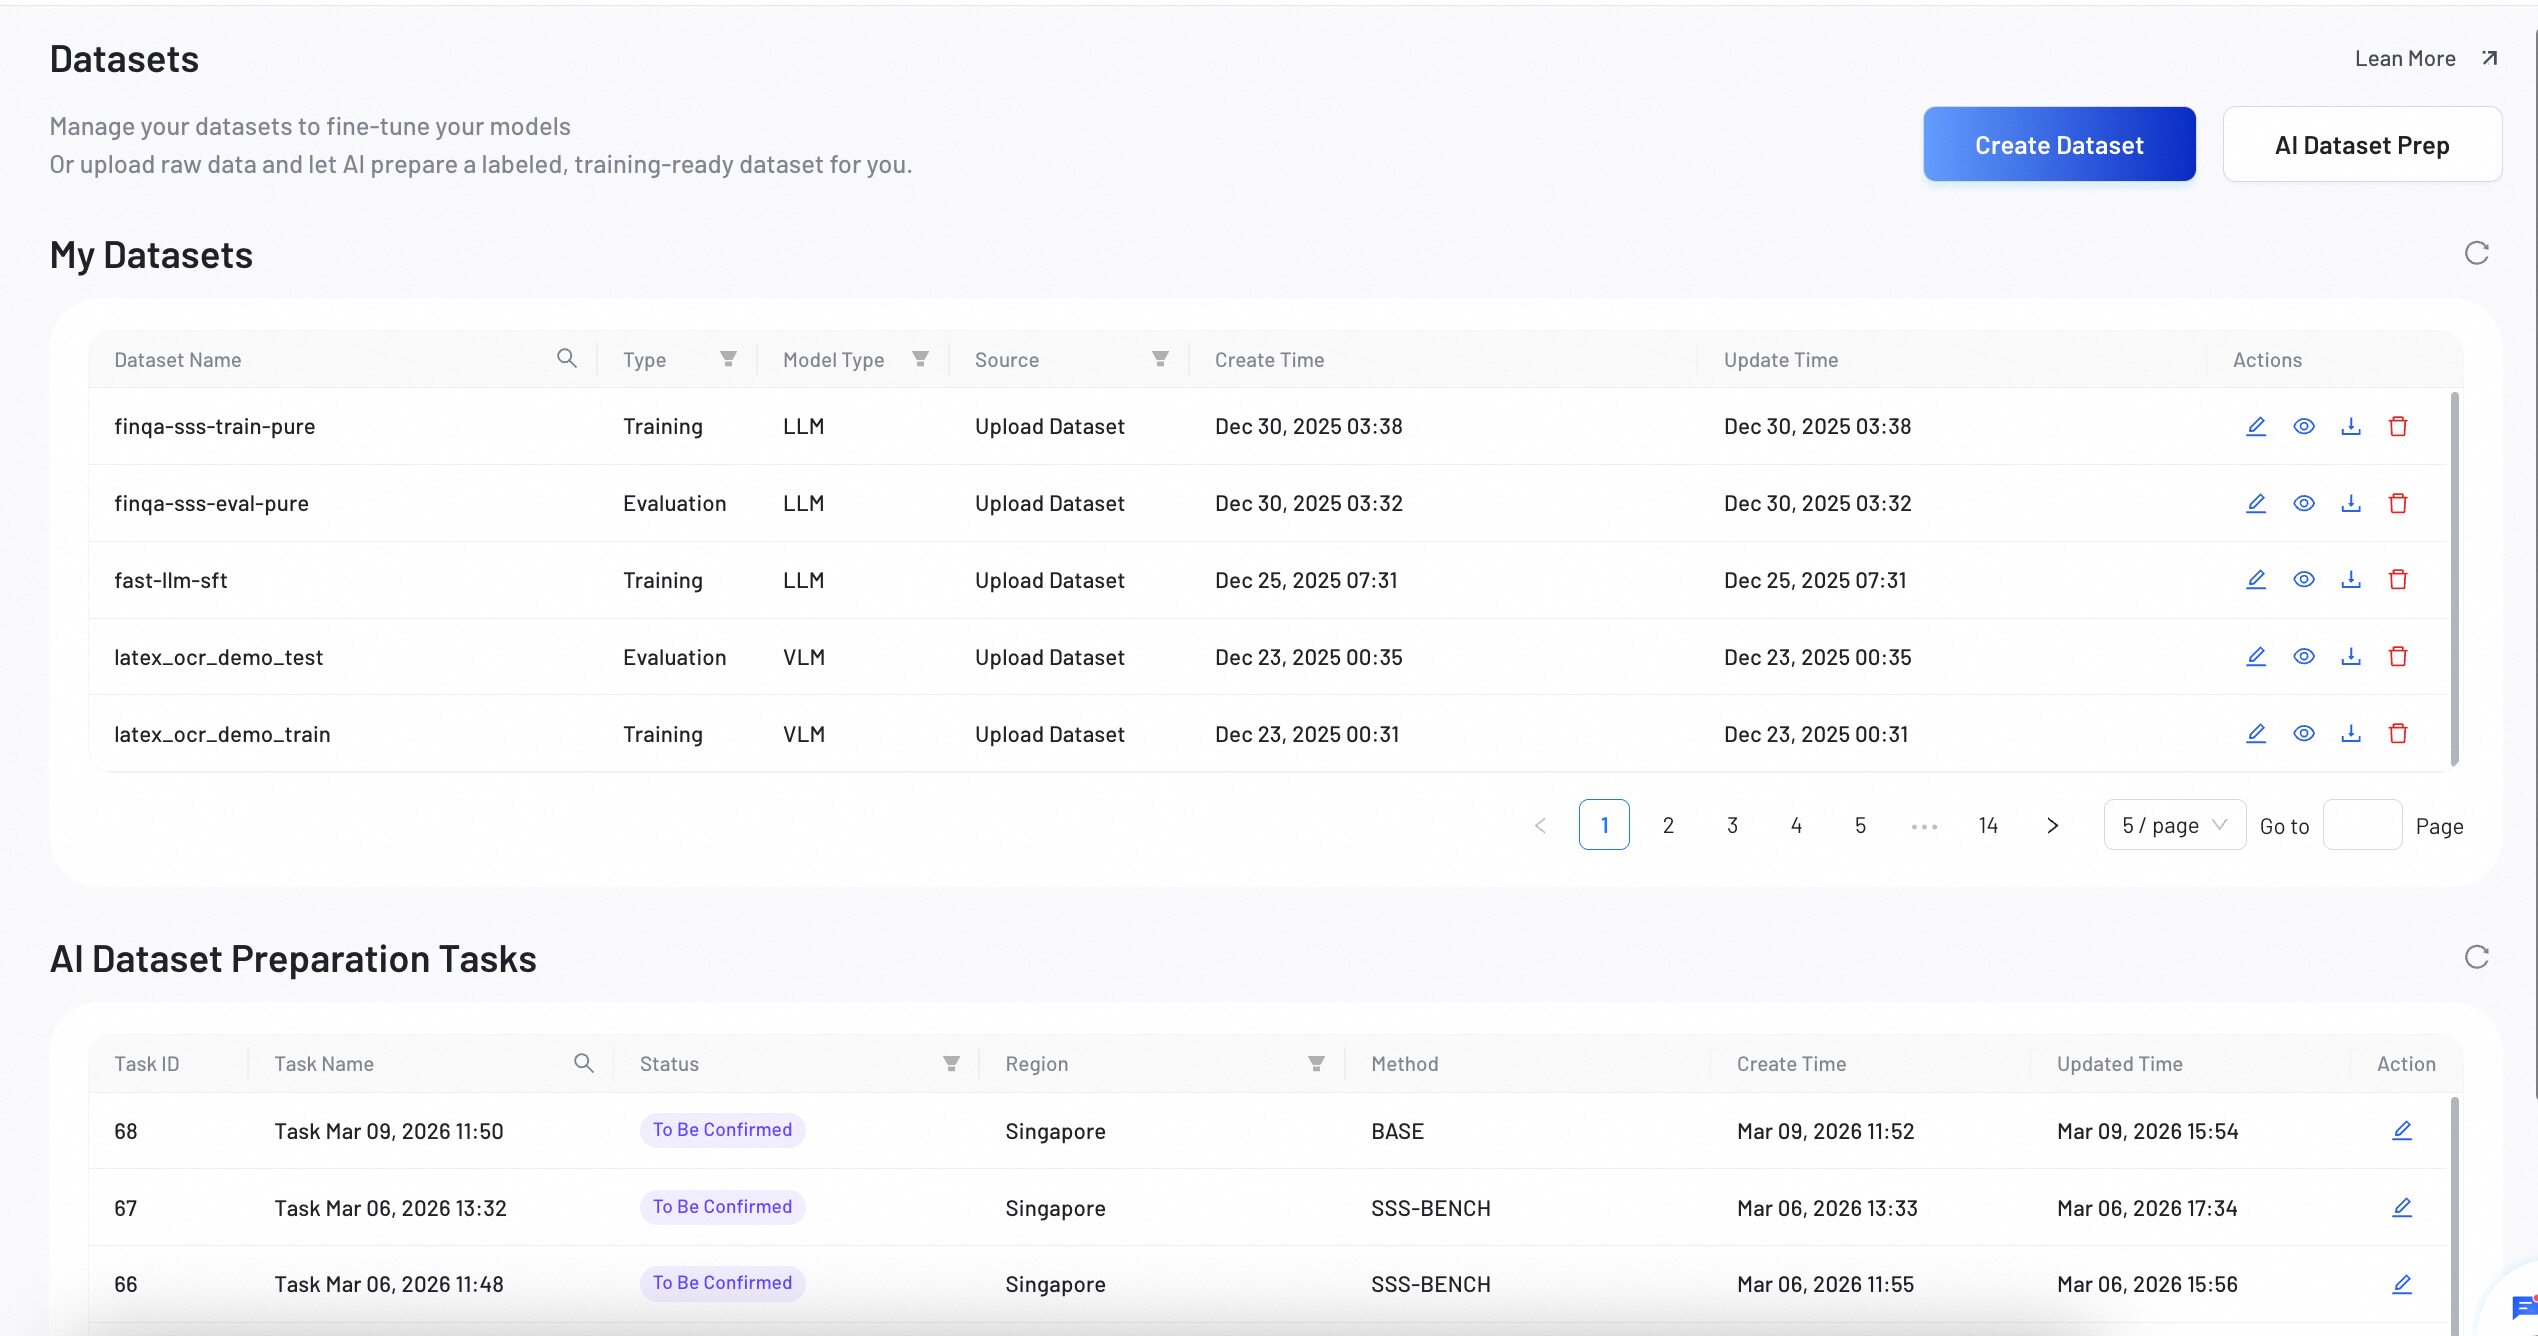
The **My Datasets** table lists every dataset you own, including those created manually and those generated by the AI preparation pipeline.
### Filtering and Searching
You can narrow down the dataset list using column-level filters:
- **Dataset Name** — Click the search icon in the column header, type a keyword, and press Enter.
- **Type** — Filter by `Training` or `Evaluation`.
- **Model Type** — Filter by `LLM` or `VLM`.
- **Source** — Filter by `Upload Dataset`, `OSS Dataset`, `AI Dataset`, or `System Default`.
:::info[ Tip]
System default datasets cannot be edited or deleted. They serve as reference examples for data format and structure.
:::
### Actions
Each dataset row provides the following actions:
- **Edit** — Opens the dataset in edit mode where you can update the name, type, category, and files. Not available for system default datasets.
- **View Details** — Opens the [Dataset Detail](#dataset-detail) page with overview and data preview tabs.
- **Download** — Downloads all files associated with the dataset. If the dataset contains multiple files, each file is downloaded sequentially.
- **Delete** — Permanently removes the dataset. A confirmation dialog appears before deletion. Datasets currently linked to a training job cannot be deleted.
## AI Dataset Preparation Tasks
The **AI Dataset Preparation Tasks** table tracks all tasks created through the [AI Dataset Preparation](/docs/datasets/ai-dataset-preparation) workflow.
### Task Status Reference
| Status | Meaning |
|--------|---------|
| **Initializing** | The system is auto-configuring and generating labeling rules. |
| **To Be Confirmed** | Labeling rules are ready for your review. Action required. |
| **AI Labeling** | The AI is generating labeled data for your evaluation or training set. |
| **Dataset Preparing** | The system is merging results and saving the final dataset. |
| **Completed** | The task finished successfully. Your dataset is ready. |
| **Failed** | An error occurred during processing. Click Edit to review and retry. |
### Filtering
- **Task Name** — Click the search icon, type a keyword, and press Enter.
- **Status** — Filter by one or more status values.
- **Region** — Filter by cloud region (Singapore, Frankfurt, Hong Kong, USA-east, Malaysia, Japan).
## Dataset Detail
### Overview Tab
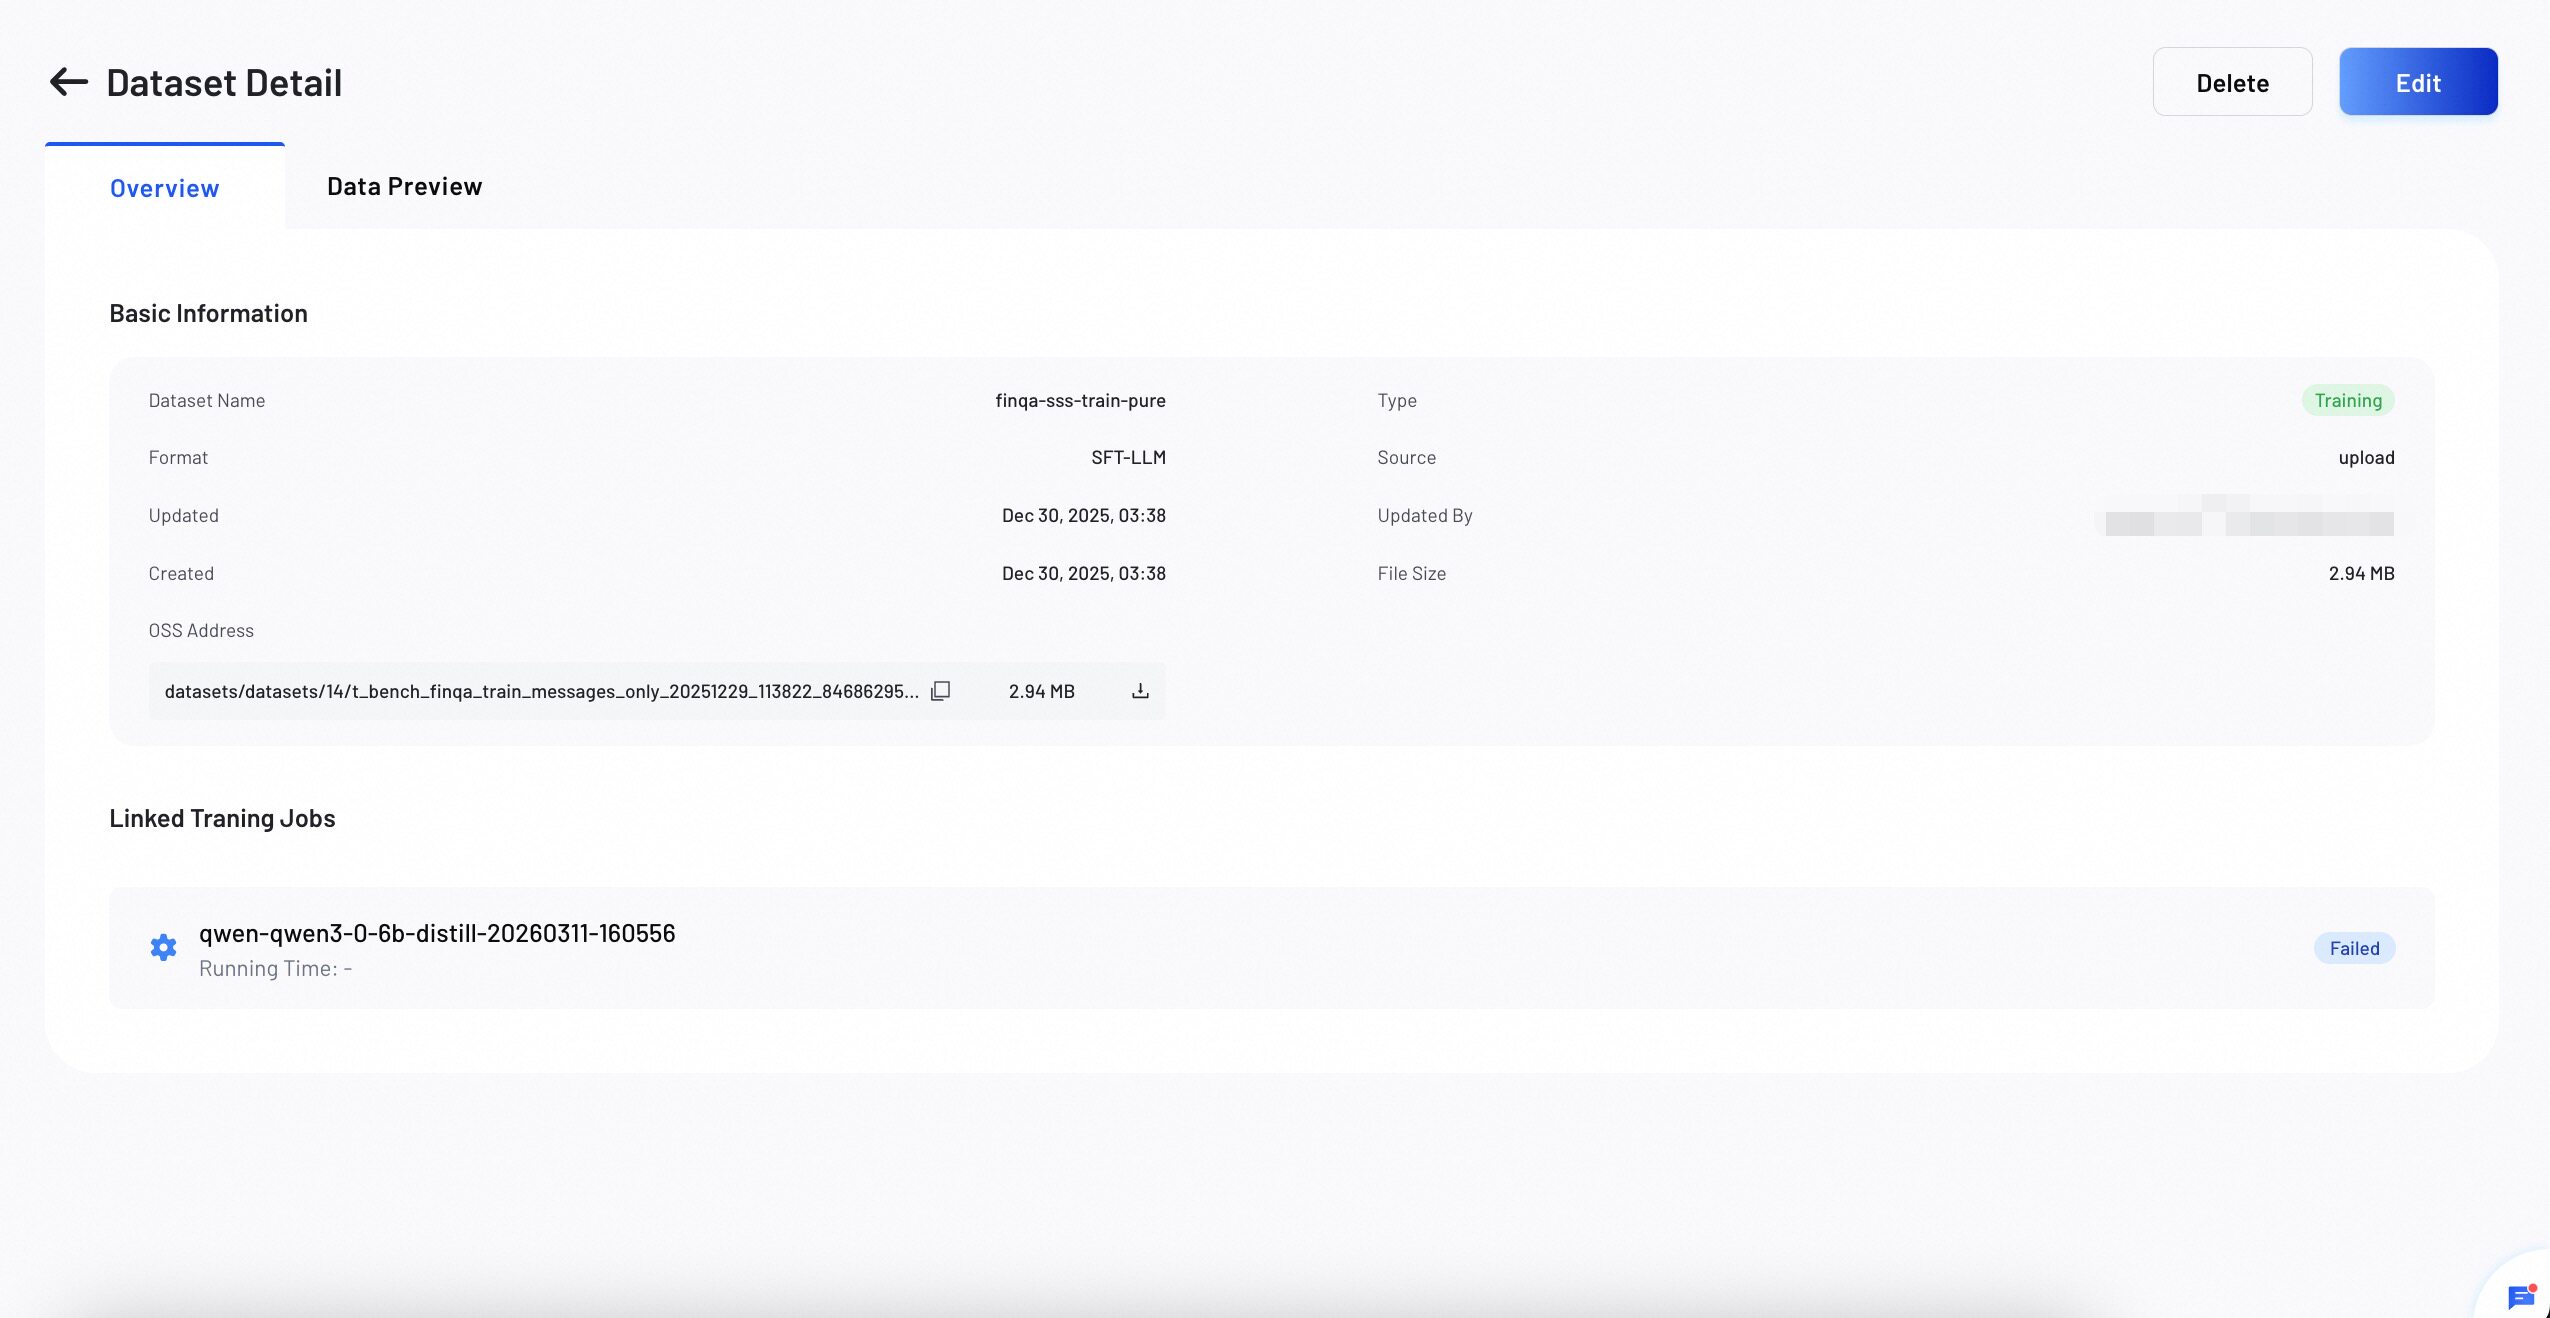
The Overview tab displays basic metadata and storage information for the dataset.
**OSS Addresses:**
Each file in the dataset is listed with its full OSS path. You can:
- **Copy** the OSS path to your clipboard by clicking the copy icon.
- **Download** individual files by clicking the download icon.
**Linked Training Jobs:**
If the dataset is being used in any fine-tuning training jobs, they appear here with the job name, running time, and current status.
### Data Preview Tab
The Data Preview tab lets you inspect the actual content of your dataset files.
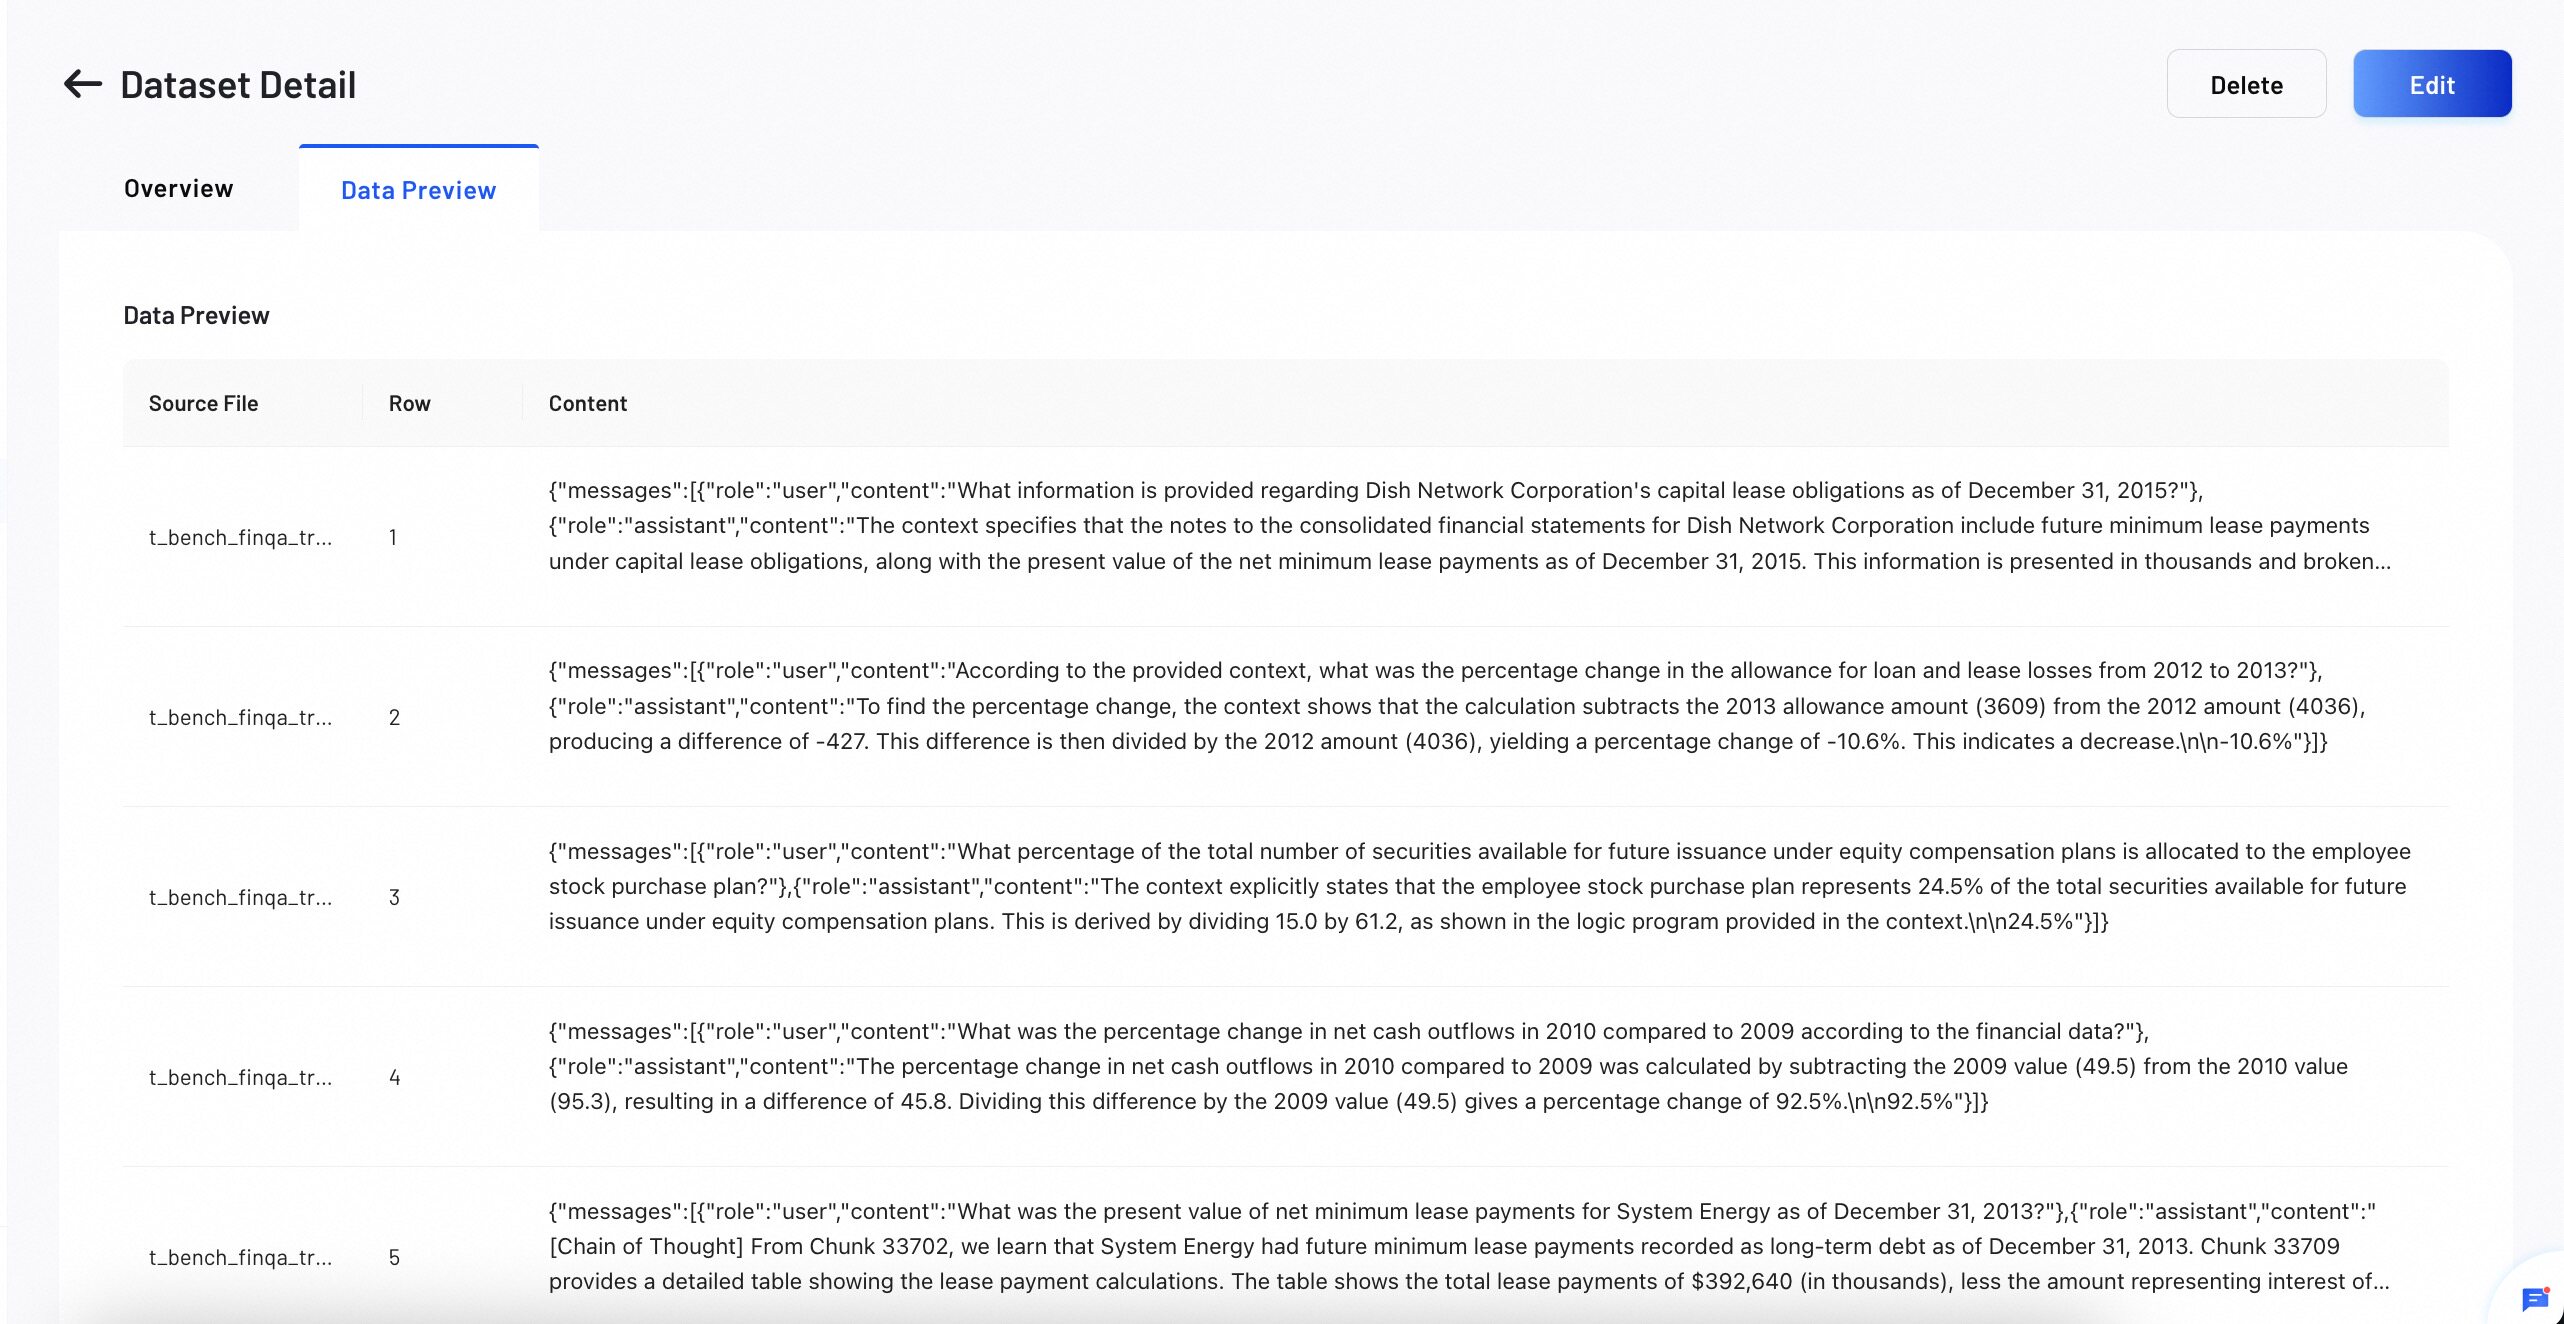
:::info[ Preview Support]
Data preview is available for JSONL-format datasets only. Other file formats display a "format not supported" notice.
:::
## Edit a Dataset
To edit an existing dataset:
1. In the **My Datasets** table, click the **Edit** icon in the Actions column.
2. The Create Dataset form opens pre-filled with the current configuration.
3. Modify the dataset name, type, training category, or upload new files as needed.
4. Click **Save & Update** to apply your changes.
## Delete a Dataset
To delete a dataset:
1. Click the **Delete** icon in the Actions column, or click **Delete** on the Dataset Detail page header.
2. A confirmation dialog appears: "Are you sure you want to delete this dataset?"
3. Click **Delete** to confirm.
If the dataset is currently linked to an active training job, the deletion fails with a message: "This dataset is in use and cannot be deleted."
## Next Steps
}
learnMoreLink="/docs/datasets/create-dataset"
>
Learn how to create a new dataset by uploading files or providing an OSS path.
}
learnMoreLink="/docs/datasets/ai-dataset-preparation"
>
Let AI automatically prepare, label, and optimize your datasets from raw data.
---
## Create Deployment
Select models from Model Gallery and create a deployment on your own cluster.
## Prerequisites
- At least one cluster shows **Activated** and its expected capacity appears in
[GPU Dashboard](../get-started/gpu-dashboard.md).
- The model is available in
[Model Gallery](../model-gallery/overview.md) or
[My Models](../my-models/overview.md).
- You understand the model's minimum GPU requirement.
## Step 1: Select a Model
Choose a model and configure the basic deployment settings.
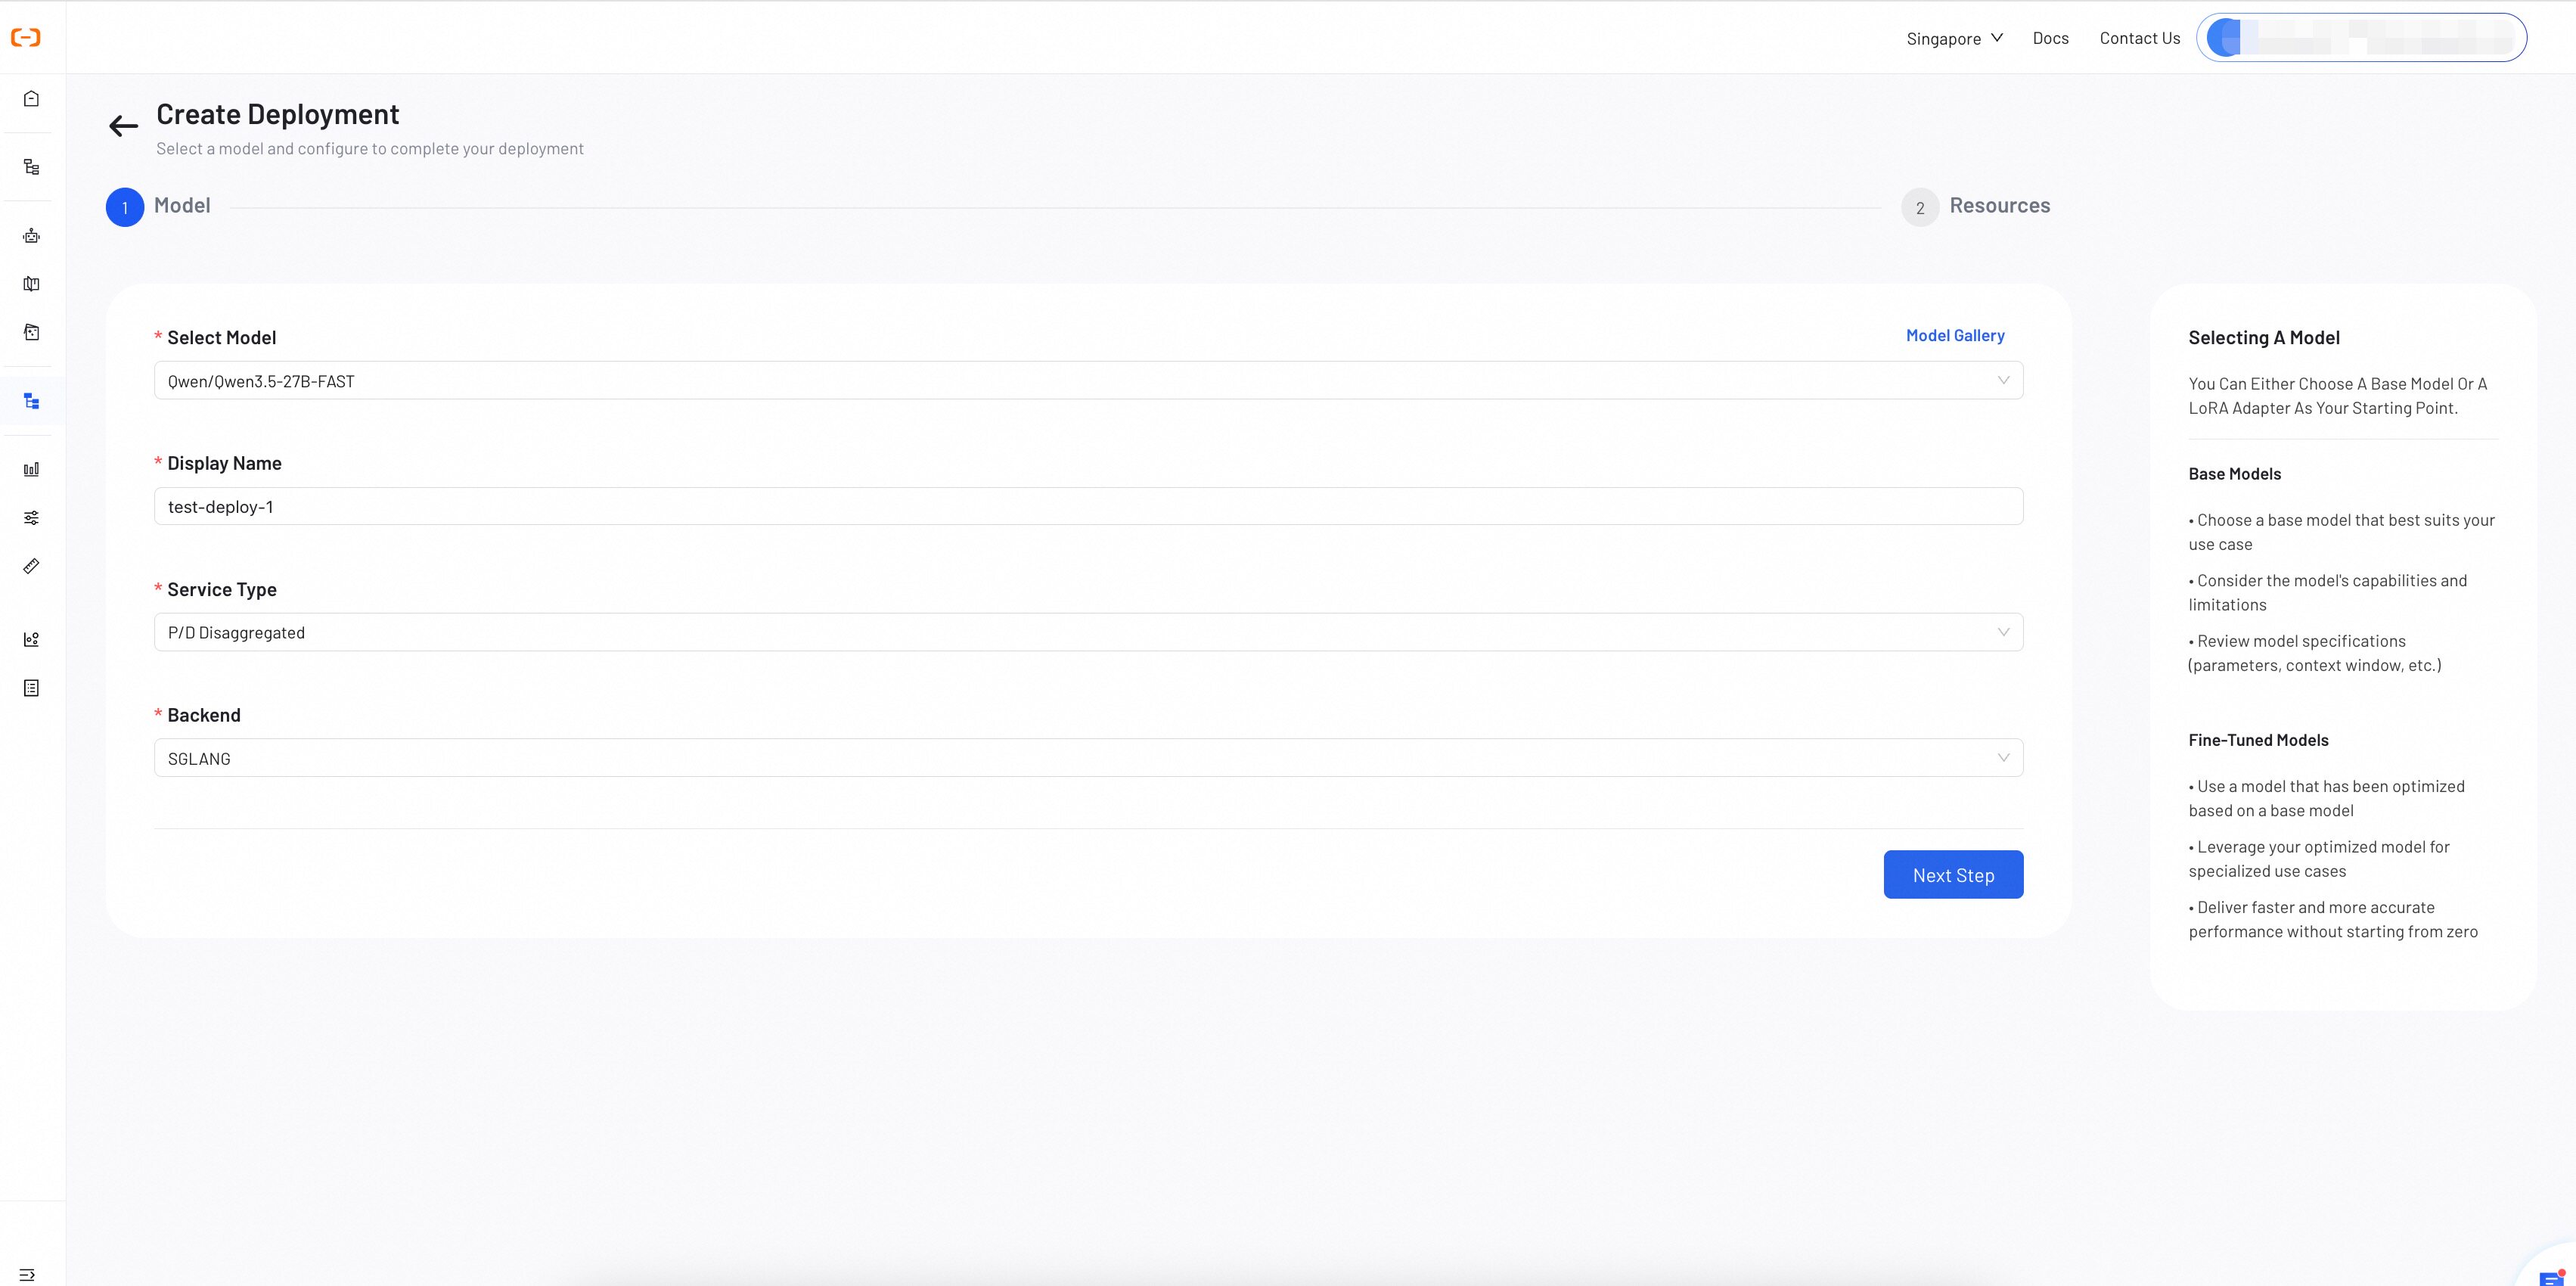
- **Select Model**: Choose a model from the dropdown list or browse the [Model Gallery](../model-gallery/overview.md). The selector can include platform, custom, and fine-tuned models available to your account.
- **Display Name**: A descriptive name to identify the deployment on the dashboard (within 64 characters).
- **Service Type**: Select the service topology for your deployment.
- **Standard**: All-in-one inference service, suitable for most use cases.
- **P/D Disaggregated**: Separates prefill and decode phases into independent services for optimized resource allocation.
- **Backend**: Select the inference backend engine.
- **SGLang**: High-performance inference engine with efficient memory management.
- **vLLM**: Open-source inference engine with PagedAttention for high throughput.
:::tip[When to use P/D Disaggregated?]
Recommended for high-concurrency, long-context workloads. For low-traffic or short-context use cases, Standard mode is simpler and more cost-effective.
:::
Click **Next Step** to proceed to resource configuration.
## Step 2: Configure Resources
Resource configuration depends on the **Service Type** selected in Step 1.
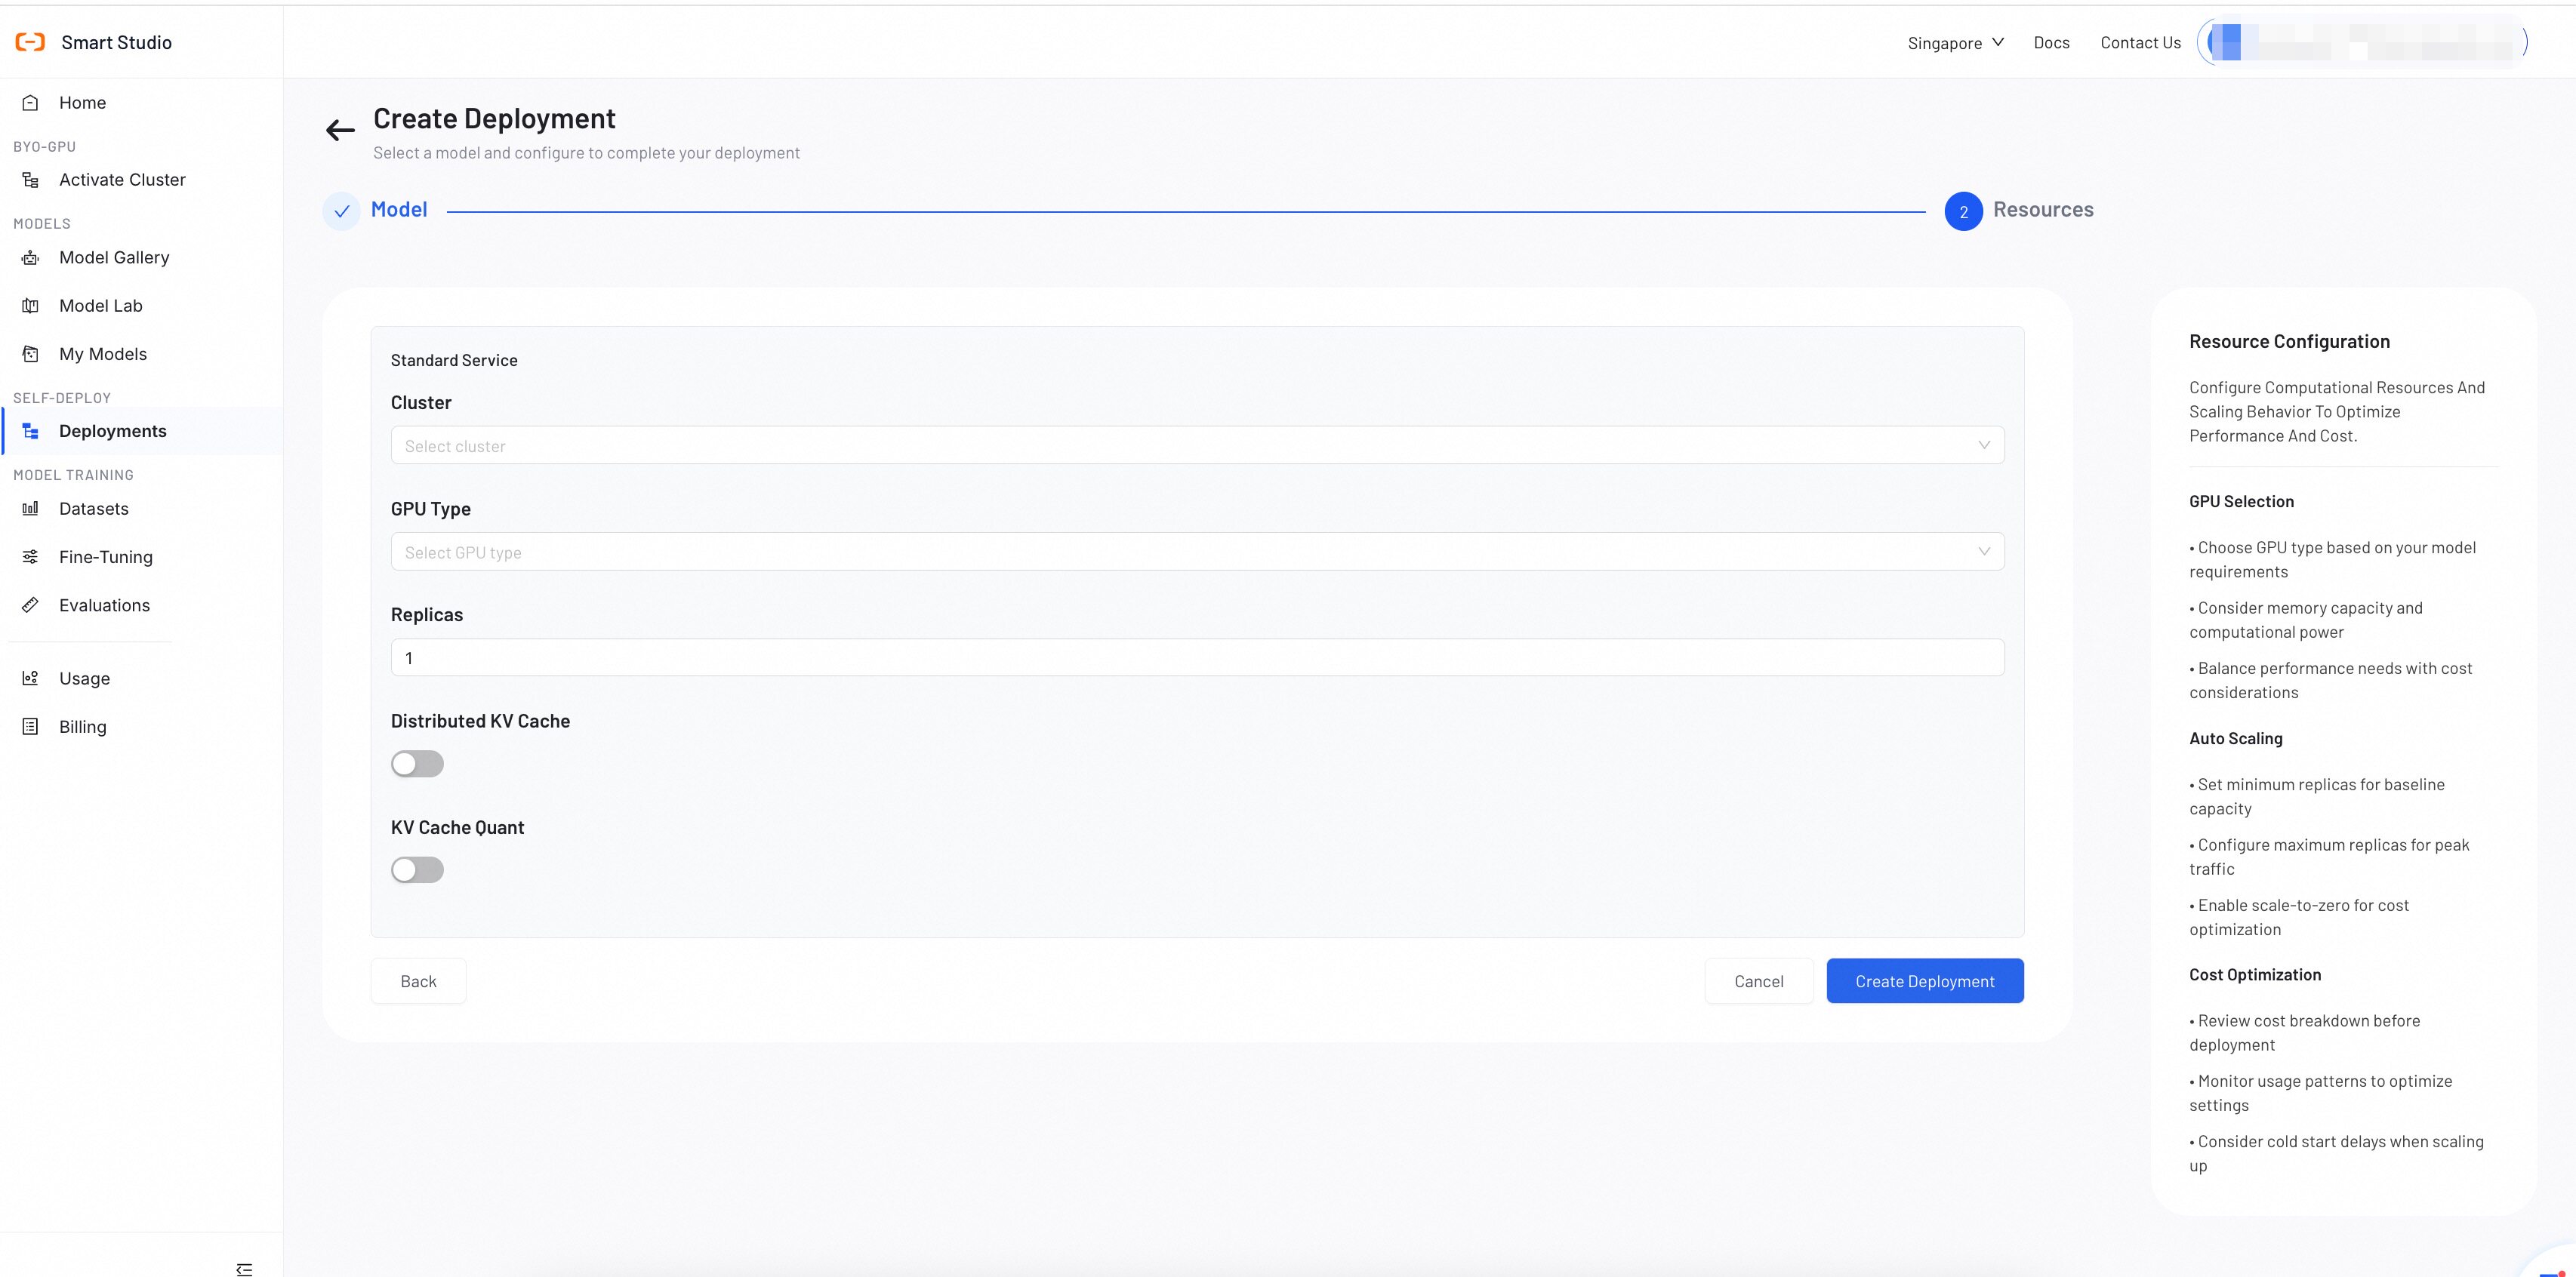
### Standard Service
Configure a unified inference service on a single cluster.
- **Cluster**: Select an activated cluster for deployment.
- **GPU Type**: Select a GPU type available in your cluster. See [Minimum Configuration for Different Model Deployments](../get-started/byo-gpu-requirement.md#minimum-configuration-for-different-model-deployments) for requirements.
- **Replicas**: Number of service replicas for load balancing. Default is 1.
- **Distributed KV Cache**: (Optional) Enable to share KV cache across instances.
- **KV Cache Quant**: (Optional) Enable KV cache quantization to reduce memory usage.
### P/D Disaggregated Service
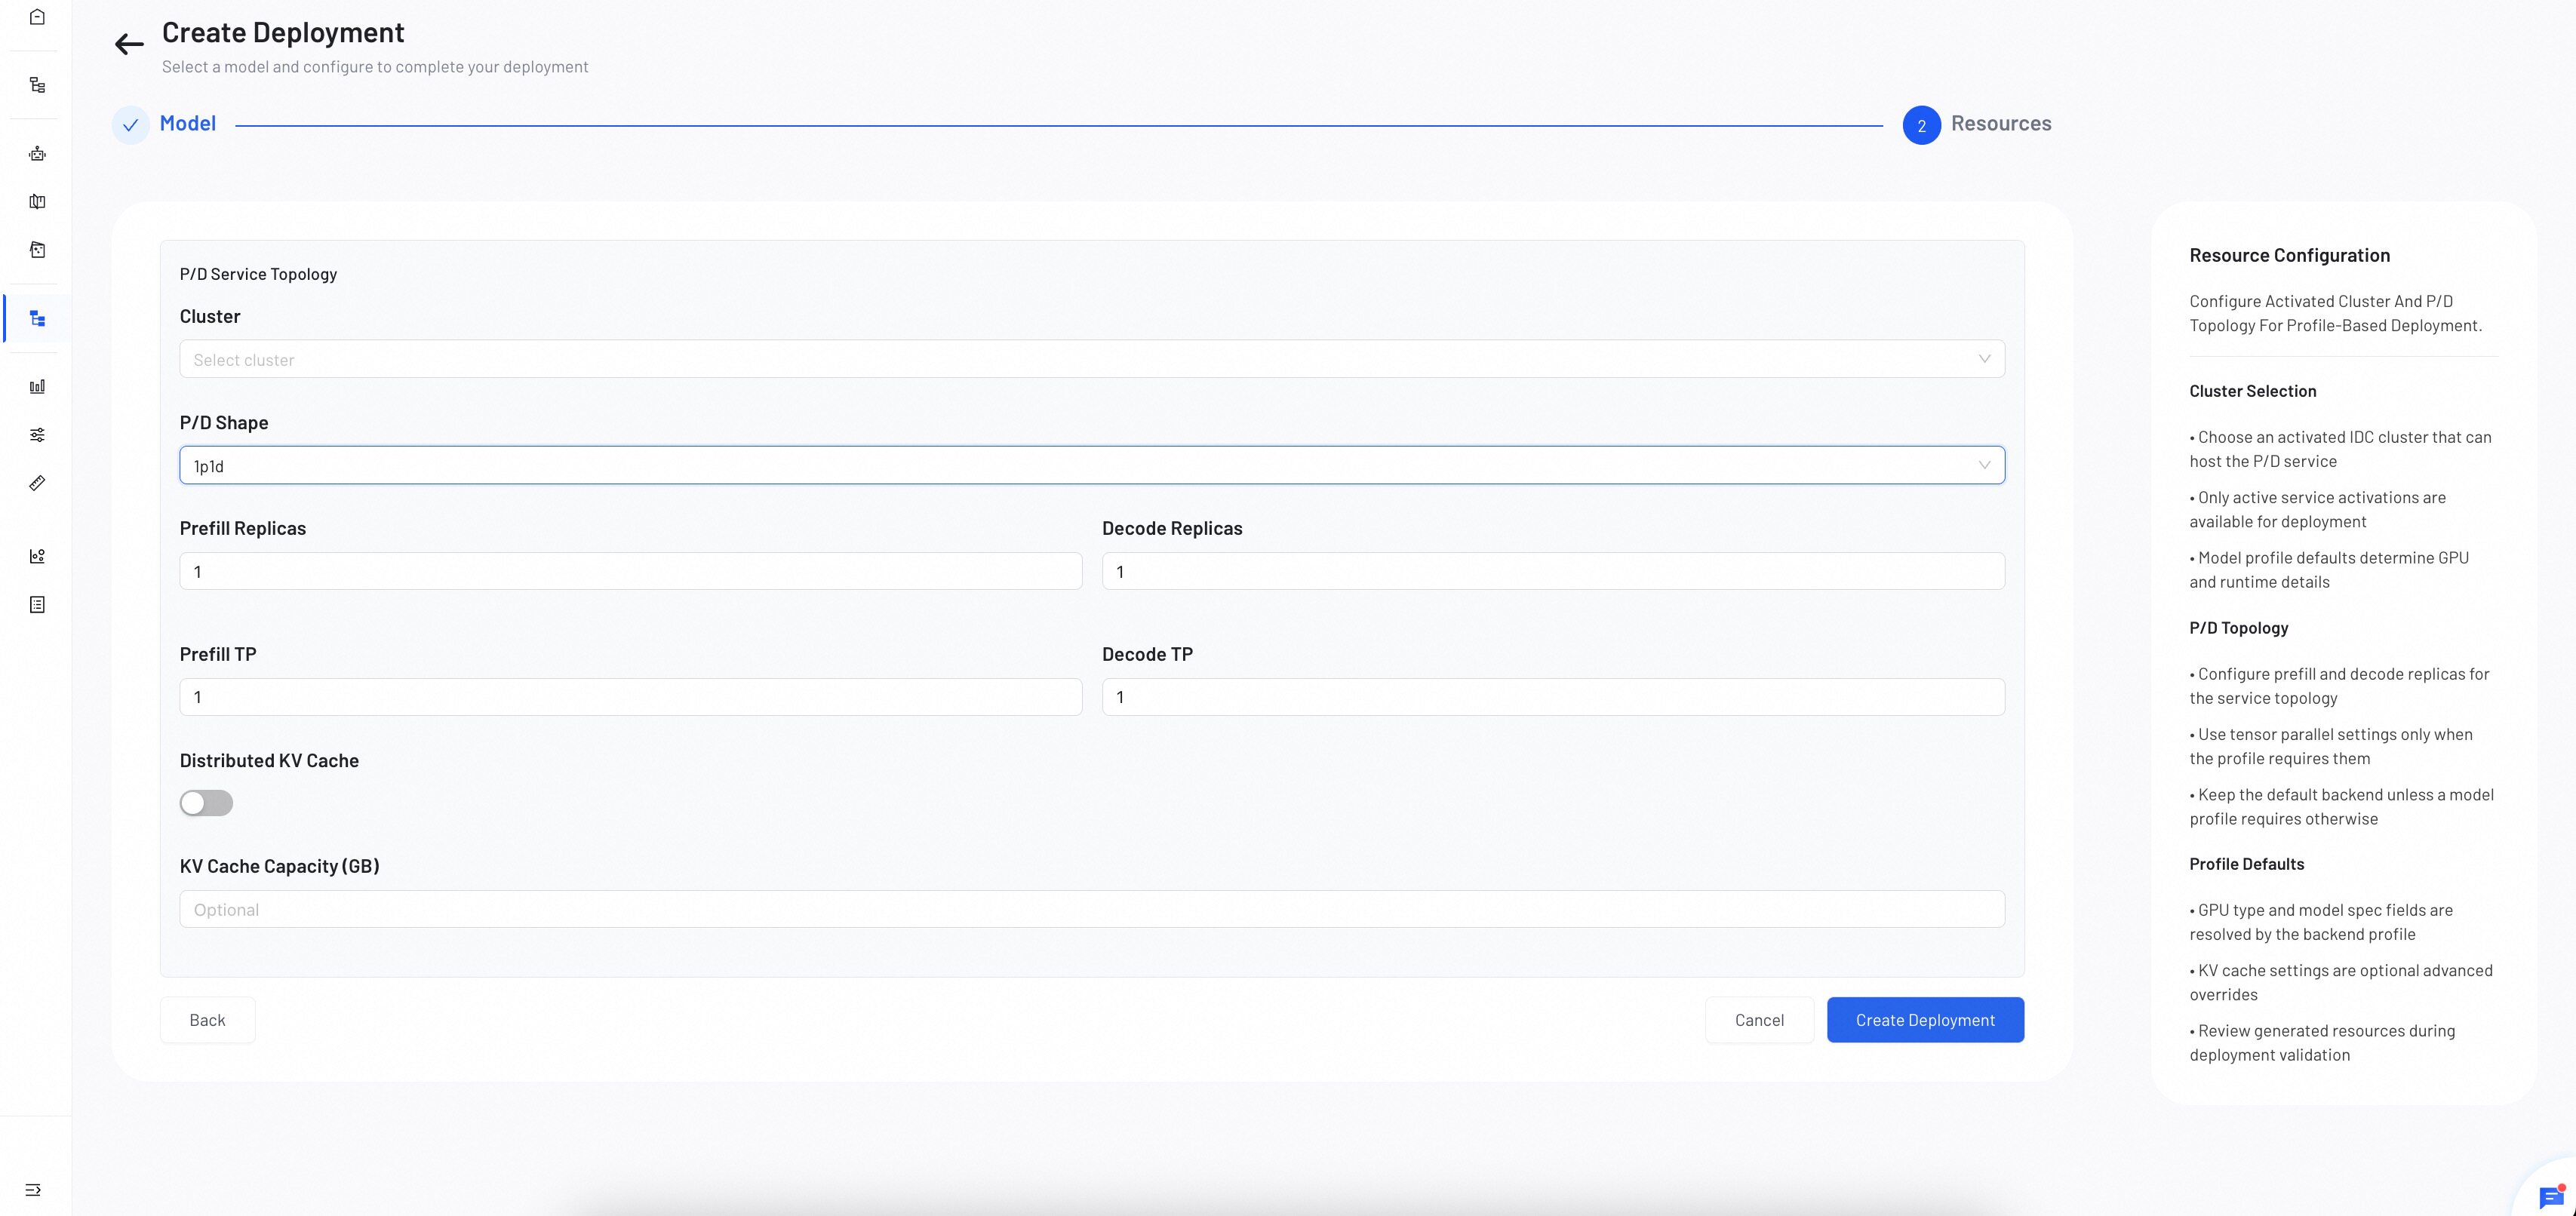
Configure separate prefill and decode services for optimized resource allocation.
- **Cluster**: Select an activated cluster for deployment.
- **P/D Shape**: Define the ratio of prefill and decode instances (e.g. `1p1d` = 1 Prefill + 1 Decode).
- **Prefill Replicas / Decode Replicas**: Number of replicas for each service. Default is 1.
- **Prefill TP / Decode TP**: Tensor parallelism degree for each service. Only adjust when the model profile requires it. Default is 1.
- **Distributed KV Cache**: (Optional) Enable to share KV cache across instances.
- **KV Cache Capacity (GB)**: (Optional) Specify the capacity in GB, or leave empty to use the profile default.
Click **Create Deployment** to submit your configuration.
:::tip[When to enable Distributed KV Cache?]
Shares cached key-value states across instances to reduce redundant computation. Enable when multiple replicas serve overlapping context (e.g. shared system prompts). Leave disabled if requests rarely share context or GPU memory is constrained.
:::
## Verify the Deployment
After submission, Smart Studio returns to the Deployments list.
1. Confirm the new deployment appears with the expected model and display name.
2. Wait while the state progresses through resource preparation and deployment.
3. When the deployment reaches **Ready**, open its details and confirm the
selected cluster, topology, and resource configuration.
4. Return to GPU Dashboard and confirm the service appears under **Model
Serving**.
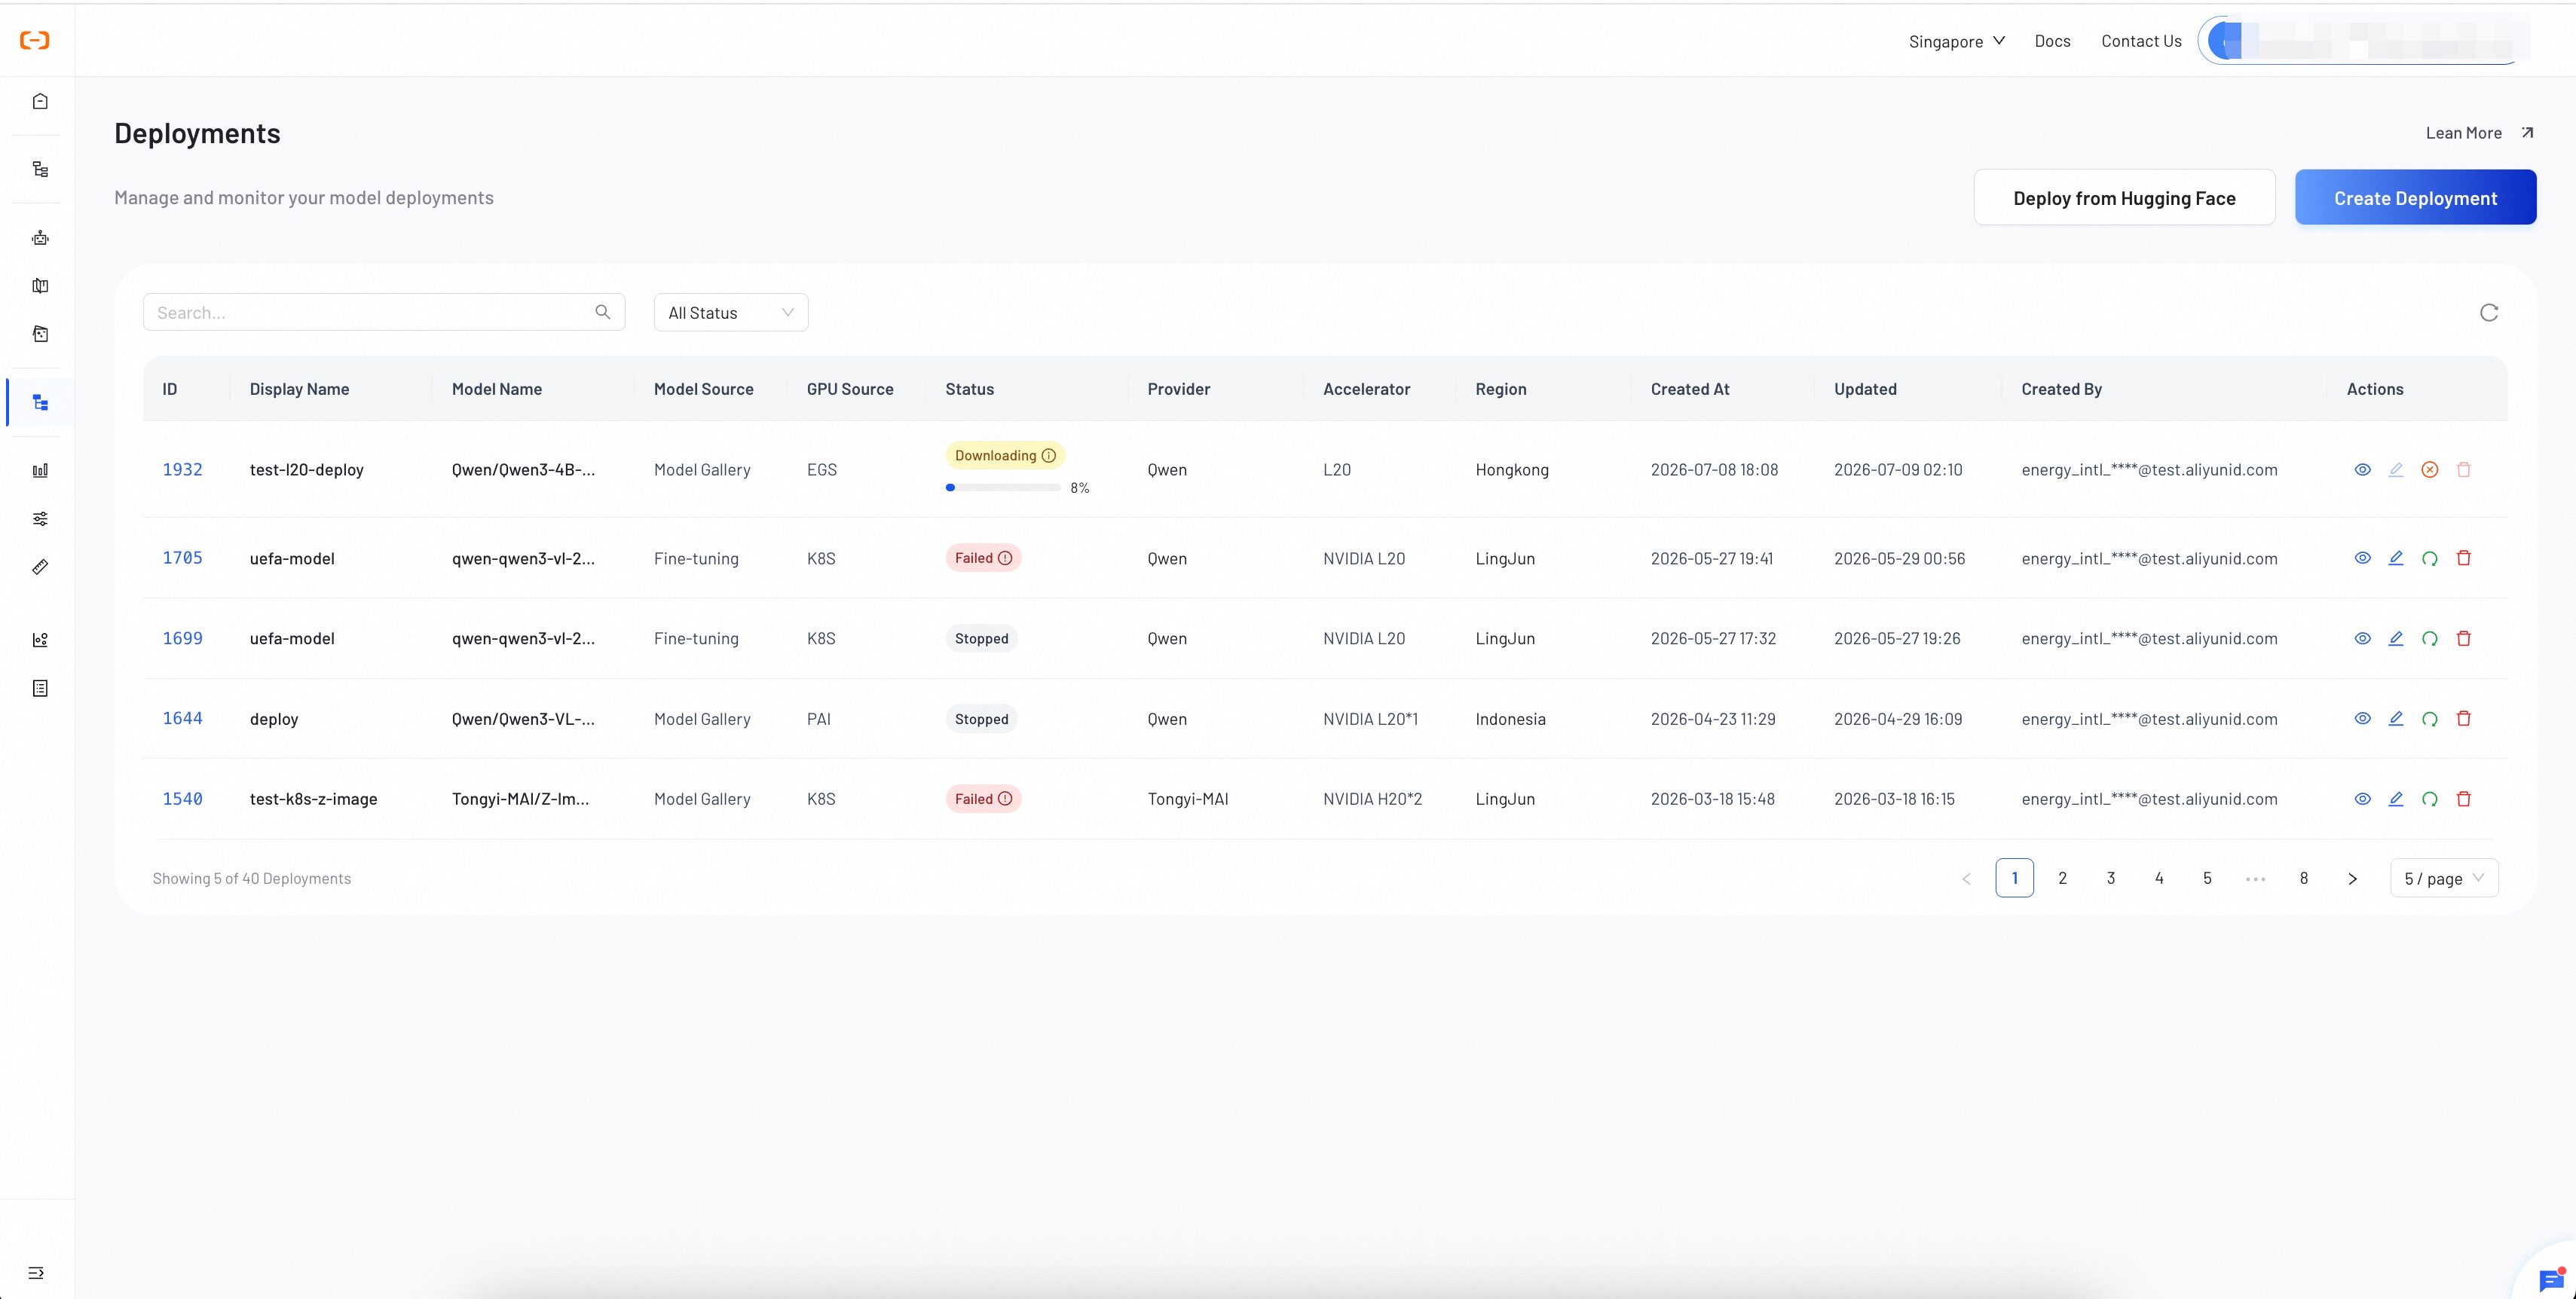
If the deployment becomes **Failed**, inspect its error message and use
[Manage Deployments](./manage-deployments.md) to decide whether to restart it
or correct the configuration.
## Troubleshooting
### No cluster is available
Return to [Activate Cluster](../get-started/self-service-activation.mdx) and
confirm that an activation shows **Activated**. Then check GPU Dashboard for
the expected capacity.
### The selected GPU type is unavailable
Compare the model requirement with the GPU types reported by GPU Dashboard.
Choose a compatible activated cluster or revise the deployment plan.
### The deployment reaches Failed
Open the status error in Deployments. Correct the model or resource
configuration when the error identifies a configuration problem; otherwise
use the supported restart action described in
[Manage Deployments](./manage-deployments.md).
## Next Steps
}
learnMoreLink="/docs/get-started/gpu-dashboard"
>
Inspect the nodes and serving workload created by this deployment.
}
learnMoreLink="/docs/deployments/manage-deployments"
>
Review status and perform supported lifecycle actions.
}
learnMoreLink="/docs/usage-billing/usage&costs"
>
Track resource consumption for self-deployed workloads.
---
## Manage Deployments
View, monitor, and manage all your model deployments from the Deployments dashboard. This page provides centralized control over deployment lifecycle operations including stopping, restarting, editing, and deleting deployments.
## Before You Begin
- Open **Self-Deploy → Deployments** in the same account and region used to
create the service.
- Check the current status before choosing a lifecycle action.
- Treat stop and delete operations as disruptive.
## Deployment List
The deployment list displays all your deployments in a table with filtering, searching, and quick actions.

### Search and Filter
You can narrow down the deployment list using:
- **Keyword Search** — Type a keyword in the search bar and press Enter or click the search icon to filter by deployment name, model name, or ID.
- **Status Filter** — Use the status dropdown to filter by a specific status: Downloading, Deploying, Ready, Failed, Stopping, or Stopped. Select **All Status** to clear the filter.
- **Refresh** — Click the refresh icon to reload the list with the latest data.
## Status Reference
Each deployment transitions through the following statuses during its lifecycle:
| Status | Description |
|--------|-------------|
| **Downloading** | The system is downloading model files from the source repository. |
| **Deploying** | The system is provisioning GPU resources, starting the container, and running the deployment command. |
| **Ready** | The deployment is online and its serving workload is available. |
| **Failed** | The deployment encountered an error and could not start. Hover over the status badge to see the error message. |
| **Stopping** | The service is shutting down and releasing GPU resources. |
| **Stopped** | The service is offline and not consuming any GPU resources. |
:::info[ Failed Deployments]
When a deployment is in **Failed** status, an error icon appears next to the status badge. Hover over it to view the specific error message. Common causes include insufficient GPU resources, model download failures, or configuration errors.
:::
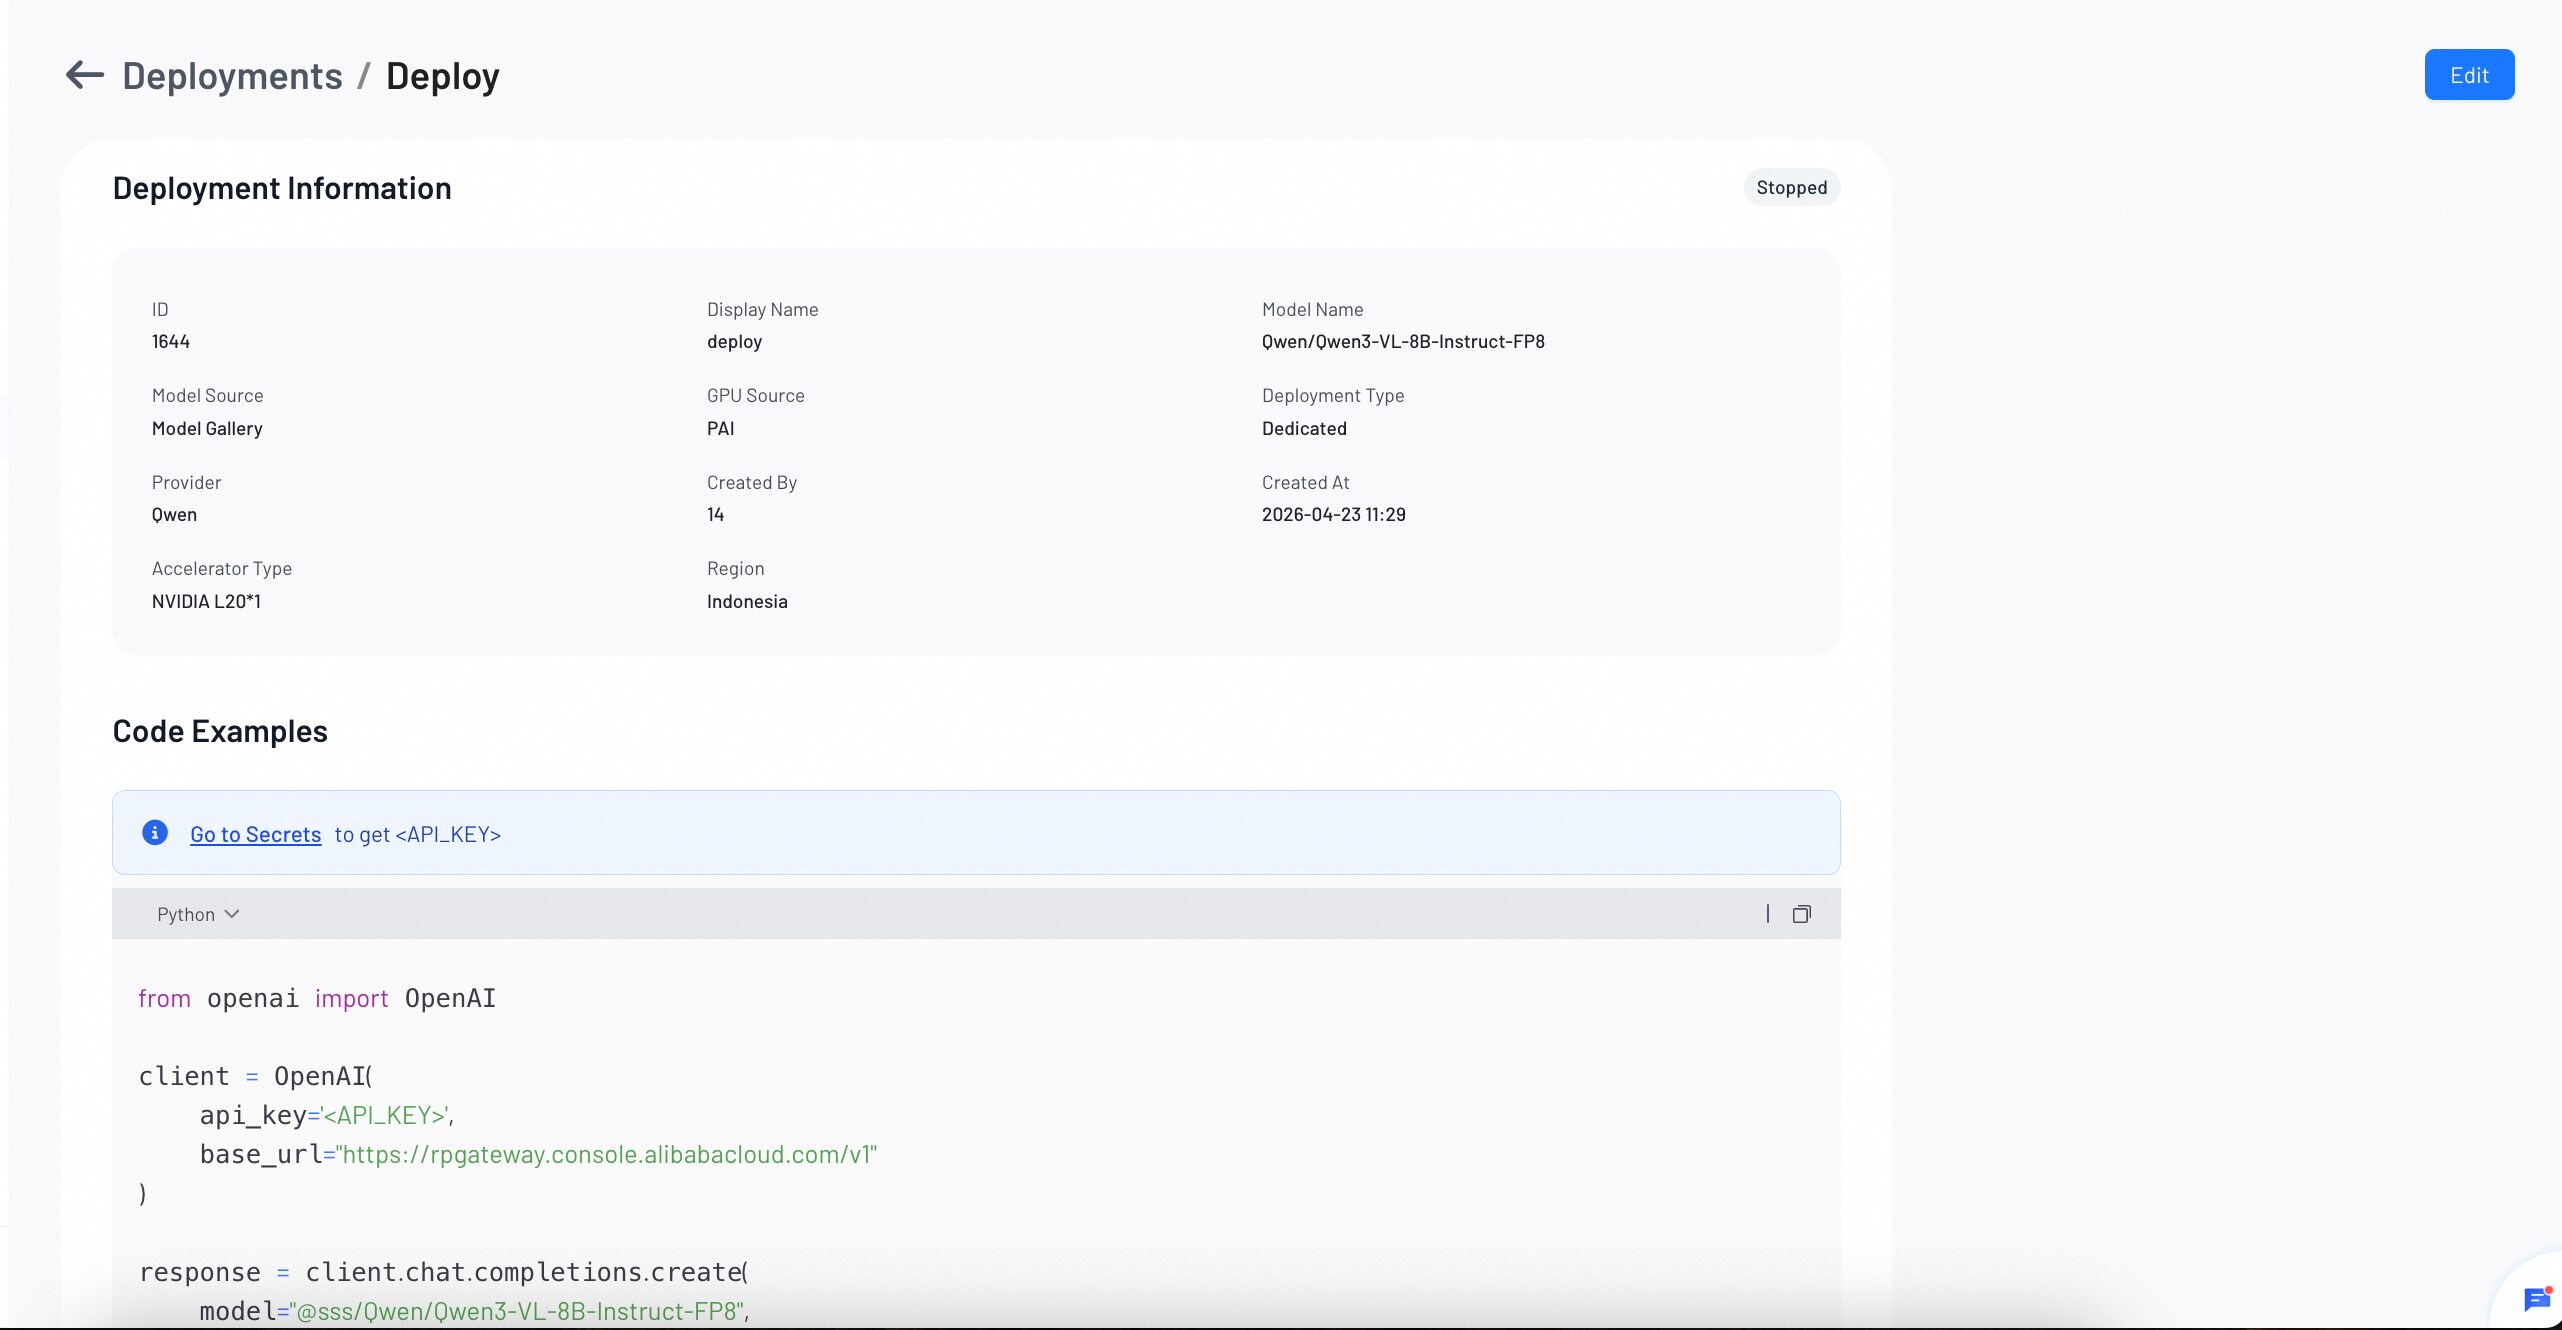
## View Deployment Details
Click the **eye icon** in the Actions column to open the deployment detail page.
### Edit Deployment
Click the **edit icon** in the Actions column to modify a deployment. Editing is only available when the deployment is in **Ready**, **Failed**, or **Stopped** status.
:::info[ Edit Scope]
Currently, only the Display Name can be modified after deployment. To change GPU type, replicas, or other resource settings, you need to delete and recreate the deployment.
:::
### Stop a Deployment
Click the **pause icon** in the Actions column to stop a running deployment. Stopping is available when the deployment is in **Ready** or **Deploying** status.
When you stop a deployment:
- The status transitions to **Stopping**, then to **Stopped**.
- All GPU resources are released and billing stops.
- The deployment configuration is preserved and can be restarted later.
### Restart a Deployment
Click the **restart icon** in the Actions column to restart a stopped or failed deployment. The system re-provisions GPU resources and starts the deployment process.
### Delete a Deployment
Click the **delete icon** in the Actions column to permanently remove a deployment. Deleting is only available when the deployment is in **Failed** or **Stopped** status.
:::info[ Delete Restrictions]
You cannot delete a deployment that is currently in **Ready**, **Deploying**, **Downloading**, or **Stopping** status. Stop the deployment first before deleting.
:::
## Verify a Lifecycle Action
After an action, refresh the deployment list and wait for its terminal status:
| Action | Expected result |
| --- | --- |
| Stop | The status progresses through **Stopping** to **Stopped**. |
| Restart | The service progresses through deployment states to **Ready**, or reports **Failed** with an error. |
| Edit | The deployment details show the updated display name. |
| Delete | The stopped or failed deployment no longer appears in the list. |
## Troubleshooting
### An action is unavailable
Compare the current status with the restrictions in this guide. Wait for an
in-progress transition to finish, or stop a running deployment before
deleting it.
### A restart reaches Failed
Open the error shown beside the status. Confirm the model still exists and the
activated cluster has enough GPU capacity. Return to
[Create Deployment](./create-deployment.md) when the resource configuration
must change.
## Next Steps
}
learnMoreLink="/docs/deployments/create-deployment"
>
Learn how to deploy models from the Model Gallery or your own custom models.
}
learnMoreLink="/docs/get-started/gpu-dashboard"
>
Inspect the GPU nodes and serving workload behind a deployment.
}
learnMoreLink="/docs/usage-billing/usage&costs"
>
Review consumption across self-deployed workloads.
---
## AI Auto Evaluation
AI Auto Evaluation tests your model using custom datasets, with LLM-as-Judge scoring and customizable metrics. Ideal for real-world or domain-specific testing.
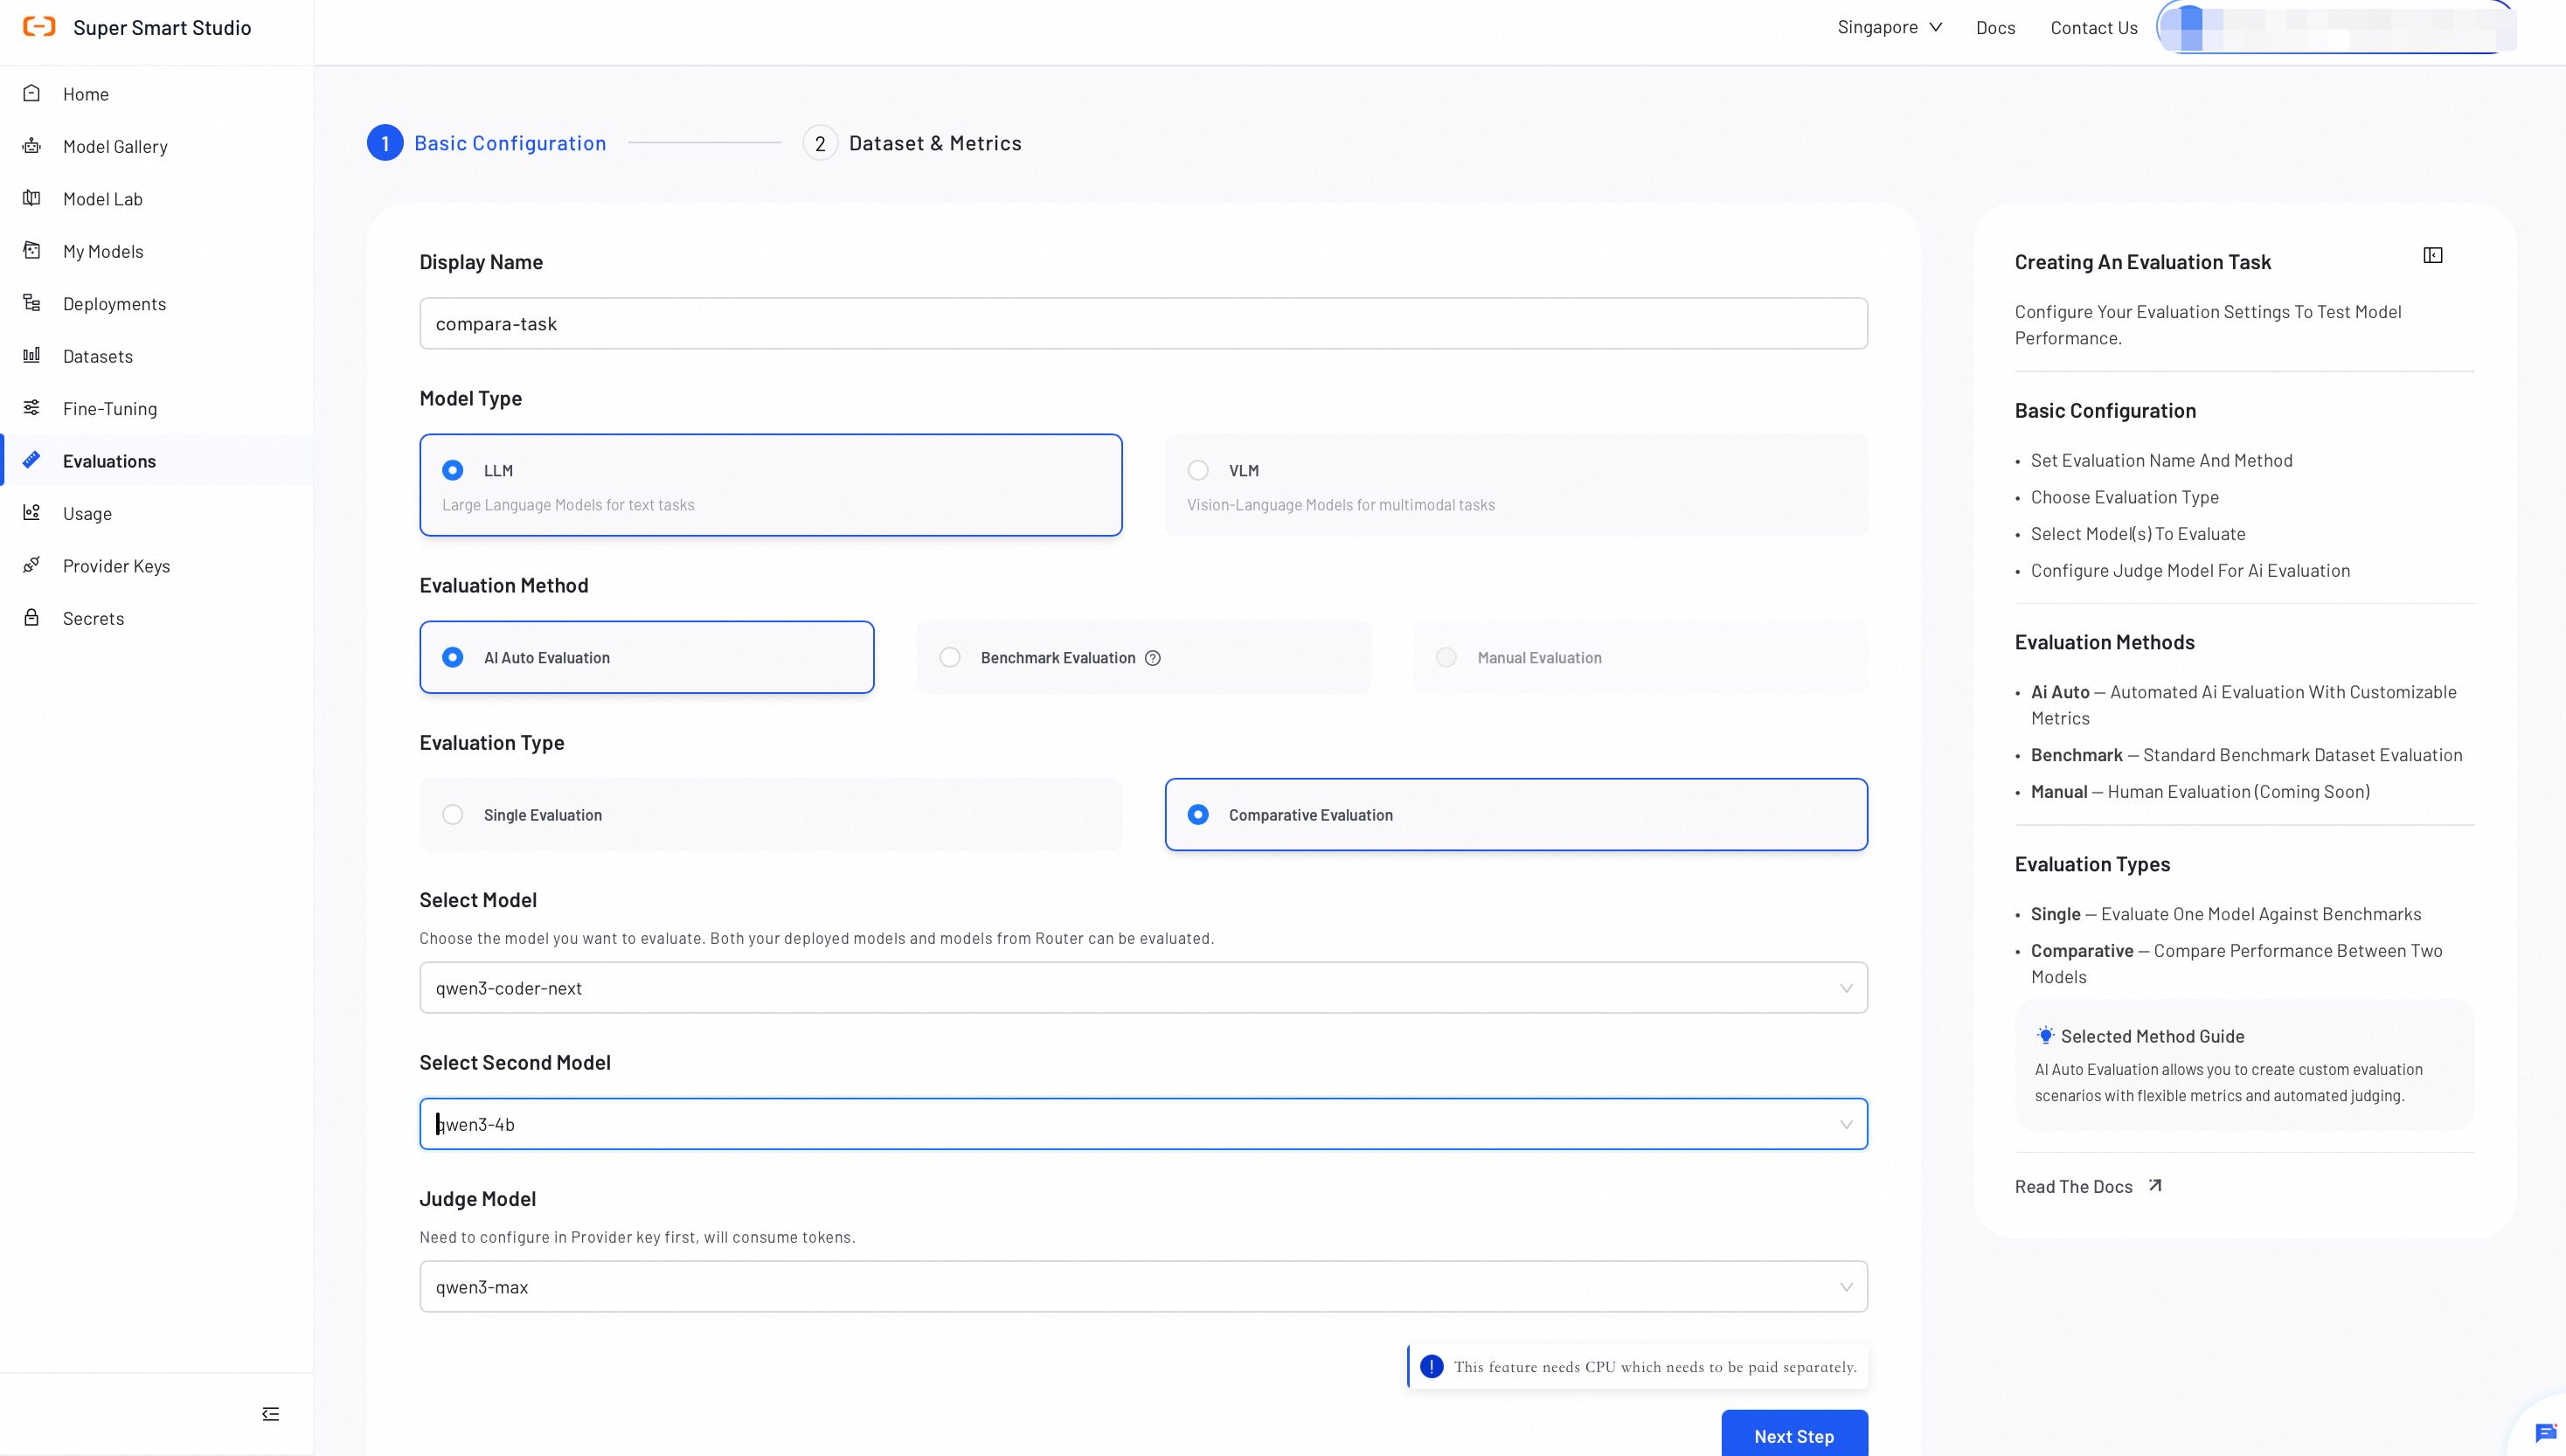
## Step 1: Configure Basic Settings
Configure the evaluation type, model(s), and judge model for your evaluation.
- **Display Name**: Enter a name for this evaluation task.
- **Evaluation Method**: Choose how to evaluate your model.
- **Evaluation Type**: Select **Single** or **Comparative**.
- **Model**: Select an available model from your current workspace.
- **Judge Model (LLM-as-Judge)**: Select a judge model to compare the model’s predicted answers against the ground truth answers.
> **Tip**: For Comparative Evaluation, select two models to evaluate side by side.
:::info[Token Consumption]
The evaluated model and Judge Model can consume a large number of tokens.
Confirm that both models are available and that your account has **sufficient
balance** before proceeding.
:::
## Step 2: Configure Datasets & Metrics
Upload an evaluation dataset and define the metrics for evaluating model performance.
#### 1. Dataset Setup
Upload the dataset you want to use for evaluation:
- **Use OSS**: Provide the OSS path to your JSONL dataset.
- **Select Existing Dataset**: Choose an existing dataset from the console.
- **Create Dataset**: Create a new evaluation dataset. For best results, use the [AI Data Prep Tool](http://daily-rp-console.aliyun.test/xt-console/datasets/preparation) to prepare your evaluation data.
:::info[Dataset Format]
All datasets must be in JSONL format. For detailed format requirements and examples, refer to the [Dataset Format Requirements](#dataset-format) guide below.
:::
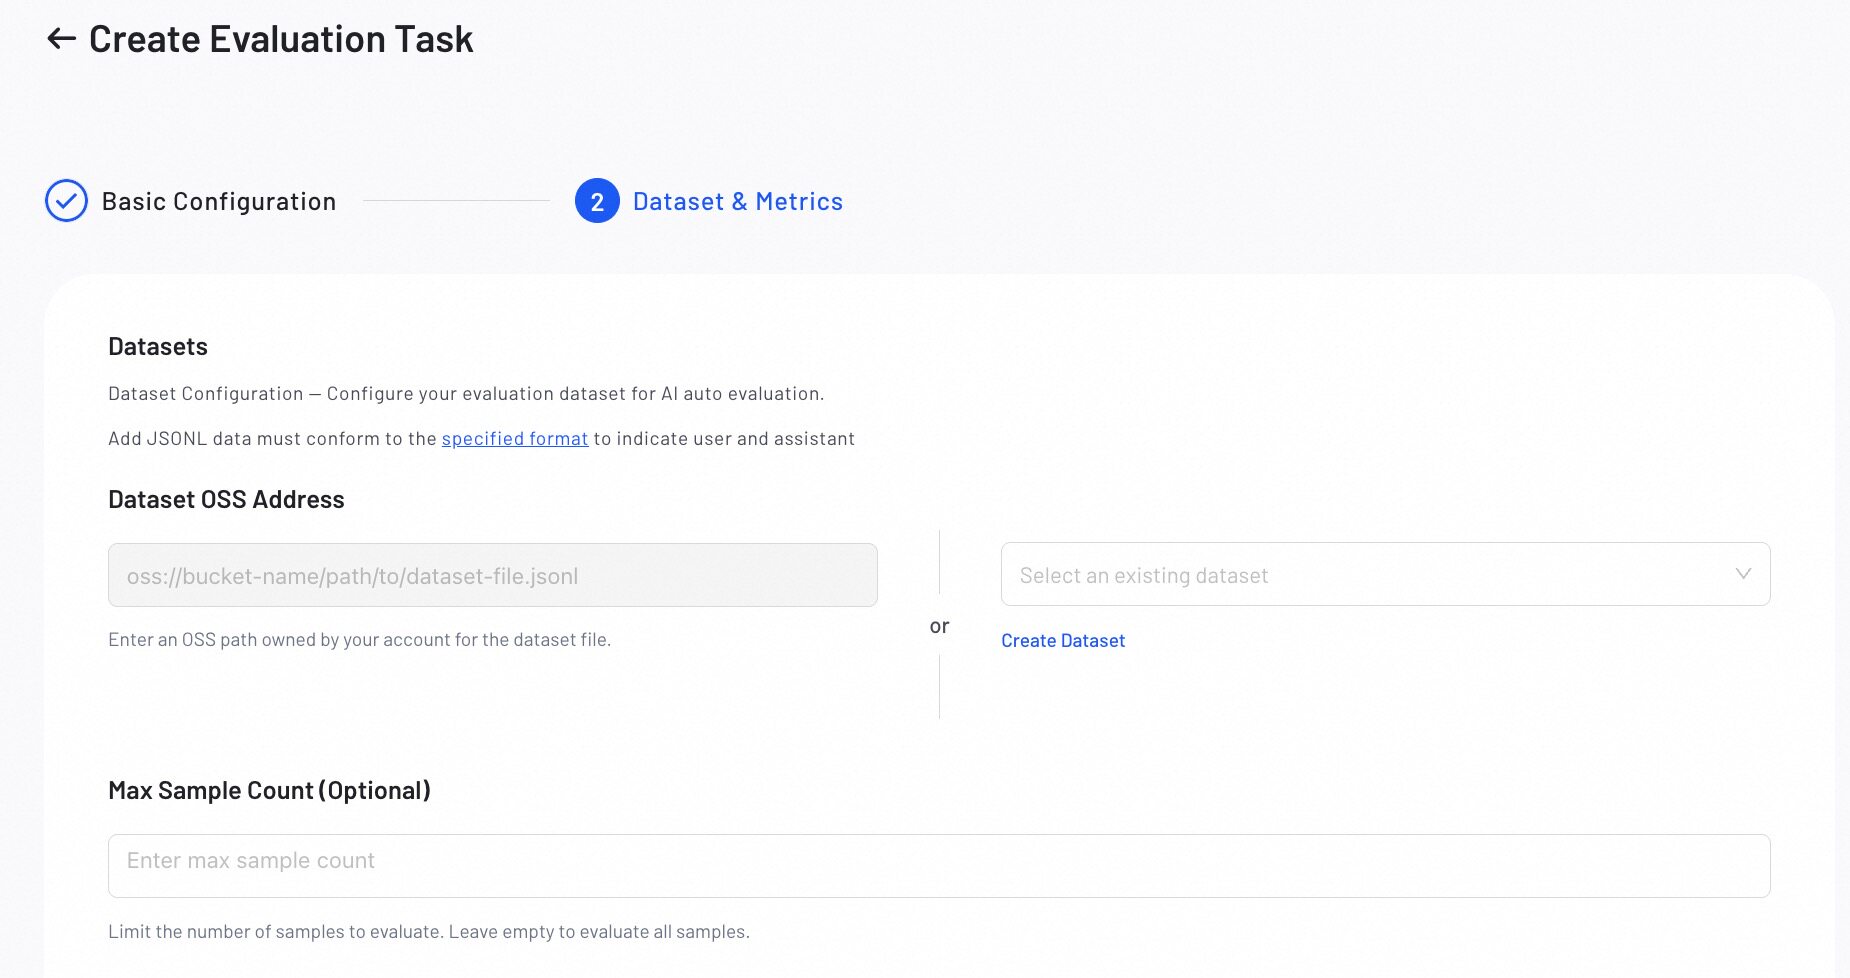
- **MAX-Sample Count (Optional)**: Set the maximum number of samples to evaluate, leave empty to evaluate all samples.
#### 2. Metrics Configuration
Define the evaluation scene and select the metrics for evaluating model performance.
1. Select a **Scene** best suits your evaluation needs:
| Scene | Description |
|---|---|
| Definitive Questions | Evaluates responses to questions that have standard, verifiable answers. |
| Open-ended QA | Evaluates responses to questions that do not have a single correct answer, such as creative or subjective tasks. |
**Scene Description**: Review and edit the scene description to provide more specific context for the evaluation task.
2. Configure metrics for your selected scene:
- **Predefined Metrics**: Select predefined metrics to evaluate the model.
- **Custom Metrics**: Create custom metrics to meet specific needs (e.g, Instruction Following, Safety).
- **Weight Distribution**: Assign a weight to each metric.
:::info[ Evaluation Criteria Preview]
Preview the system prompt and user prompt template to understand how your model will be evaluated before execution.
:::

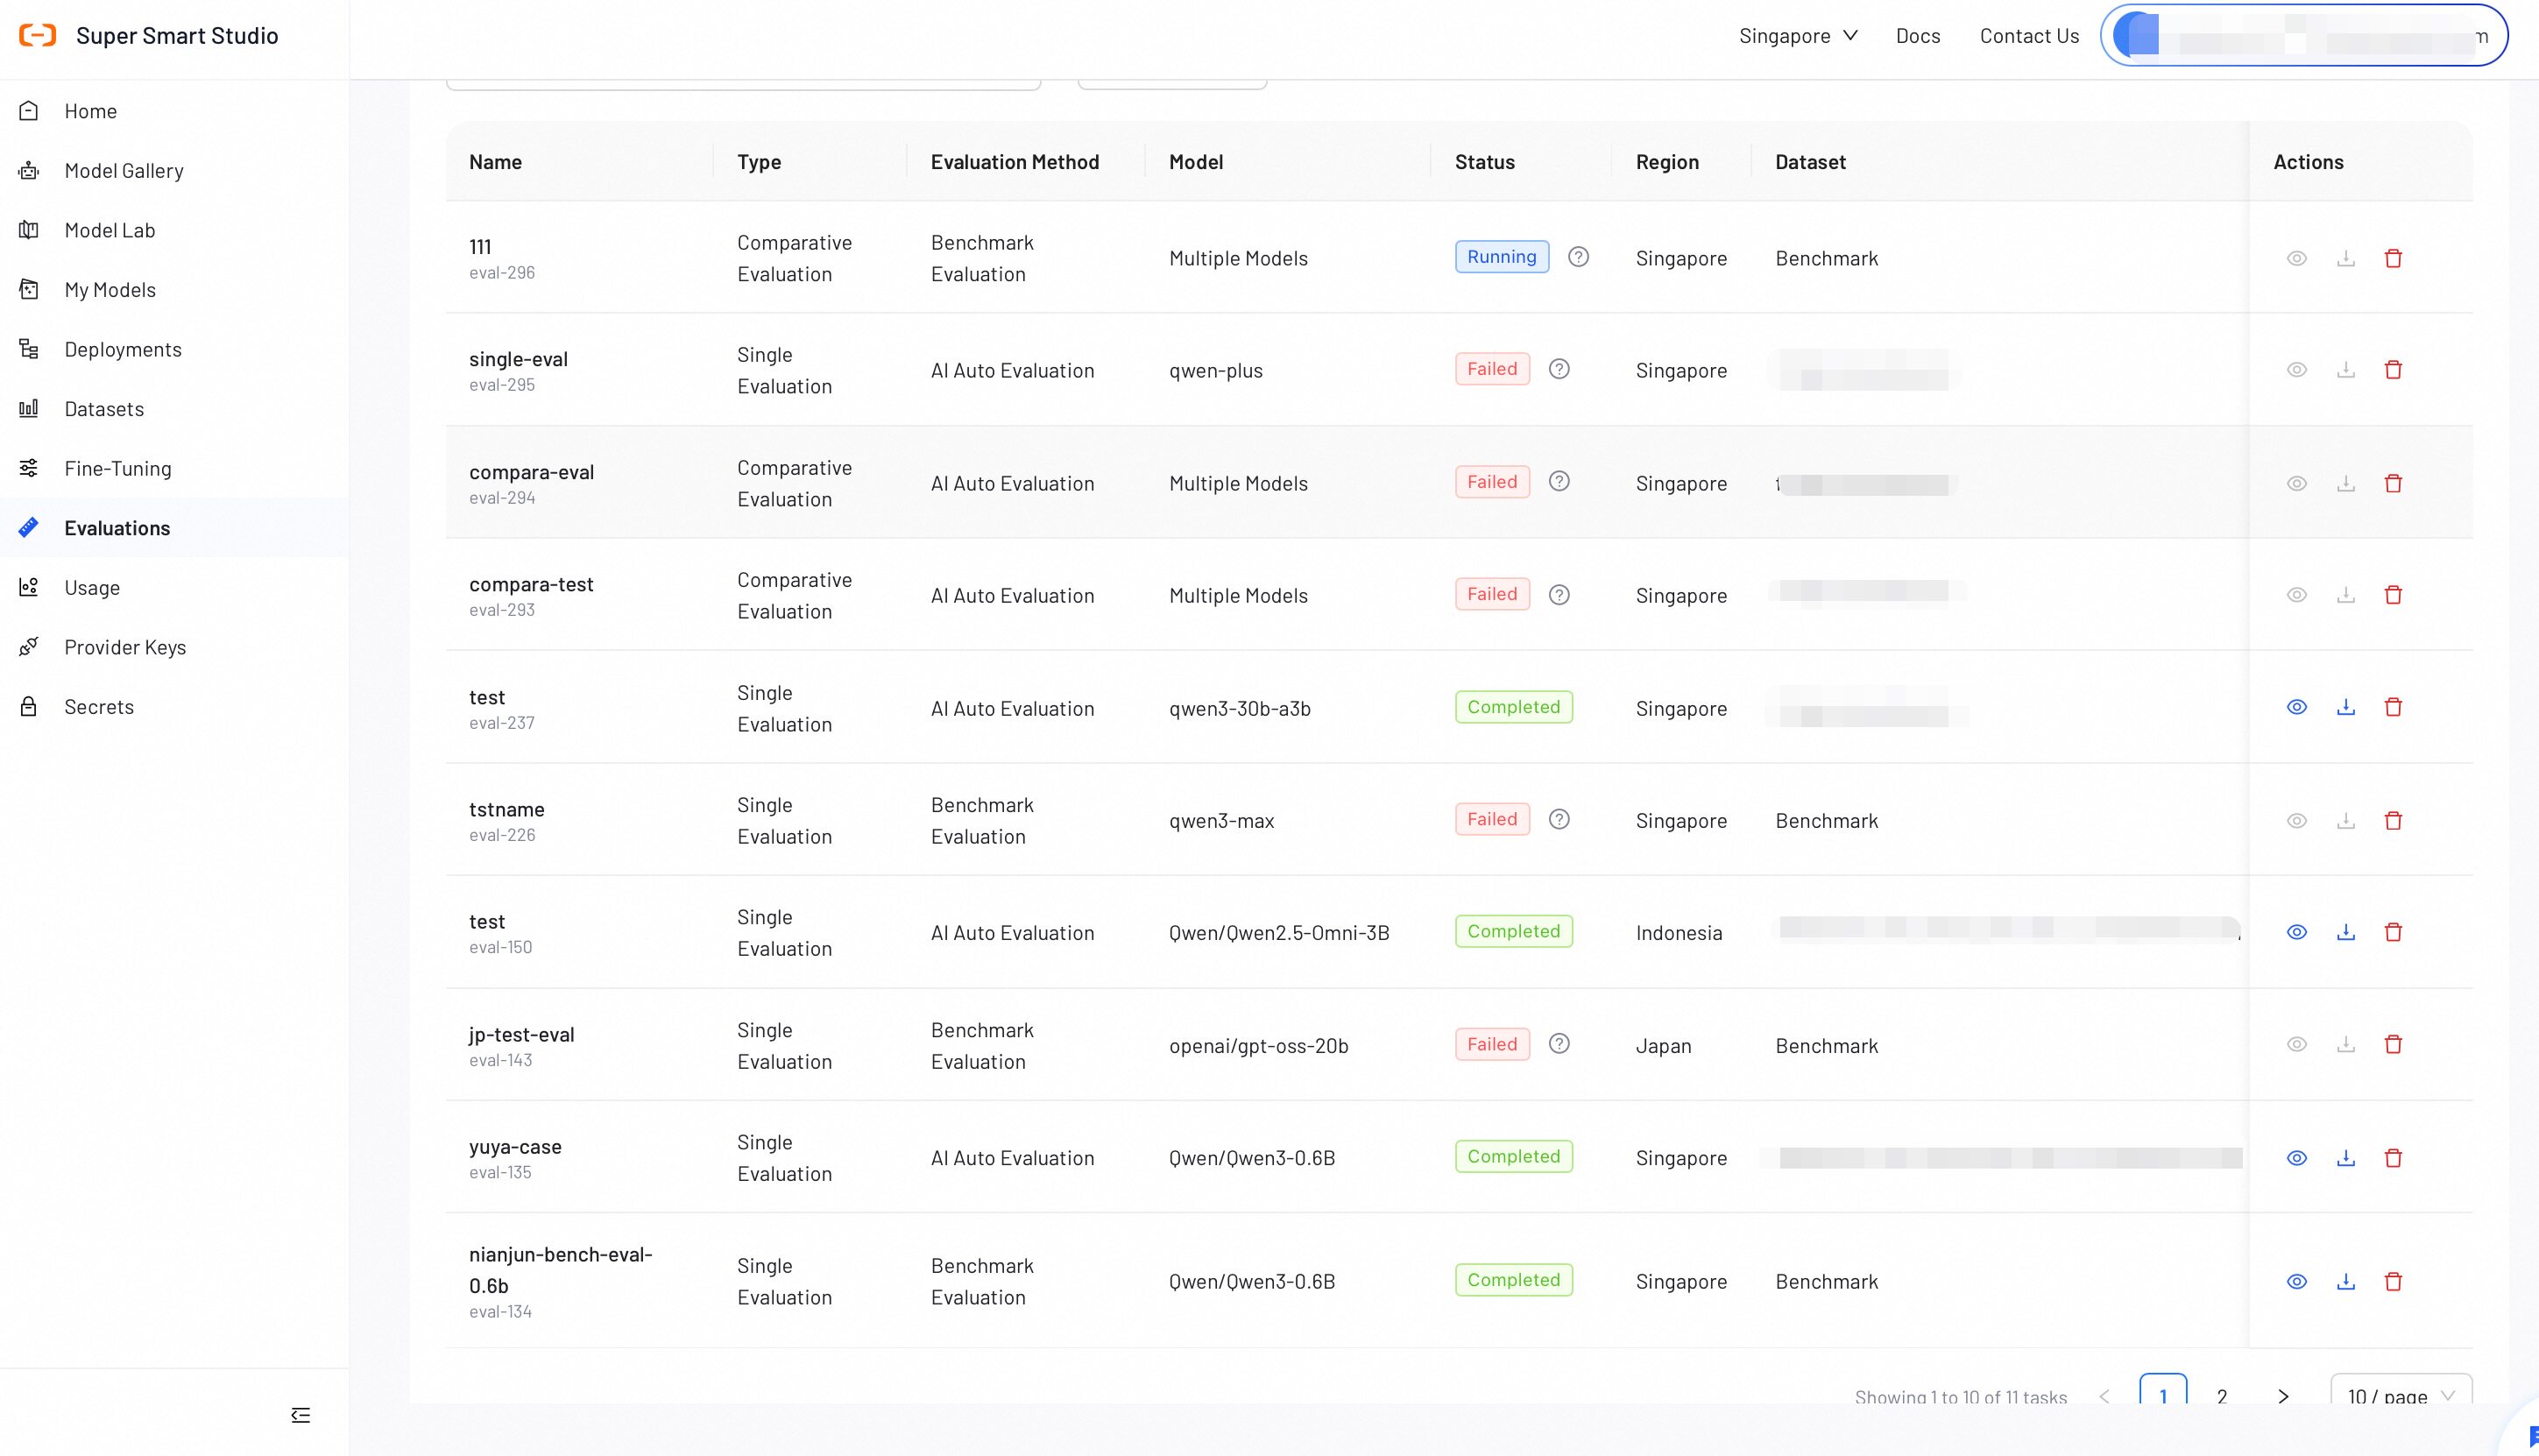
Verify all configurations, then click **Start Evaluation**. The evaluation progress will display in the list.
## Step 3: View Evaluation Report
After an AI Auto evaluation job completes, review the detailed report to analyze model performance. The report layout adapts for **Single** or **Comparative** evaluations.
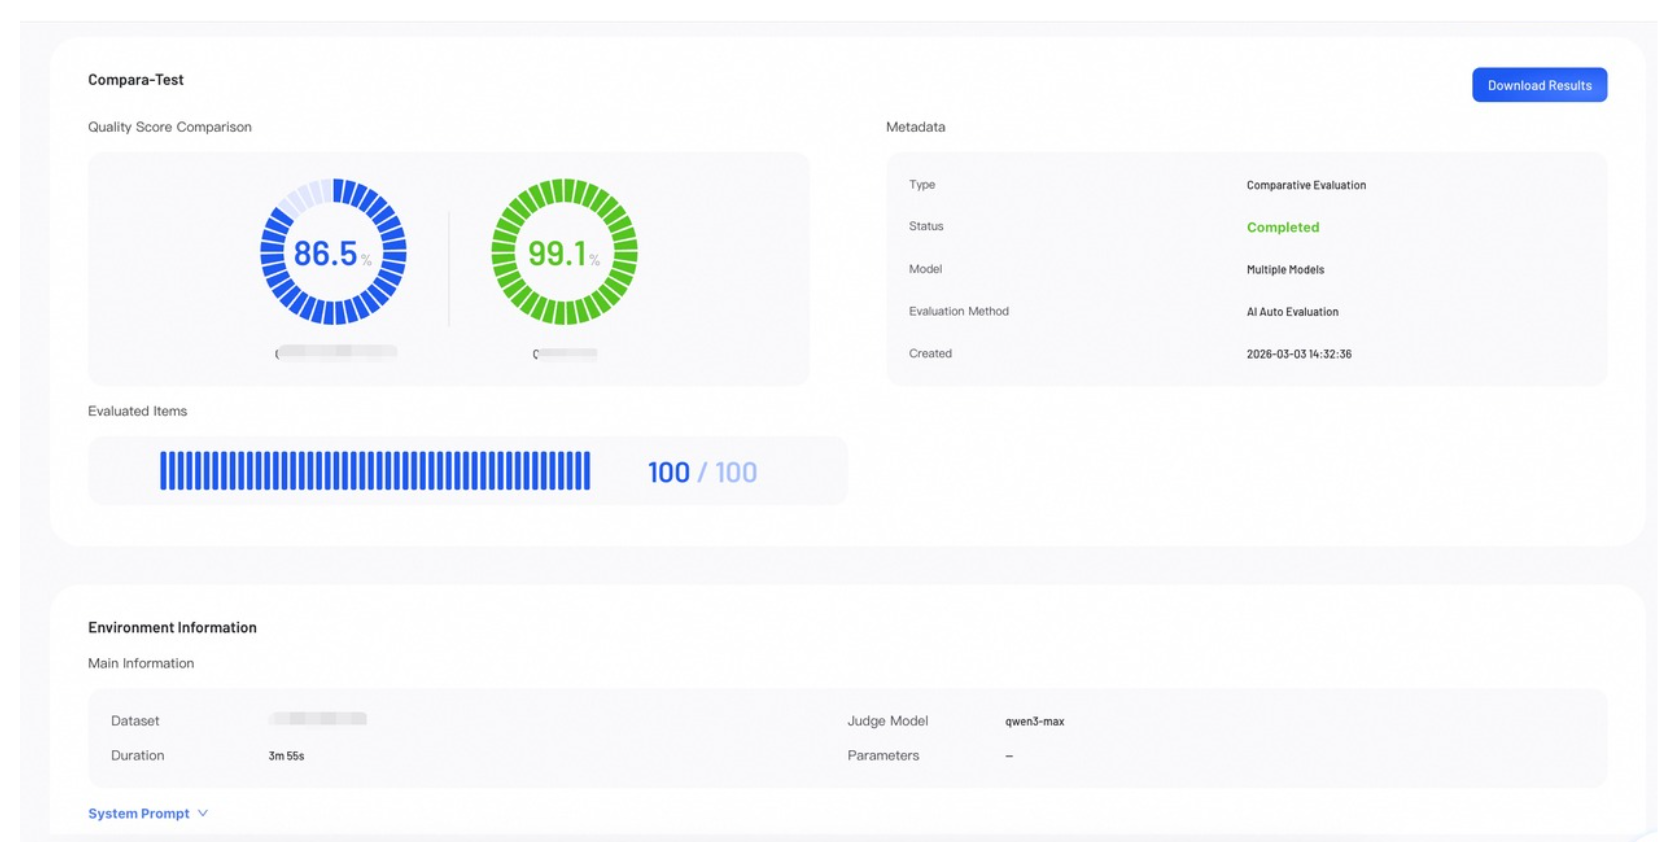
### Score Overview
The Score Overview section provides a high-level summary of the evaluation results.
* **Quality Score**: Represents the model's overall weighted score. In a **Comparative Evaluation**, scores for all models appear side-by-side.
* **Evaluated Items**: Shows the number of data samples evaluated out of the total.
* **Metadata**: Lists key information about the job.
* **Download Results**: Click to download the complete evaluation results.
### Performance Metrics
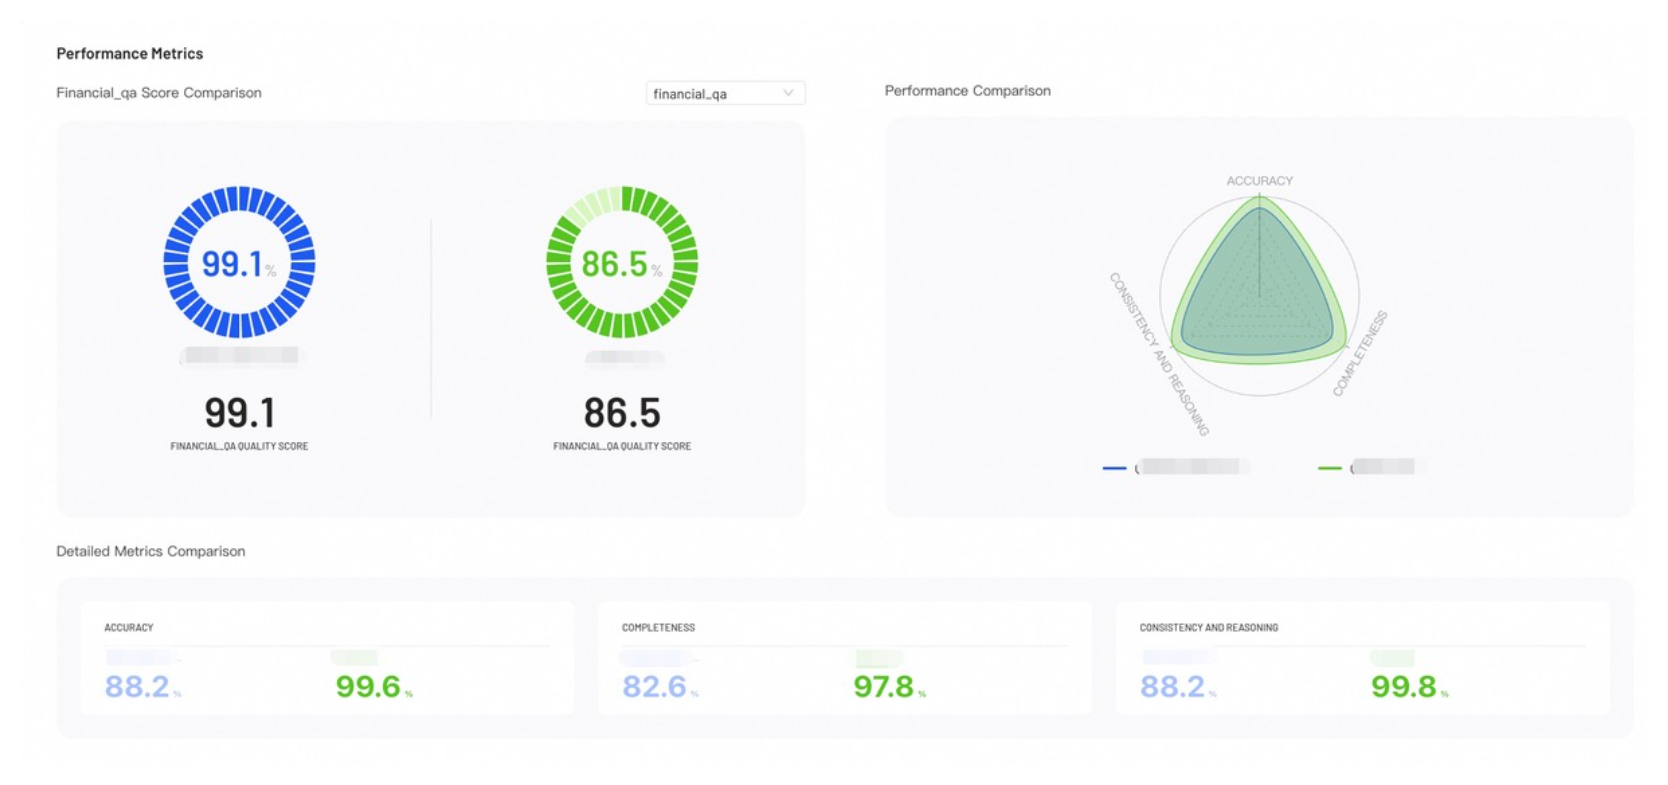
Performance Metrics provides visual insights into your evaluation results, helping you identify where each model excels.
* **Score Comparison**: Displays the accuracy of the model across different questions and benchmark categories.
* **Performance Comparison**: The radar chart compares model capabilities across all configured metrics.
* **Detailed Metrics Comparison**: Lists the exact numerical scores for each evaluation metric across all models.
### Case Analysis
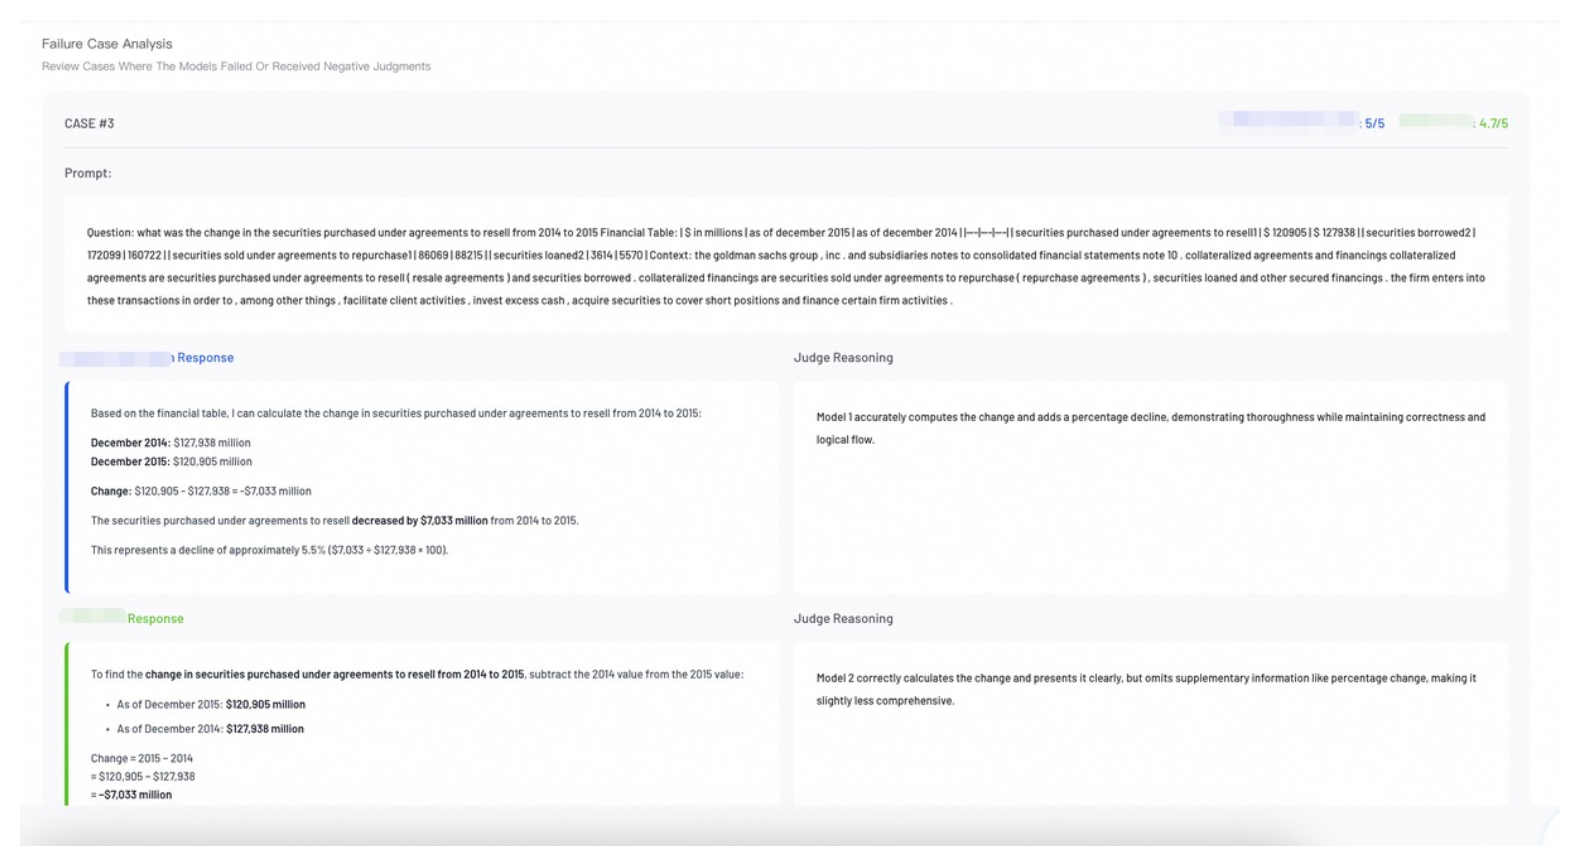
Review individual evaluation cases to perform error analysis and understand specific model behaviors.
**Single Evaluation**: The report defaults to Failure Case Analysis, highlighting low-performance samples.
**Comparative Evaluation**: The default Side-by-Side View shows how different models responded to the same prompt. Review the judge's score and reasoning for each response to understand performance differences.
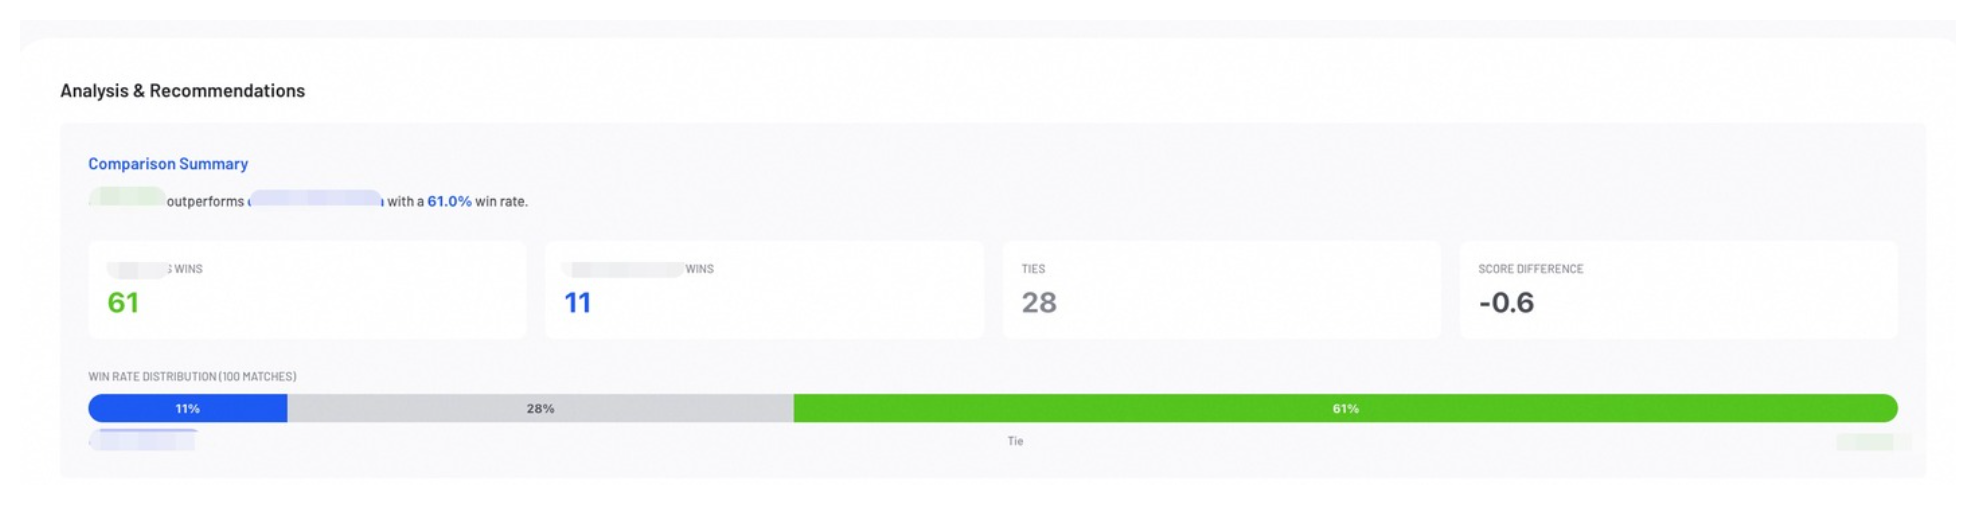
### Analysis & Recommendations (Comparative Evaluation Only)
The Analysis & Recommendations section provides a model recommendation based on the comparison.
## Dataset Format
Select the appropriate dataset format based on your evaluation type to ensure compatibility.
Datasets for AI-Auto evaluation must align with the format generated by the AI-Data-Prep tool.
```json
{
"init": { // Initial version
"messages": [ // Conversation list
{ "role": "user", "content": "..." }, // User question
{ "role": "assistant", "content": "..." } // Model answer
],
"question_type": "fact_retrieval", // Question type
"config_post_training_method": "sft", // Training method
"metadata": { // Metadata
"entity": "...", // Core entity
"entities_used": ["..."] // List of entities used
}
},
"confirm": "confirmed", // Review status
"refined": { // Refined version
"messages": [ // Same structure as init.messages
{ "role": "user", "content": "..." },
{ "role": "assistant", "content": "..." }
]
}
}
```
```json
{
"init": {
"messages": [
{ "role": "user", "content": "..." },
{ "role": "assistant", "content": "..." }
],
"question_type": "domain_benchmark",
"config_post_training_method": "sft",
"metadata": {
"source": "benchmark",
"benchmark_type": "domain",
"benchmark_name": "judicial_analysis",
"industry": "legal"
}
},
"confirm": "confirmed",
"refined": {
"messages": [
{ "role": "user", "content": "..." },
{ "role": "assistant", "content": "..." }
]
}
}
```
```json
{
"init": {
"messages": [
{
"role": "system",
"content": "System prompt (Role definition)"
},
{
"role": "user",
"content": "User instruction (Detailed task rule description + Processing instruction)"
},
{
"role": "assistant",
"content": "Model's initial output (First generated HTML code)"
}
],
"image_path": "Input image file path"
},
"confirm": "confirmed | rejected", // Review status
"refined": {
"messages": [
{
"role": "system",
"content": "System prompt (Same as init)"
},
{
"role": "user",
"content": "User instruction (Same as init)"
},
{
"role": "assistant",
"content": "Model's refined/corrected output (Final confirmed HTML code)"
}
],
"image_path": "Input image file path (Same as init)"
}
}
```
## Next Steps
}
learnMoreLink="https://smartstudio.console.alibabacloud.com/xt-console/fineTuning"
>
Use evaluation insights to fine‑tune your models for improved performance.
}
learnMoreLink="https://smartstudio.console.alibabacloud.com/xt-console/datasets"
>
Create or refine datasets to enhance your next training or evaluation run.
---
## Benchmark Evaluation
Benchmark Evaluation evaluates model performance using official datasets and standardized metrics. This approach delivers precise, quantifiable insights into real-world model capabilities.
**Currently, only LLM Benchmark Single evaluation is supported.**
## Step 1: Configure Basic Settings
Configure the evaluation type, model(s) for your evaluation.
- **Display Name**: Enter a name for this evaluation task.
- **Model Type**: Select **LLM**. (VLM support coming soon)
- **Evaluation Method**: Choose how to evaluate your model.
- **Evaluation Type**: Select **Single**. (Comparative eval coming soon)
- **Model**: Select an available model from your current workspace.
:::info[Token Consumption]
Evaluation can consume a large number of model tokens. Confirm that the
selected model is available and that your account has sufficient balance
before proceeding.
:::
## Step 2: Select Benchmark Dataset & Metrics
Select a public benchmark dataset to objectively measure model performance against industry standards.
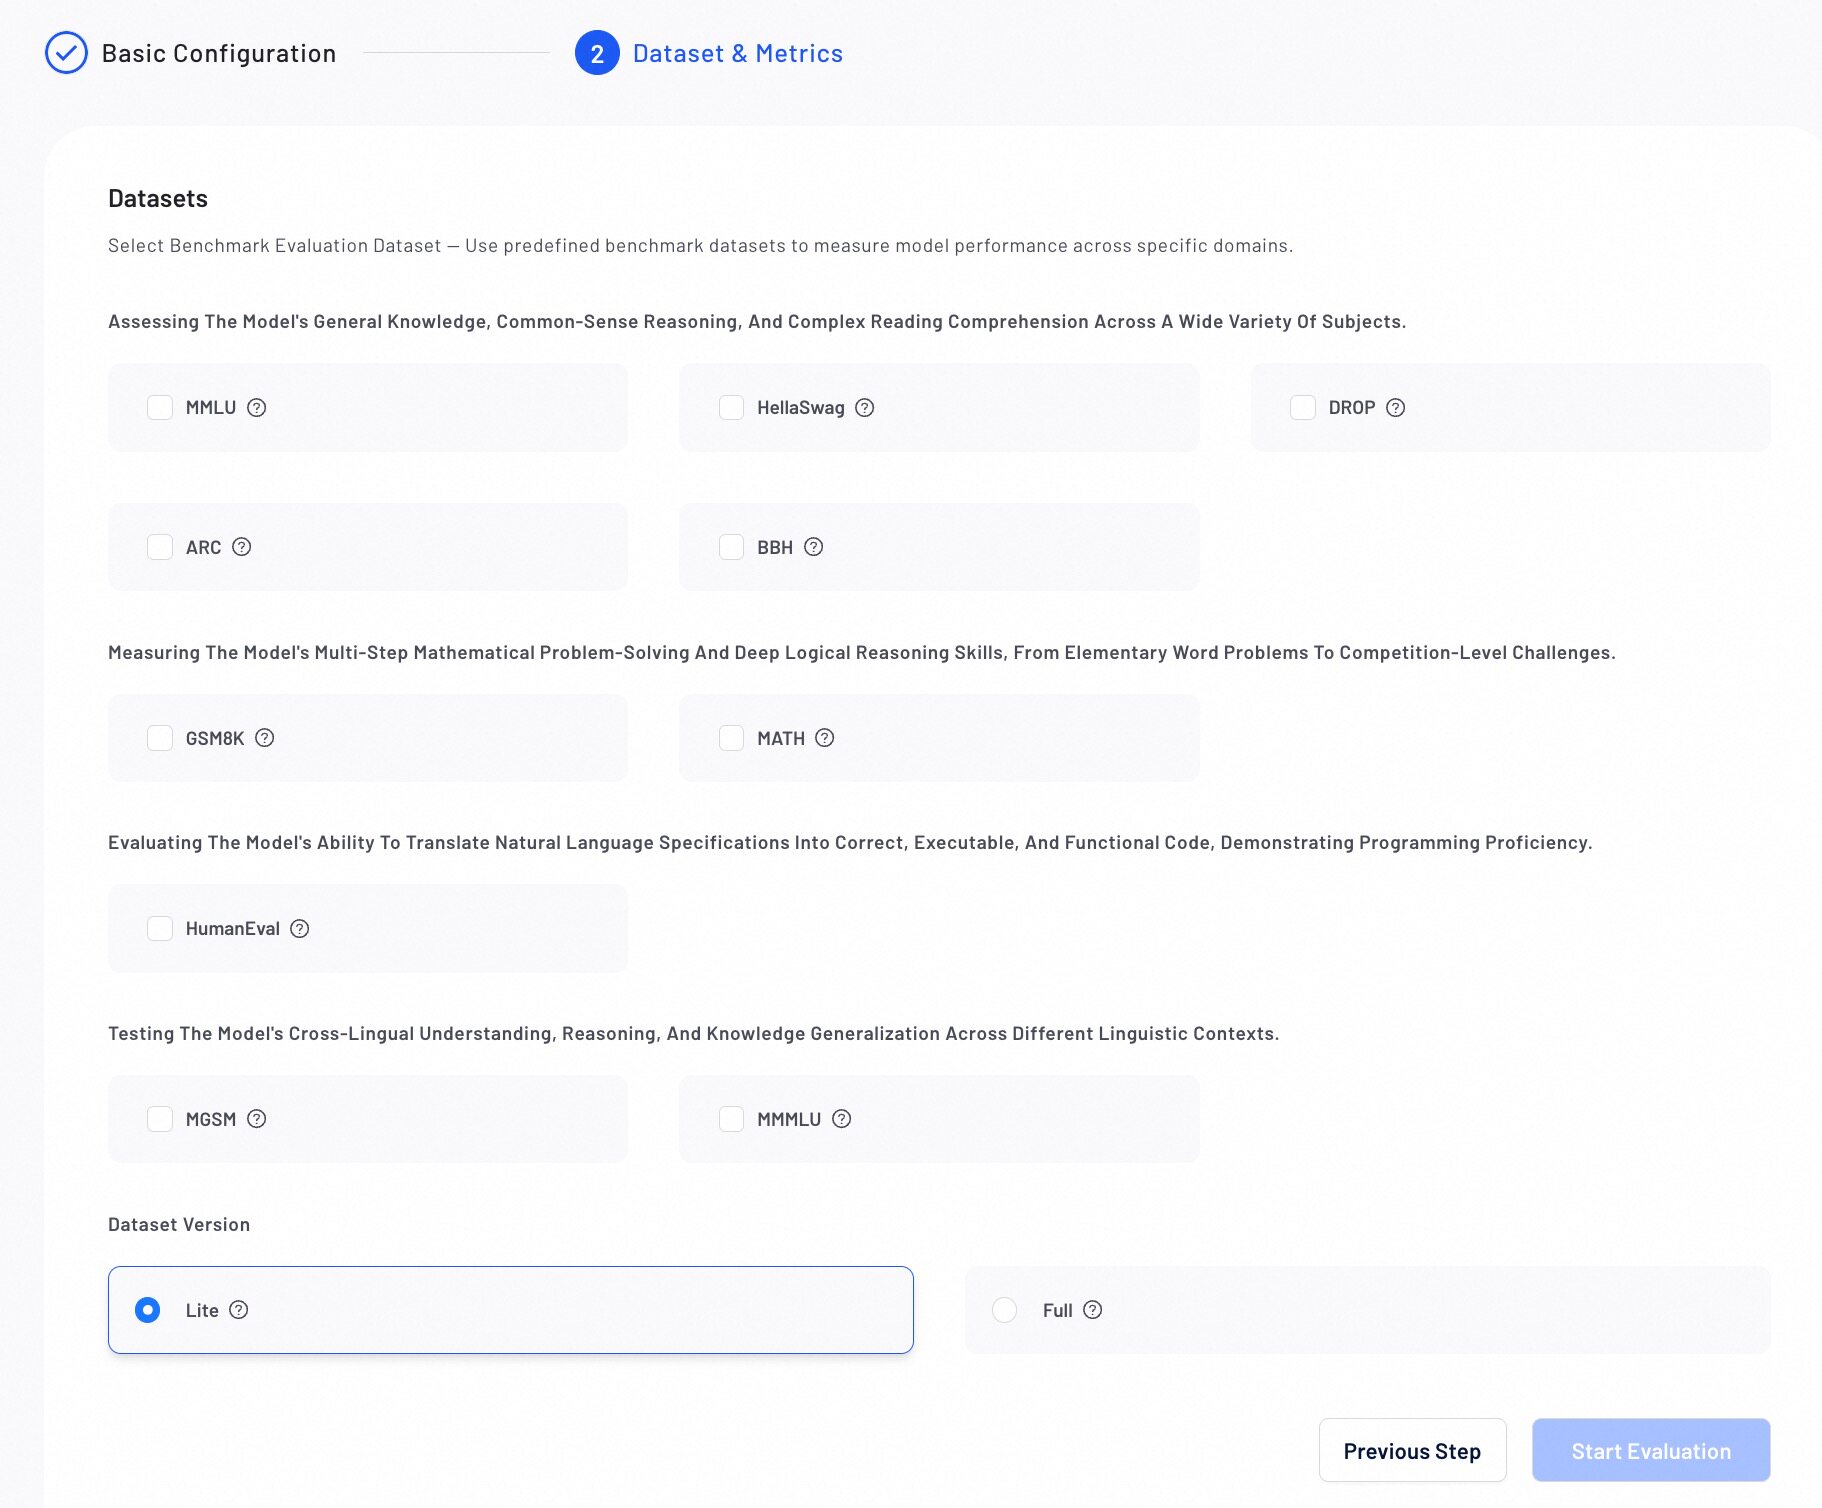
1. Choose a Benchmark Dataset
Choose from standard benchmarks across multiple domains:
#### General Knowledge & Reasoning
- **MMLU**: 57 subjects across STEM, humanities, and social sciences
- **HellaSwag**: Commonsense reasoning
- **DROP**: Discrete reasoning and numerical inference
- **ARC**: Science and world‑knowledge reasoning
- **BBH**: Hard BIG‑bench subset requiring multi‑step reasoning
#### Math Reasoning
- **GSM8K**: Multi‑step elementary math
- **MATH**: Competition‑level math and formal reasoning
#### Code Generation
- **HumanEval**: Functional correctness via unit tests
#### Multilingual Evaluation
- **MGSM**: Multilingual GSM8K across 10 languages
- **MMMLU**: Multilingual MMLU in 14 languages
2. Select a Dataset Version
Select the **Lite** version for a faster evaluation or the **Full** version for complete and accurate results.
Verify all configurations, then click **Start Evaluation**. The evaluation progress will display in the list.

## Step 3: View Evaluation Report
After a benchmark evaluation completes, review the detailed report to analyze model performance.
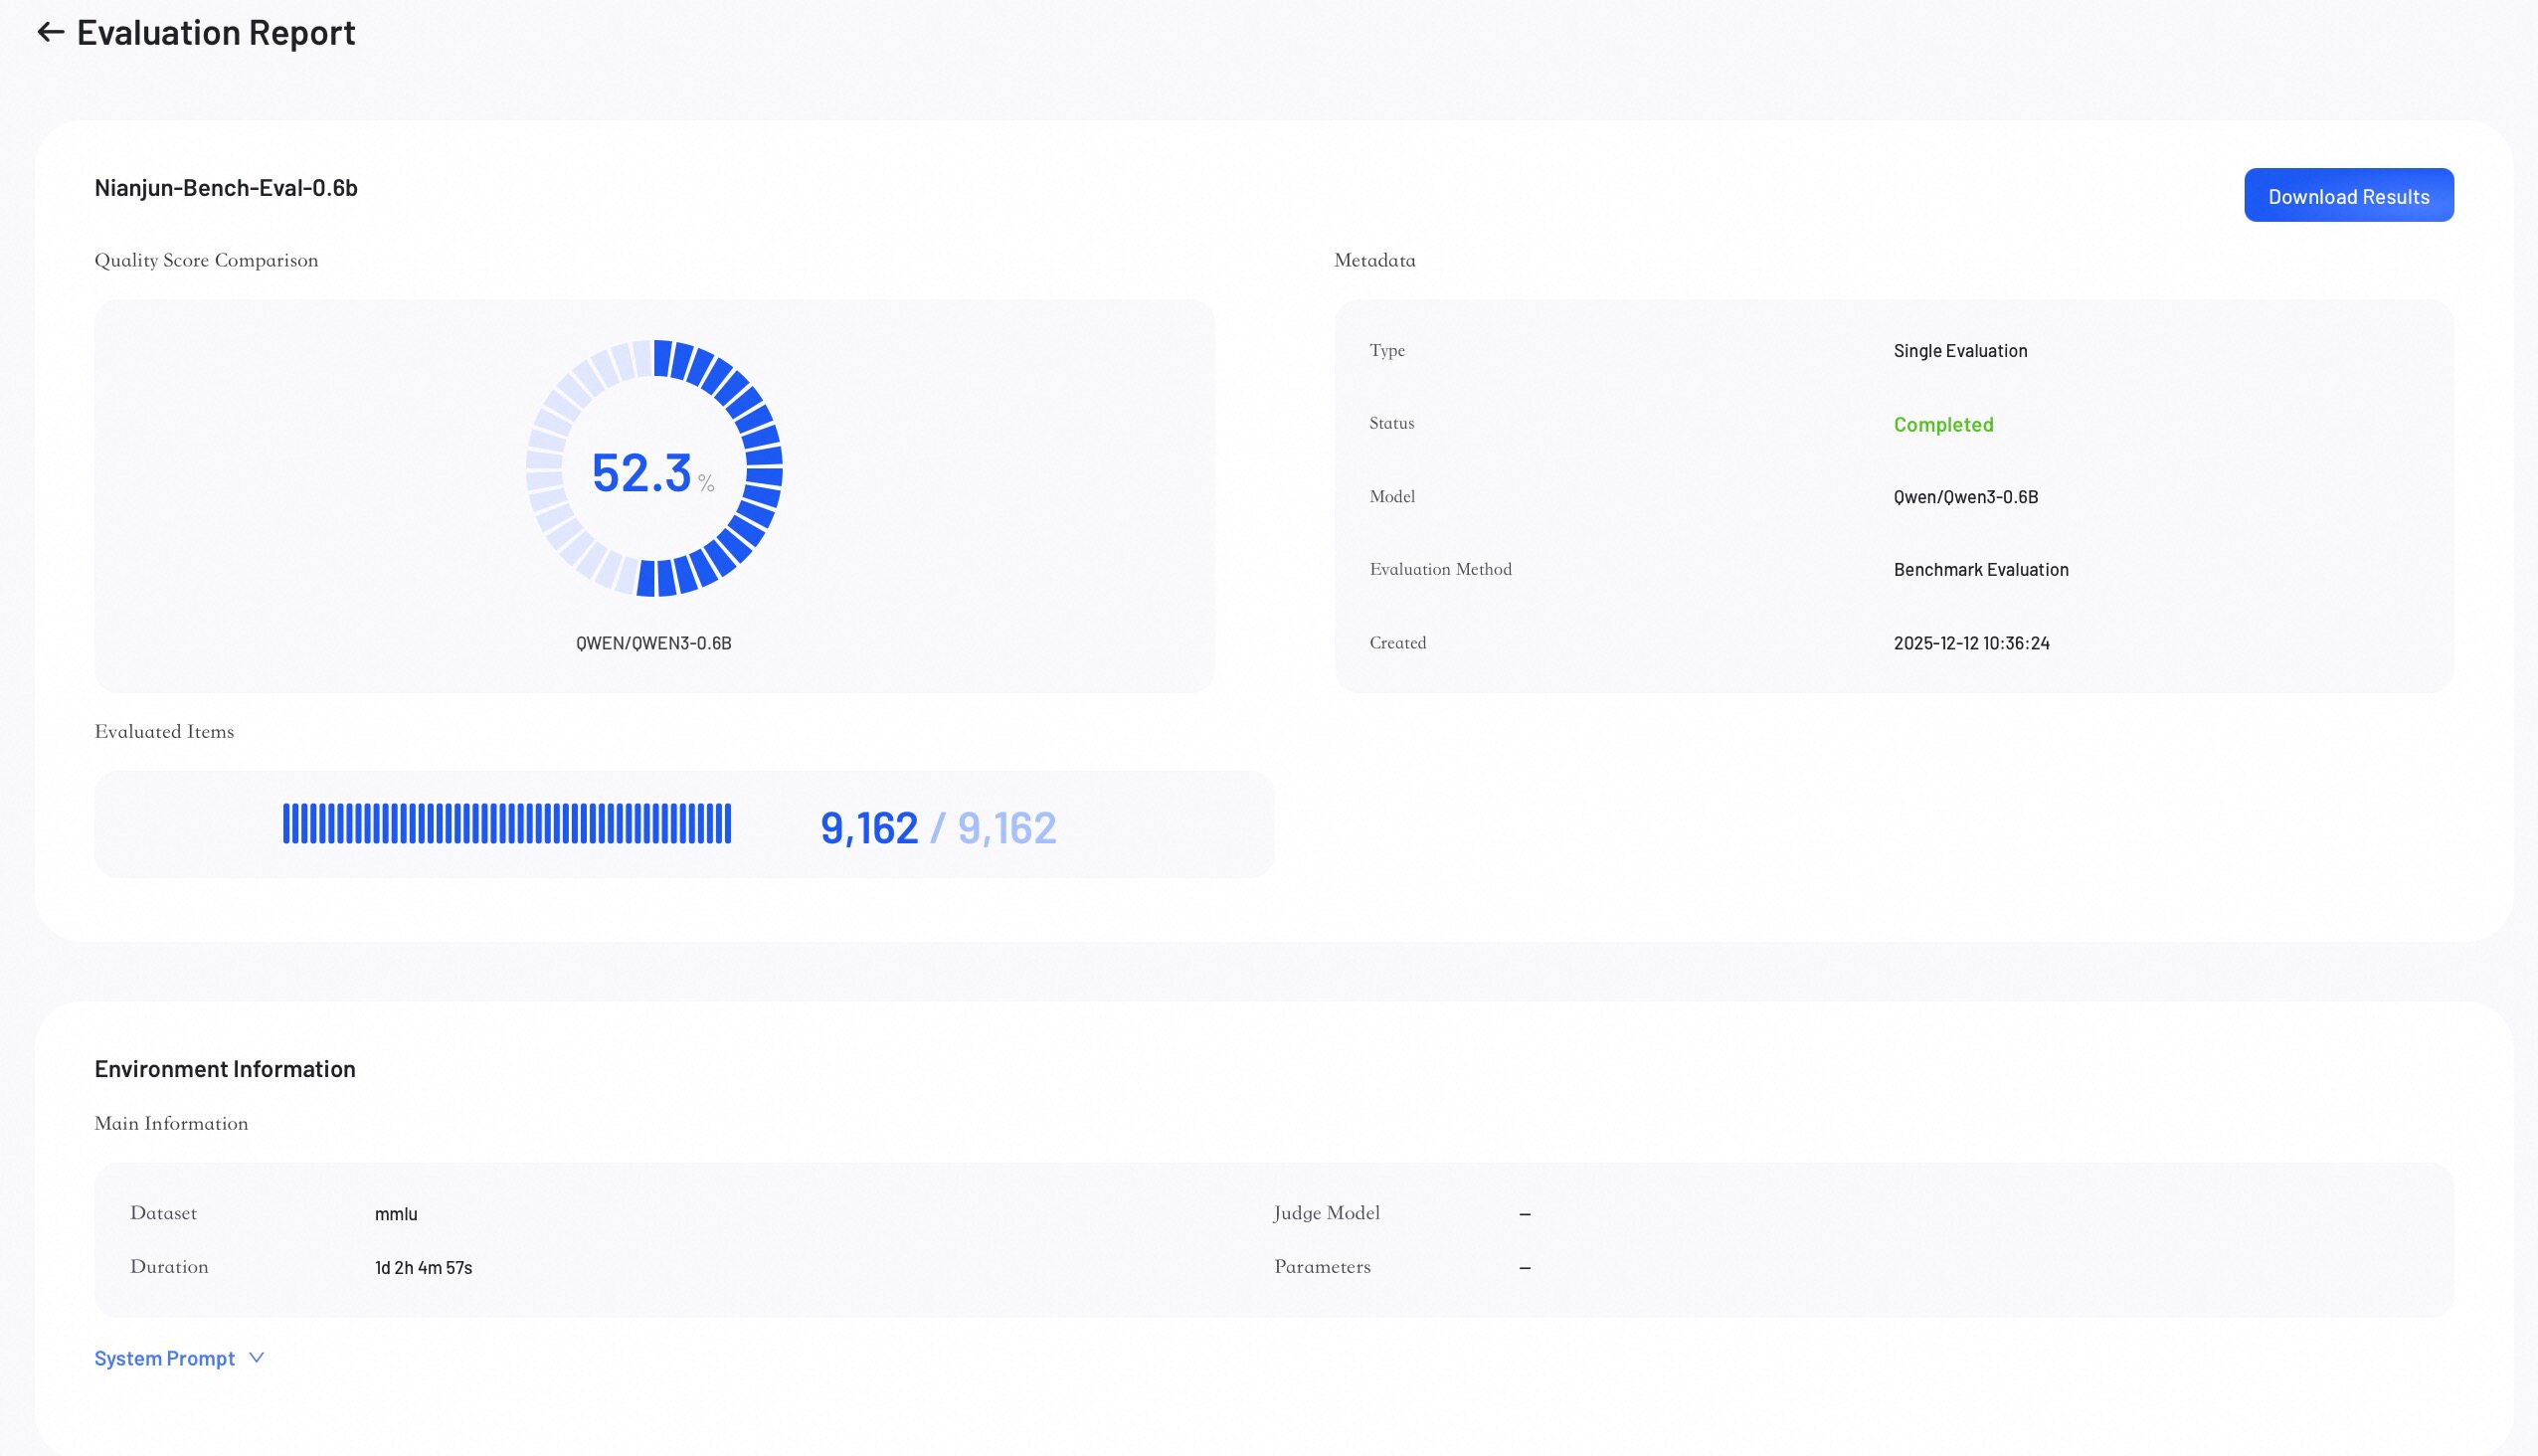
### Score Overview
The Score Overview section provides a high-level summary of the evaluation results.
* **Quality Score**: Represents the model's overall weighted score.
* **Evaluated Items**: Shows the number of data samples evaluated out of the total.
* **Metadata**: Lists key information about the job.
* **Download Results**: Click to download the complete evaluation results.
### Performance Metrics
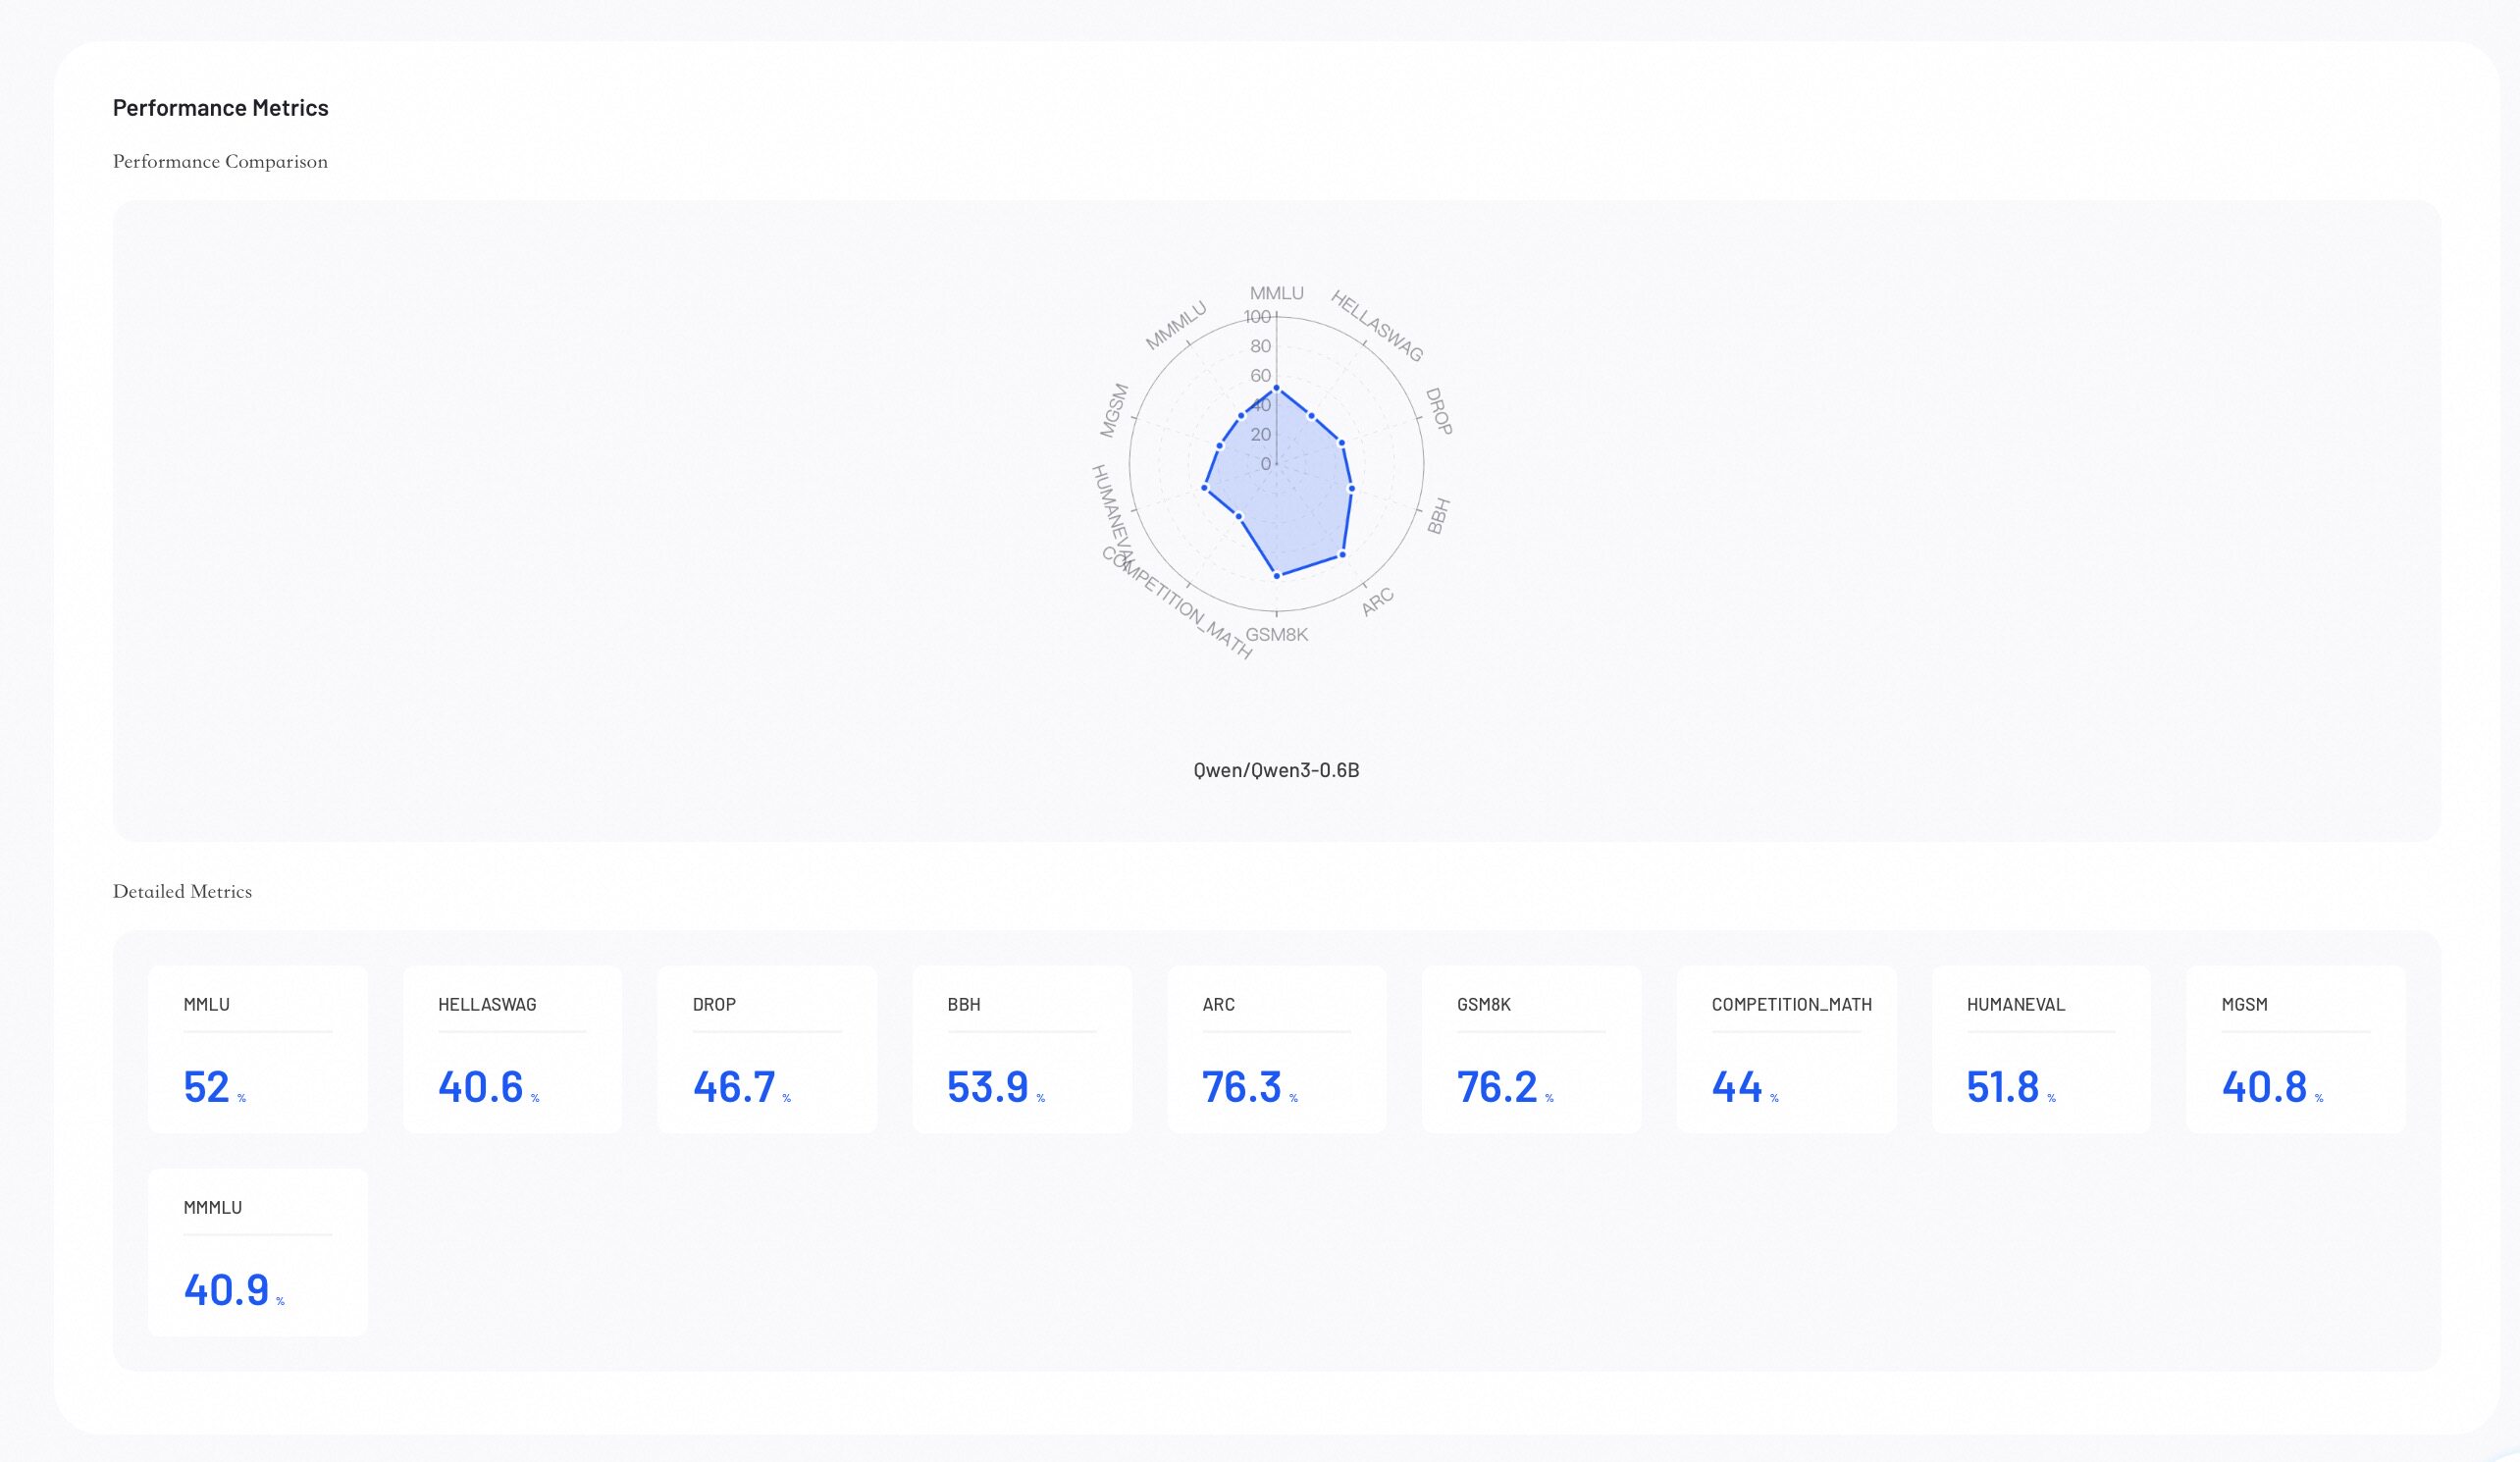
Performance Metrics provides visual insights into your evaluation results, helping you identify where model excels.
* **Performance Comparison**: The radar chart compares model capabilities across all configured metrics.
* **Detailed Metrics Comparison**: Lists the exact numerical scores for each evaluation metric across all models.
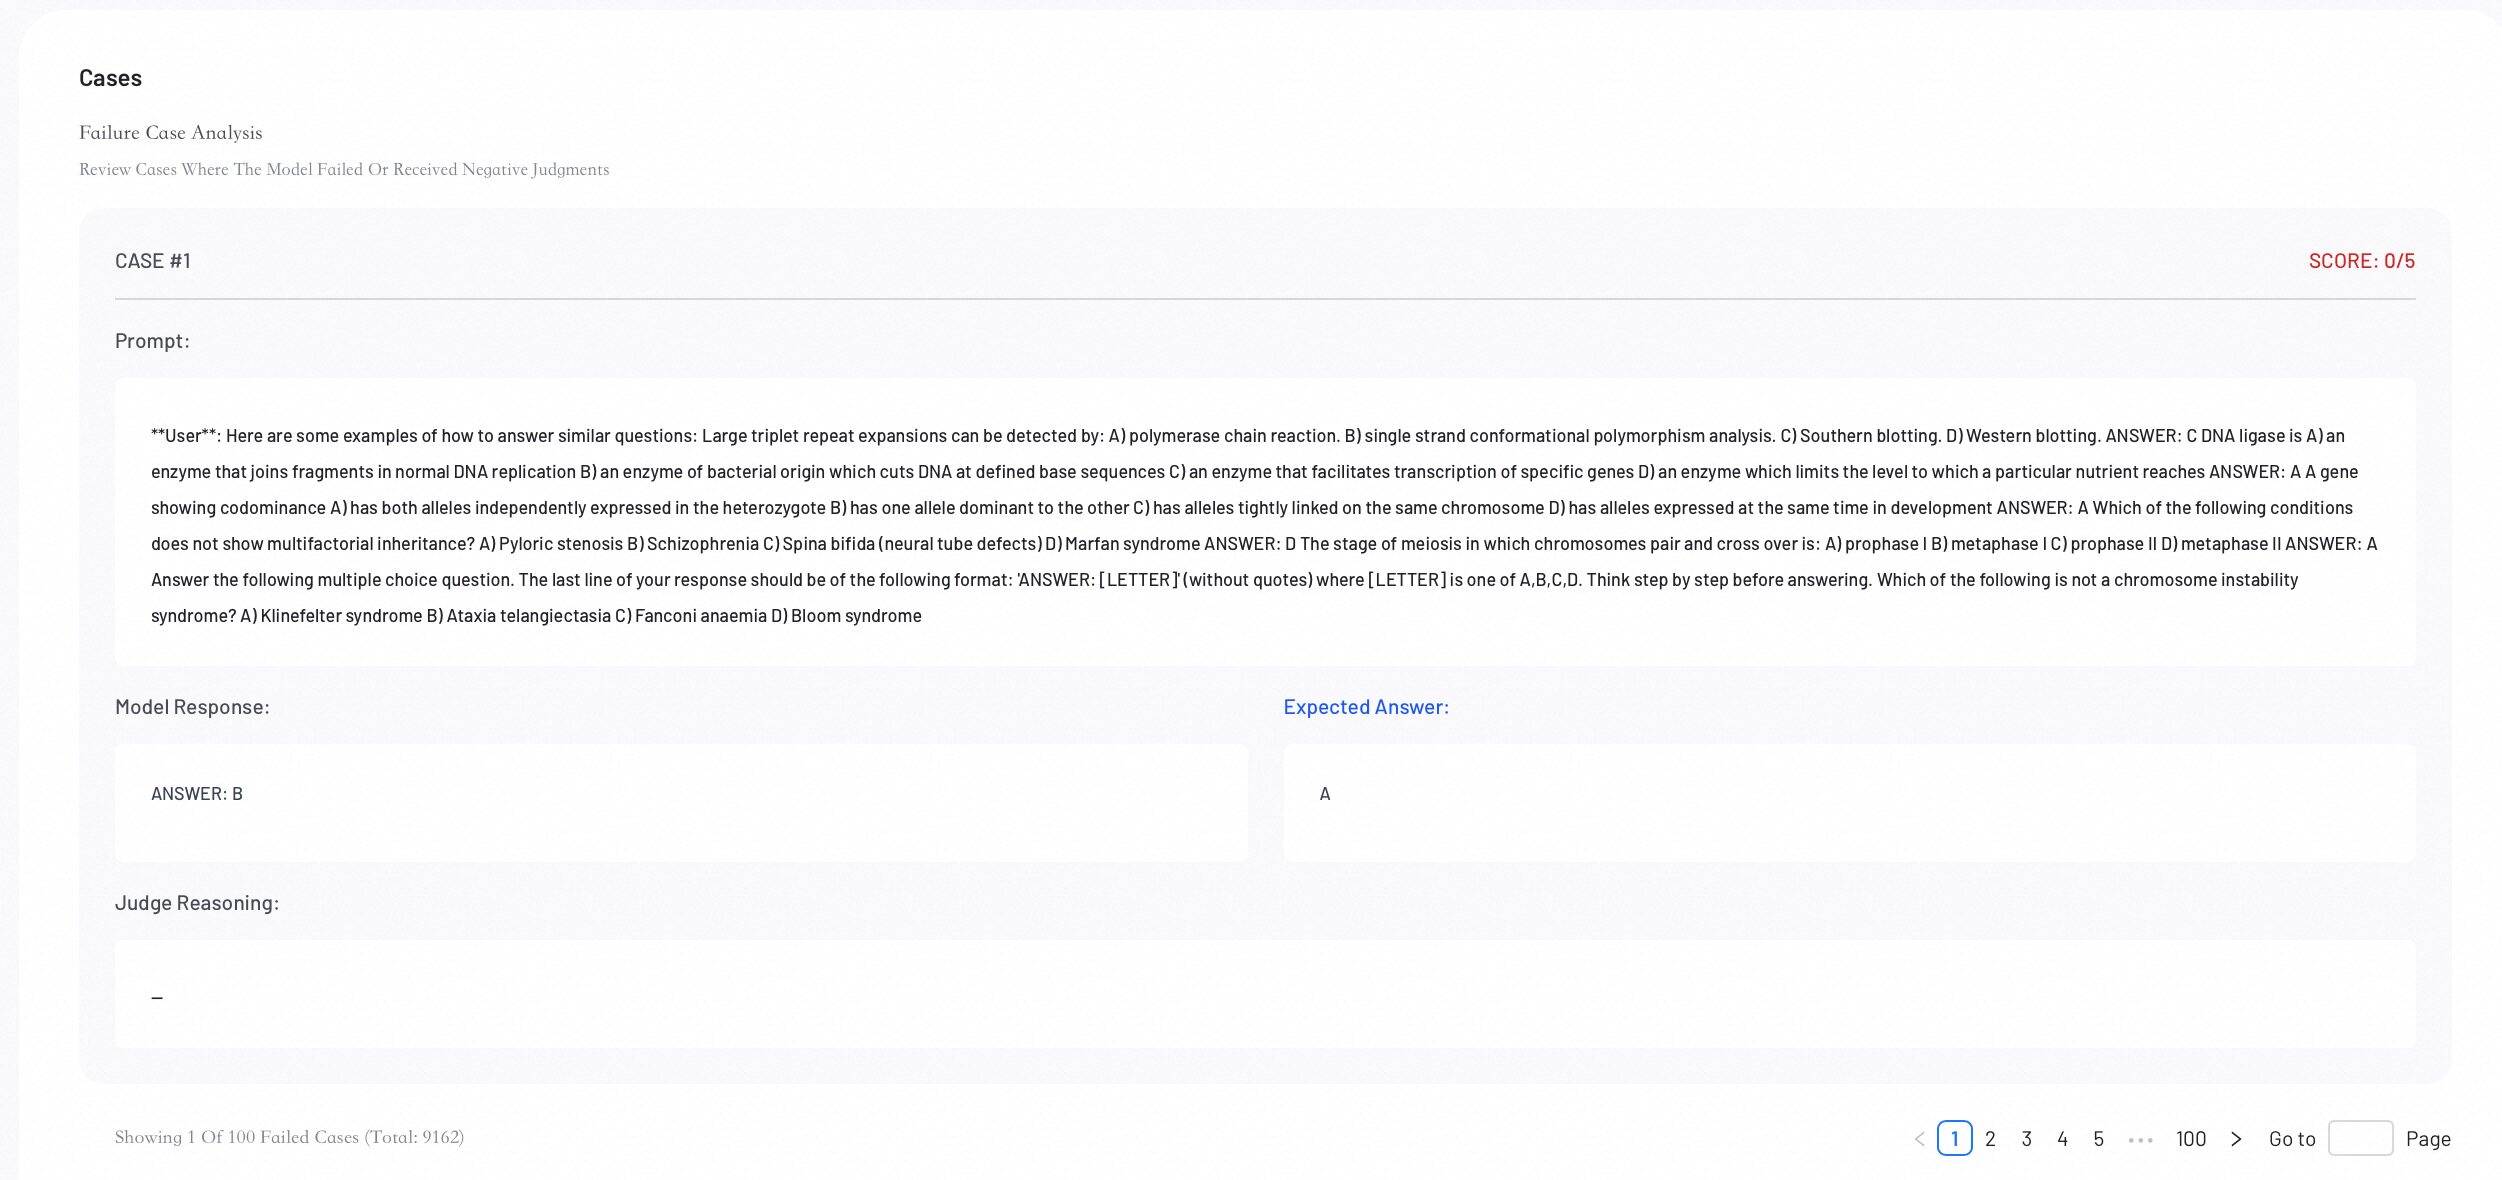
### Case Analysis
Review individual evaluation cases to perform error analysis and understand specific model behaviors.
## Next Steps
}
learnMoreLink="https://smartstudio.console.alibabacloud.com/xt-console/fineTuning"
>
Use evaluation insights to fine‑tune your models for improved performance.
}
learnMoreLink="https://smartstudio.console.alibabacloud.com/xt-console/datasets"
>
Create or refine datasets to enhance your next training or evaluation run.
---
## Evaluations Overview
Smart Studio provides a range of evaluation methods to evaluate single or multiple models. Generate detailed reports and gain a clear understanding of your model's capabilities.
## Evaluation Types
Smart Studio offers two primary ways to structure your evaluation, depending on your goal.
Evaluate the performance of a single model in-depth to understand its strengths and weaknesses.
- Validate performance after fine-tuning
- Identify specific failure modes and areas for improvement
- Establish a performance baseline for a new task
Compare two or more models side-by-side to determine the best-performing one for your use case.
- Benchmark your fine-tuned model against a base model or industry standards
- Select the optimal model from multiple candidates
- Track performance improvements across different model versions
### Single vs. Comparative Evaluation
| Feature | Single Model Evaluation | Comparative Evaluation |
| :--- | :--- | :--- |
| **Primary Goal** | Deep-dive analysis of one model | Ranking and selection among multiple models |
| **Input** | One model | Two models |
| **Output** | A detailed performance report | A leaderboard and side-by-side comparisons |
| **Best For** | Understanding "How good is this model?" | Answering "Which model is better?" |
## Evaluation Methods
Choose the evaluation method that best fits your dataset, requirements, and resources.
Uses a powerful Large Language Model (LLM) as a judge to score model outputs based on custom or predefined criteria.
- Evaluate open-ended responses
- Assess performance on custom datasets
Evaluates models against standardized, public datasets to provide objective and reproducible metrics.
- Measure performance on academic benchmarks (e.g., MMLU, GSM8K)
- Compare your model against state-of-the-art (SOTA) models
- Ensure objective and consistent scoring
### AI Auto vs. Benchmark
| Feature | AI-Auto Evaluation | Benchmark Evaluation |
| :--- | :--- | :--- |
| **Evaluation Core** | LLM as Judge | Standardized Datasets |
| **Best For** | Custom & open-ended tasks | Standard & objective tasks |
| **Flexibility** | High (custom metrics & scenes) | Low (fixed metrics & datasets) |
| **Evaluation Time** | Varies (often fast on custom sets) | Long |
## Detailed Evaluation Reports
Regardless of the type or method you choose, every evaluation job generates a detailed report. The report provides a comprehensive overview of your model's performance, including:
- Overall scores and a summary of key findings.
- Metric-level breakdowns to identify specific strengths and weaknesses.
- Side-by-side comparisons and a leaderboard to rank models against each other.
- Sample-level analysis to review individual inputs and outputs for error analysis.
## Next Steps
}
learnMoreLink="https://smartstudio.console.alibabacloud.com/xt-console/evaluations/createEvaluation"
>
Create a new evaluation job to measure and compare your models
}
learnMoreLink="https://smartstudio.console.alibabacloud.com/xt-console/deployments/deploymentList"
>
Create a deployment endpoint for your model
---
## Data Distillation
Learn how to transfer knowledge from a remote teacher model to a smaller
student model, targeting similar task performance at lower serving cost.
## Purpose and Overview
Data Distillation trains a smaller "student" model to replicate the behavior
of a larger remote "teacher" model. Unlike knowledge distillation, the student
can only access the teacher's outputs, not its internal states or reasoning
process.
## Step 1: Select Models
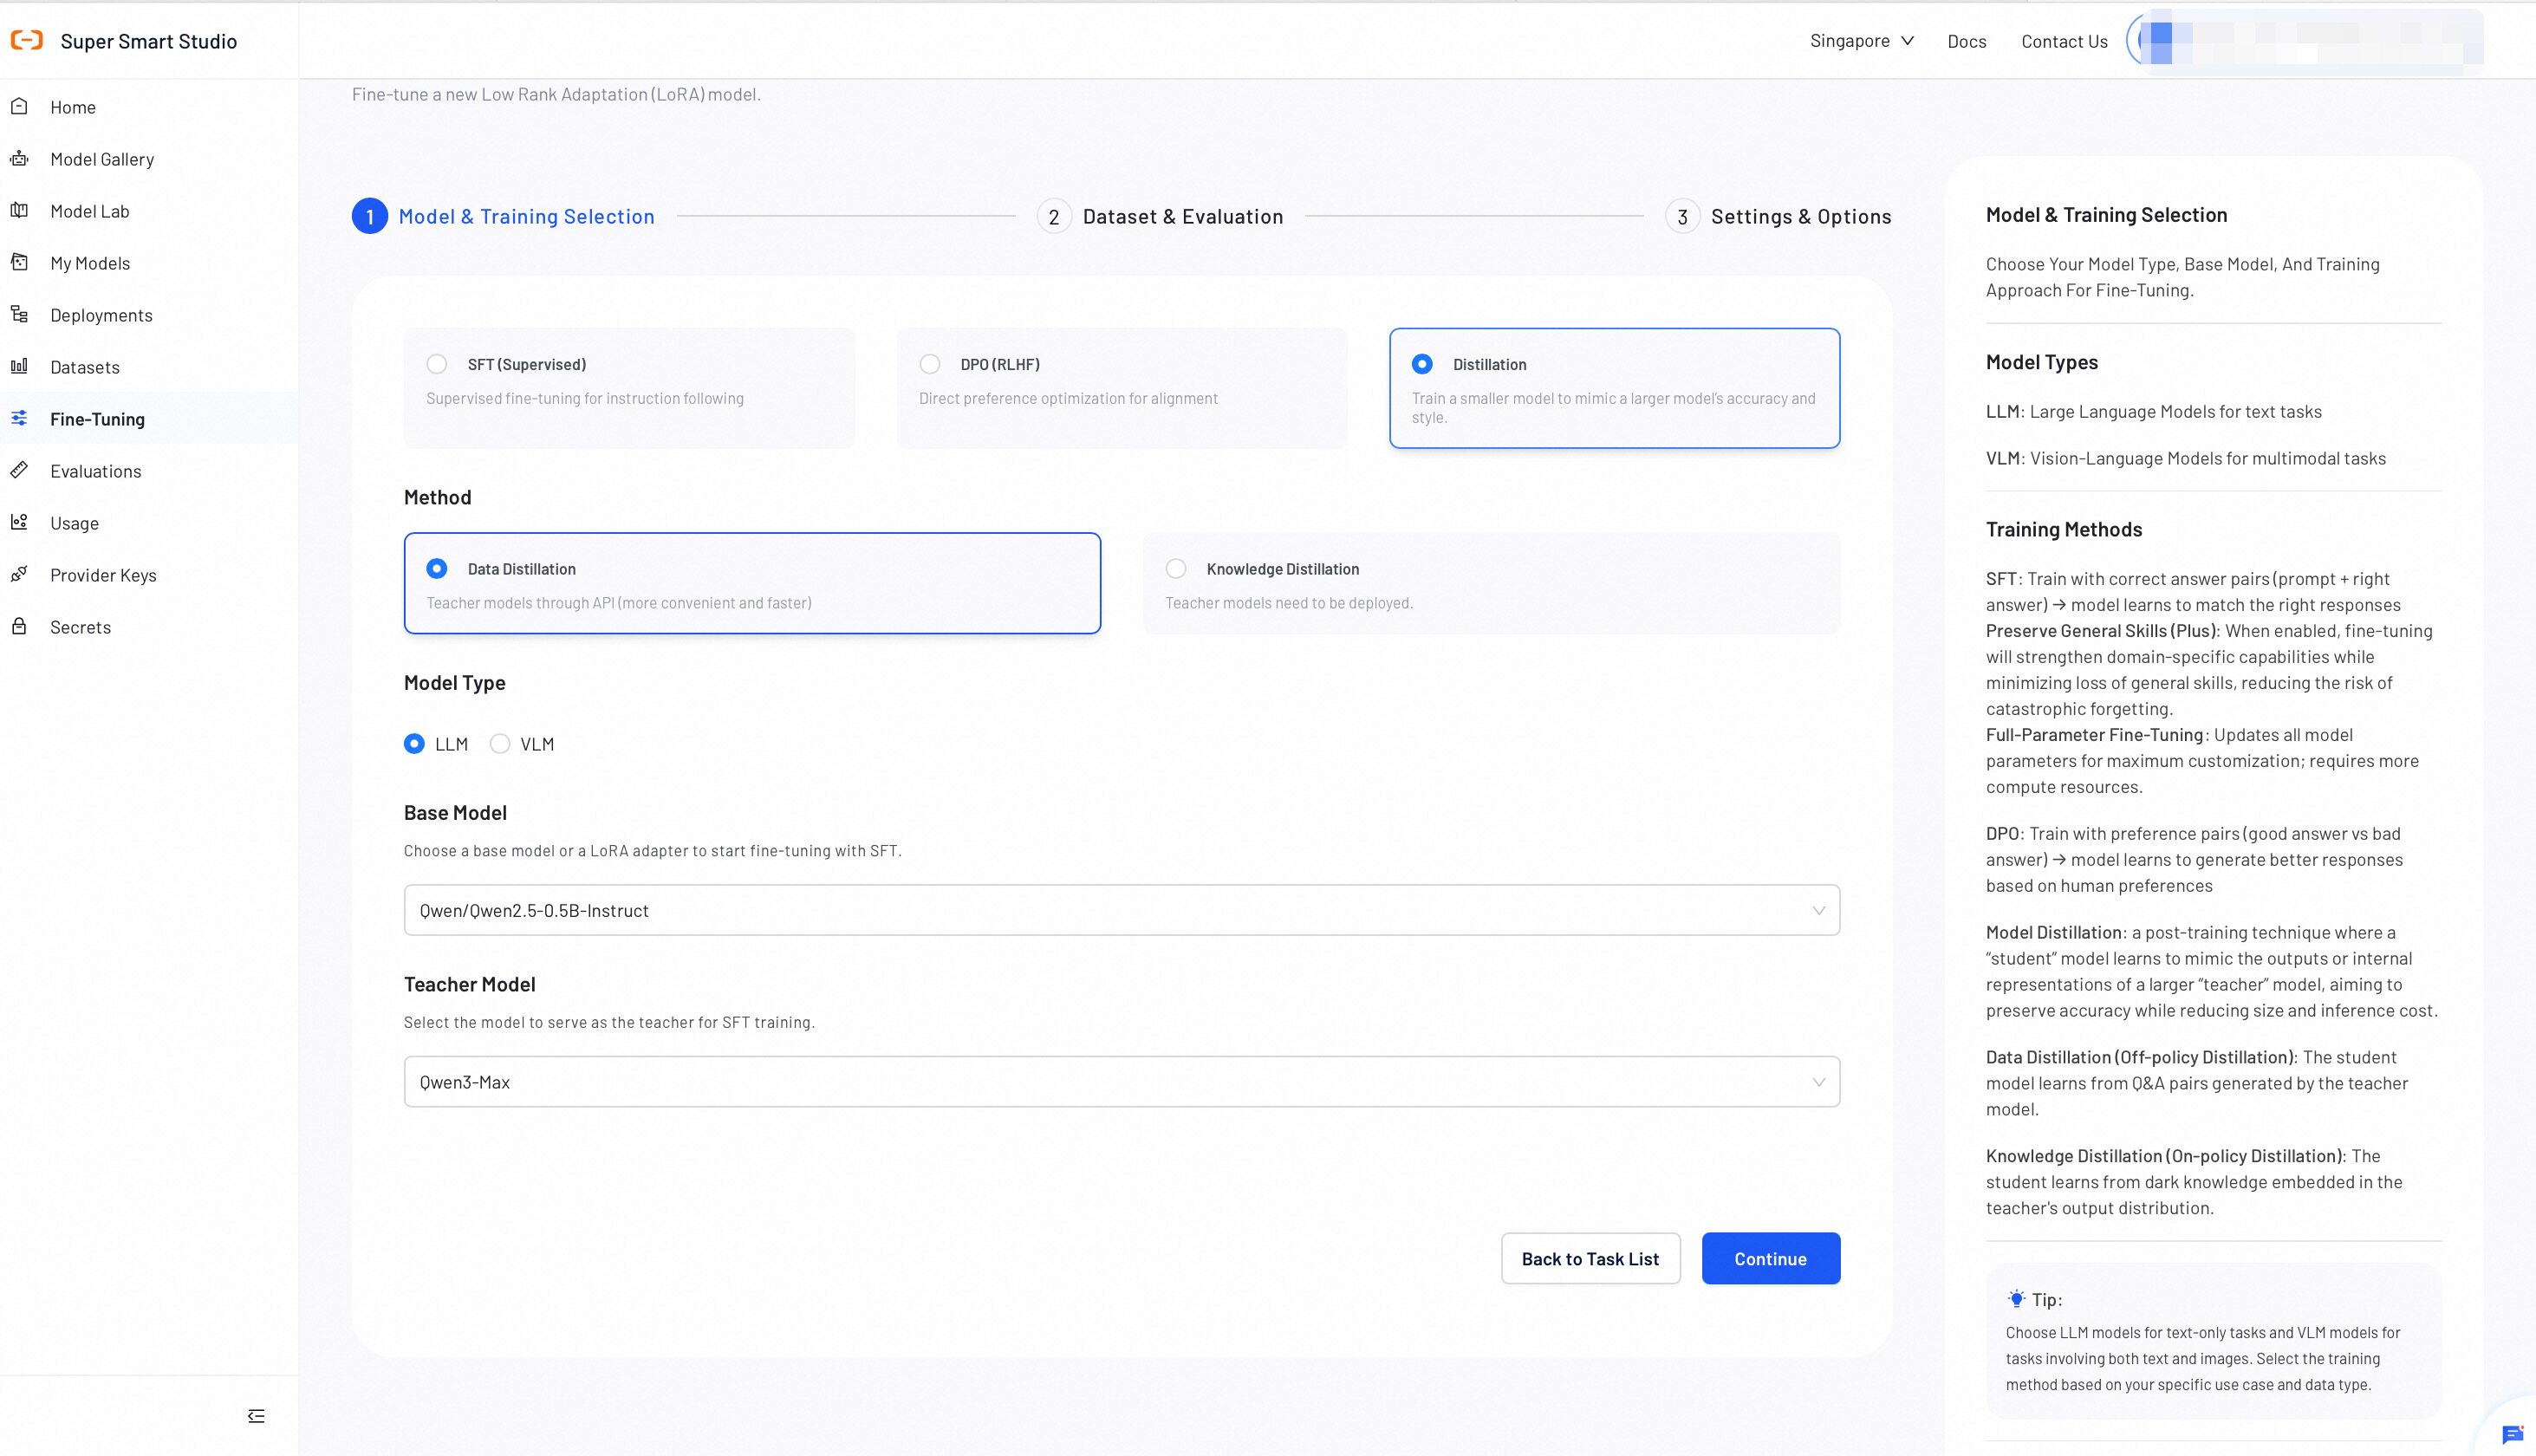
Select a teacher model and a base model for the distillation process. The teacher provides the knowledge, and the base model learns to replicate it.
### Base Model
The Base model is the smaller model that learns from the teacher. After training, you deploy the base model for inference.
### Teacher Model
The teacher is a larger remote model that generates the reference outputs the
base model learns from during training.
:::info[Model Selection Tips]
- Choose a teacher model with strong performance on your target task. Larger models generally produce better teaching signals.
- Choose a base model significantly smaller than the teacher for maximum efficiency gains.
- The base model should share the same model family as the teacher for best results. (e.g., Qwen teacher → Qwen base model)
- Start with **Instruct models** for most conversational tasks. (e.g., `Qwen3-4B-Instruct-2507`)
- Choose **Thinking models** when the task requires step-by-step reasoning. (e.g., `Qwen3-4B-Thinking-2507`)
- Use **Base models** when you need maximum customization flexibility. (e.g., `Qwen3-4B`)
:::
After completing all selections, click **Continue**.
## Step 2: Dataset & Evaluation
Upload a training dataset and optionally a validation dataset to monitor training progress.
Smart Studio provides multiple ways to prepare datasets:
- Upload a dataset directly. For instructions, see [Create Datasets](/docs/datasets/create-dataset).
- Use [AI Dataset Preparation](/docs/datasets/ai-dataset-preparation) to automate the dataset creation process.
- Provide the OSS address of the data without uploading the file to the platform.

### Dataset Requirements
#### File Format
File must be in **JSONL format** with each line containing a complete conversation example.
#### Dataset Size
Recommended size: 100–100,000 examples. High-quality, diverse examples produce the best distillation results.
#### Image Quality(VLM Only)
High-quality images are essential. Ensure images are clear, properly formatted, and relevant to the task.
:::info[Data Quality Tips]
- Ensure diverse examples covering different scenarios and edge cases
- Maintain consistent response quality and style throughout the dataset
- Include both positive and negative examples where applicable
- Validate that all examples follow the required JSON schema
:::
### Required Data Format
```json
{
"messages": [
{"role": "system", "content": ""},
{"role": "user", "content": ""},
{"role": "assistant", "content": ""},
{"role": "user", "content": ""},
{"role": "assistant", "content": ""}
]
}
```
### Format Explanation
- **system**: Optional system prompt to define model behavior and context
- **user**: User input or query that the model should respond to
- **assistant**: Expected model response for the given user input
Each JSONL file line should contain one complete conversation example
### Example Data Formats
```json
{"messages": [
{"role": "system", "content": "You are a useful and harmless assistant"},
{"role": "user", "content": "tell me the weather tomorrow"},
{"role": "assistant", "content": "Sunny tomorrow"}
]}
{"messages": [
{"role": "user", "content": "What is the capital of France?"},
{"role": "assistant", "content": "The capital of France is Paris."}
]}
{"messages": [
{"role": "system", "content": "You are a technical support assistant"},
{"role": "user", "content": "How do I reset my password?"},
{"role": "assistant", "content": "To reset your password, please follow these steps:
1. Go to the login page
2. Click 'Forgot Password'
3. Enter your email address
4. Check your email for reset instructions"
}
]}
```
### Required Data Format
```json
{
"messages": [
{"role": "system", "content": ""},
{"role": "user", "content": ""},
{"role": "assistant", "content": ""}
],
"images": ["/xxx/x.jpg", "/xxx/x.png"]
}
```
### Format Explanation
- When user-content contains placeholders like ``, they should correspond to the order in the images field, with matching quantities
- When `` count is 0, it corresponds to Distill-LLM, allowing 0 images
- `` only appears in user-content
### Example Data Formats
```json
{"messages": [
{"role": "user", "content": "Where is the provincial capital of Zhejiang?"},
{"role": "assistant", "content": "The provincial capital of Zhejiang is in Hangzhou. "}
]}
{"messages": [
{"role": "user", "content": "What's the difference between these two images?"},
{"role": "assistant", "content": "The first one is a kitten, the second one is a puppy"}
],
"images": ["/xxx/x.png"]
}
{"messages": [
{"role": "user", "content": "